Driving a passenger car for beginners. Tutorial driving a car
In America, the proportion of new cars sold with a manual box is only 6 percent. Therefore, for many American drivers, driving a car with mechanical transmission Causes great difficulties. So many drivers used to driving vehicles with automatic automatic transmission. In our country, the share of cars sold with a mechanical manual manual transmission is still a little more than with an automatic box, but, nevertheless, many drivers driving a car with a mechanical transmission causes a lot of difficulties. Our instruction and a small allowance will prepare for all motorists, which will help learn how to ride on mechanics.
Cars with mechanical transmission, as a rule, are cheaper than machines with automatic transmission. But driving a vehicle with a manual transmission, not only allow you to save money when buying a car, but also will open for you a completely new world of auto.
Note that many are still equipped with a manual box. But even by purchasing a nonsense car, it will allow you to significantly reduce the cost of fuel, since the machine equipped with MCPP consumes much less than fuel than a car equipped with an automatic box.
What other advantages of mechanical transmissions before automatic boxes? MCPP is much more reliable than automatic transmission and moreover, the cost of repairing mechanics is much less than the repair of a complex machine.
Plus it is controlled by a car with a mechanical transmission than a car with an automatic transmission.
Step One: Why are transmission in the manual transmission?
 A manual transmission requires the driver to independently switch speeds. Most cars with MCPP have 4 or 5 speeds and plus one rear transmission rate. In order to master where which the speed of gear is and for which each of them is needed, you need to know the following:
Clutch pedal. When you click on the pedal, the special mechanism in the box gives you the ability to include the necessary transmission using the speed switching knob. Remember that you can switch the gearbox only if the clutch pedal is pressed to the end.
Neutral transmission actually denotes that the torque from the engine will not be transmitted to the wheels. With the engine running and when the neutral transmission is enabled, if you press the gas pedal, the car does not touch. When neutral transmission is enabled, you can include any speed, including rear transmission from this position.
For most cars with 2-a0 transmission mechanics is a workhorse, since the first transmission is mainly designed to start from the scene. The second gear will help you go down on a car with a steep slope or help you move in traffic.
The rear transmission is somewhat different from other speeds in the MCPP. This speed has received a slightly larger range of work than the first transmission. At the rear speed, you can accelerate faster than on the 1st. But the rear gear does not "love" when the car is driving in this mode for a very long time (can lead to the failure of the gearbox mechanism).
So rear transmission is not a way of main movement.
The gas pedal allows each speed to use the maximum torque of the engine installed for each speed. Accepted by car, equipped, you feel every speed, which gives each driver the unique sensations of the drive and the best control over the car.
Step Two: Lighten the location of the gear
 Before learning how to ride the mechanics, it is necessary to master the location of each speed of the gear, which is indicated on the switch knob. After all, you will not look at the car's movement on the handle, where is the speed located?! Remember that for the perfect gear shift, you must completely press the clutch pedal, otherwise each speed will be turned on with a characteristic embossed or crunch, which can lead to a transmission breakdown.
If you are a newbie driver, then first from the side from the front passenger seat, as another more experienced driver synchronously presses the clutch pedal and switches speeds. pay attention to maximum speed Car on each transmission.
At first, even by having studied the location of each speed, you will still be mentally remembered where there is a transmission. Over time, you will stop thinking about switching gear each time and will do it at an unconscious level (mechanically). The thing is in habit. So if you are not at the very beginning of the perfect skill of the car control with the manual transmission, then do not be discouraged and do not fall into despair. The speed of gear shift and much more will come to you as the driving experience accumulates.
Another problem of any driver's newcomer who controls the car with a manual box is not knowledge when and what speed turn on. In order to know whether the transmission is right included at a certain vehicle speed, we advise you to navigate the engine sound.
If the engine turnover is very low and the car does not accelerate, you have enabled the overestimated transmission and you need to go to a lower gear.
If the engine turnover is very large, then you need to turn on higher gear to unload the box.
If your car is equipped with a tachometer, then in order to understand when you need to switch the speed, focus on the number of engine revolutions. Despite the fact that every brand and model of the car with a manual box requires of different order Transmission, mostly, each transmission can be switched when the engine reach is 3000 revolutions per minute. You can also navigate the speedometer to know when you need to switch the transfer rate.
For example, switch the speed every 25 km / h (1st transmission 1-25 km per hour, 2nd 25-50, 3-a0-70, etc.). Remember that this is just general rule Shift gear mechanical box. And than these values \u200b\u200bwill deviate up to the increase.
Step Three: Engine Start
Put the gear knob to the neutral position, after pressing the clutch pedal before you have a motor. Do not switch the transmissions without a pressed pedal, as this may lead to the failure of the manual transmission. Running the engine, warm it up operating temperature. If you warmer the car in winter, then the first few minutes of warming up do not let the clutch pedal after turning on the neutral transmission. This will allow you to warm up the frozen oil in the box much faster.
Attention!!! Do not start the motor motor when the transfer is enabled. This will lead to an uncontrolled movement of the machine, which can lead to an accident.
Step Four: Properly Use the Clutch Pedag
 The clutch is a mechanism that helps you smoothly switch the speed of gear. Always squeeze the grip to the end. If you switch the transmission while driving, not until the end of the clutch, then you will hear a crush or crunch. Try to avoid it so as not to damage the box.
Also remember that the left foot should press only the clutch pedal. Right leg only gas pedal and brake pedal.
The first time it will be hard for you to perfectly release the clutch after switching speed. To this you need to get used to it. If you are experiencing problems with this, we advise you after switching the transfer slowly release the grip to feel the moment of the start of the transfer.
Avoid unnecessary accelerations of the car, when the clutch pedal is pressed until the end. Do not produce a habit to leave the clutch pedal by more than 2 seconds (even on traffic lights - use neutral speed).
Many newcomers drivers experience a problem with a very rapid release of the clutch pedal. Do not be discouraged if you do not work. Over time, you get used to and you will not notice how coordinated you switch the transfer. Remember that difficulties are experiencing everything. As soon as you start often ride in dense urban traffic, you quickly gain experience.
Step Fifth: Sophisticated Coordinated Actions
 What ? This is your door to the world of driving acceleration and special car perception. But in order to fully feel the true pleasure of managing the car with mechanics, well-coordinated and coordinated actions are needed. As an example for the 1st and 2nd speed, we give all your actions that you must bring to automatism over time.
Slit clutch pedal to the end. Switch the speed knob to the first speed. Start slowly let the clutch pedal, at the same time smoothly and slowly pressing the gas pedal. By bringing the clutch pedal somewhere until the middle, you will feel that the torque began to be completely transmitted to the wheels. After releasing a smoothly clutch pedal to the end, accelerate to 25 km / h. Next, you need to go to the second gear. To do this, push the clutch to the end again and switch the speed to the second gear, after which it smoothly, lowering the clutch pedal, slowly add gas.
Step Six: Downshifting
 Downshifting method of switching lower car gear during deceleration. As you will switch the transmissions when the speed is reduced, and how it works automatically, when a vehicle is slowed down, has a huge difference. Switching to reduced speed will help you not only slow down the car, but also allows you to include that speed that is valid.
Downshifting will help you in bad slippery weather both in the summer, and in winter, do not resort to braking using brake pedal, if it is necessary to reduce the speed, which makes it more secure car movement in contrast to the machine equipped with automatic transmission.
Here is an example as possible using downshifting to stop the car from the speed of 70 km / h:
- Press the clutch pedal and switch the box to the 3rd transmission, moving my right foot from the gas pedal to the brake.
- To avoid high revolutions release a slow clutch pedal.
- Before you stop, squeeze the clutch pedal again.
- Do not turn on, as a reduced transmission, the first speed.
This stop method will allow you to dwell much faster and safer than when braking one brake pedal.
Step seventh: rear speed
 Be careful when switching the back of the car. If incorrectly turning on the gear lever can jump out. Never try to turn on the rear speed until the car is completely stopped. On some models, in order to turn on the rear speed, you must first press on the gear shift knob.
Remember that the rear gear has a high range of work, so be careful and do not push the gas pedal strongly, as the car can quickly dial dangerous.
Step eighth: movement on the hill
 As a rule, most highways do not have a smooth plane due to terrain relief. Therefore, stopping on the road, in many places the car without a brake begins to roll back. Troce on the road with an inclined plane is much more complicated than on an equal terrain. In order to perfectly learn how to touch the hill, it is necessary to fix your skills with the following exercise.
Stand on the road with an inclined plane and, putting a car on the handmade parking brake ("handbrake"), turn on the neutral transmission. Now your task, releasing the handbrake, turn on the first gear, squeezing the clutch pedal, move on a hill, release smoothly clutch simultaneously pressing the gas pedal. At some point you will feel that the car stopped driving back. It is in this position that you can hold the car on the slope or a hill without a brake.
Step ninth: Parking
 Leaving the car in the parking lot after you drown out the motor, learn the clutch pedal and turn on the first transmission. So you will protect your car from rolling into your absence. For reliability, it is also necessary to raise the parking brake lever (or press the button if the electronic handler). The main thing is to remember that returning before you have a car, you must definitely switch to a neutral position.
Step Tenth: Practice
 All these actions will seem to you at first very complicated and heavy. But it's all natural. During the operation of a car, your experience will grow. Remember that the more practice, the more driving experience you acquire. If you are still afraid to get driving the car's wheel, then make independent driving workouts on any site where other cars are missing. Thus, you will gain confidence in the automatic management.
As soon as you become bolder, we advise you in earlier morning or night practices in real road conditions Your settlement. Examine all the roads, especially where you intend to ride a car most often. The lack of cars will give you confidence at this time.
Many are afraid to drive a car with mechanics. Some declare that it is not comfortable and not modern. Do not listen to anyone. Manual gearbox, despite obsolete technologies, remains one of the most reliable transmissions in the automotive industry.
Yes, in some moments, the mechanics slightly reduces the driving comfort, but for this you will be rewarded much more control over the car, high power, better fuel efficiency, cheap service cost and not expensive repair (compared to automatic transmission), valuable driving life skill, which allows You manage almost any vehicle in the world.
You planned the purchase of a car. But before you buy a car you need to learn to drive. Is it difficult or easy? You yourself answer this question after the theory of driving the car for beginners will now be considered.
How to learn to drive the car yourself? Good question.
Before you open the door of the car and sit down to the driver's seat in the hope of quickly mastering the new technique for you, you need a little more paint books and brochures.
What exactly? In fact, there are not many of them, they are very important to protect themselves and others on the road. And you guessed, road rules (traffic rules).
This is the real Bible for the motorist and know it needs to bend. To master the rules, it is easier to search for video tutorials on the Internet or a car driving simulator online. There is such.
After you counted that we have mastered the material, do not be lazy to buy a collection exam tickets on traffic rules and check your knowledge. It is especially useful to do this before passing the exam for driving. Without this procedure in no way.
Driving a car - practice
Suppose you coped with traffic rules, and now you have the most interesting thing - driving a car.
Suppose you have something to learn - your new car or your friends or acquaintances. In any case, it is better that the first car, behind the wheel of which you will find yourself, was with. Why?
Everything is very simple, such a type of transmission will give the opportunity to learn more deeply and the checkpoint, as well as understand the behavior of the car as a whole, because you will become with him while driving almost one.
I am confident that all car owners with experience will definitely say that before you get behind the wheel of a car with a fashionable "machine", you need to learn how to drive a machine on a manual transmission.
In addition, it is desirable to have a person more experienced in this case, which, if that, will help.
So let's start and try to present the theory of driving the car for beginners as easy as possible and on points.
Workshop: Preparation
- Preparation for the trip - This subparagraph includes several important events.
First, inspect the car, the decoration of his cabin, and especially the driver's place. Check for yourself where there are pedals, gear knob, other controls, for example, turn signals and headlamp switches.
Secondly, sit behind the wheel and adjust the seat under yourself, the slope of the steering column and the rearview mirrors.
Thirdly, do not forget to run away;
- We try to start and swinging the machine - insert the key to the ignition lock and turn first to the ACC position (some consumers turn on), then in ON holds 10 seconds, and then to the START position. If everything is in order and the engine started, release the key, and it will return to the ON position. To join the motor, you need to rotate the key to the ACC position.
Workshop: Starting
- We try to start moving - this is a key part of driving a car. As you probably remember, we study the driving of a car with a manual gearbox, which means that the Kole gearbox is the right of us or simply "handle", and in my feet we have three pedals: on the left - grip, in the middle - brake and right - gas.
Now press the left foot on the clutch until it stops, and with the right hand turn on the scene the first gear (by the way, it is often schematically painted in which way to pull to turn on one or another speed).
Remove the car from the manual brake and smoothly begin to let the clutch, as soon as you felt the movement - do not throw this pedal sharply, but continue to carefully lift my leg with her. Let's go - gas pedal Adjust the speed if you need to stop - press the right leg on the brake:
- Almost immediately, as you tried, and the tachometer arrow rapidly crawled up - switch to the second gear. The procedure looks the same as in the paragraph above - let go of the gas, squeeze the clutch, we translate the lever to the second transmission, carefully release the clutch, parallel to quietly pressing gas;
- Switching from the second rate to the third can be made at a speed of 40 km / h, on the fourth - at 60 km / h, on the fifth - at 80 km / h;
- How to learn to drive without a skill to stop correctly? Suppose you acted to a certain speed and now you need to slow down in front of the traffic light. If you taught the gas pedal before, letting it and then click the brake smoothly, parallel to the left foot squeeze the clutch. Do not forget to touch later you need from the first gear.

conclusions
It is about this way that the theory of driving a car for beginners and exercises of a person who does not know how to learn how to drive a car. Tips are simple and the main condition for their successful consolidation is a frequent practice behind the wheel.
It should be noted that driving a car with an automatic box is much simpler, because there is no need to think about the transition from one transmission to another, and the pedals are only two - gas and brake.
Having learned on the "mechanics", you will with a vehicle on "you", after which the "automatic" will seem to you with rest and children's entertainment. But about that another time, friends.
I hope the theory of driving a car for beginners outlined above will be for you, dear readers, at first, useful.
Let's start with the most common - comfortable landing and good review. Several comments on landing - it is necessary that you can not only sit comfortably, but also conveniently managed. The housing should not deviate from the back even when the fifth transmission is turned on. The left foot with complete clutch squeezing should be almost completely straightened. As for the distance on which you should be from the steering wheel, it can be adjusted in this way: putting the hand on the steering wheel in position 12 (full coverage of the steering wheel palm), change the tilt of the seat back until the shoulder is tightly pressed to the seat back. If you still have anyone else on your car, do not be lazy to adjust the seat in your usual position every time, otherwise you will not feel the pedals well, especially the gas pedal ..
Next - Review. This is perhaps one of the most important points. Do not take time on right adjustment Side mirrors and rearview mirrors. There should be no dead zones, or, if this fails to achieve, they must be minimal. To adjust the left side mirror, you can get up at the roadside and follow the mirror behind passing machines, achieving the most optimal review. Also remove S. windshield (If there is there) all sorts of mice, dogs, monkeys and other fauna representatives. If still really want this in the car hanging, hang on the left rear glass.
Next, some rules that are desirable to follow when driving. Immediately make a reservation that, perhaps, much of the following will seem superfluous or unnecessary. This is to some extent true, since when moving at the average speeds on dry asphalt coating, you can, in principle, ride as it fell, and most likely nothing will happen. However, habits and skills that are produced from you, determine your behavior in an extreme situation. Therefore, if you are used to pressing the brake, simultaneously squeezing the clutch, and even if you know that it is impossible to do this on ice - in a critical situation on a slippery road you do not all. In this case, your habits and reflexes will work, because there will be no time to think. And the last - maybe you will never get into a serious emergency. However, if this happens - it is better to be ready.
Behind the wheel hold on with both hands, on front drive This is especially important, since the steering wheel knocks very easily.
Do not let the steering wheel spontaneously promotion (after completing the turn to return the wheels to the straight position). It can be very bad if the wheel falls into the hole, on the hammer, on a slippery plot, etc. At least one hand should track and control the rotation of the steering wheel.
Try to accustom yourself to always know in what position the wheels of the car are. Sometimes after a number of maneuvers and disorderly rotation of the steering wheel, the beginner driver cannot immediately navigate - it is necessary to move first to see where it goes, then adjust - it all takes time (and place if the movement in a limited space).
The foot with the pedal of clutch should be removed even when switching the 1st and 2nd gear.
To increase stability and manageability, the car should always be on the transfer, and on the correct conditions correct for these conditions, namely: the engine turnover must be maintained such that if necessary, you would not quickly switch to easily smuggle. Never move rolling, even approaching the traffic lights - switch down until the second transmission. Clutch squeeze at the last moment before full stop.
Example: You are slowly approaching the traffic light. At some point, looking at the rearview mirror notice that the truck will fly at the back (for various reasons, not to slow down). The only way out is to quickly go ahead (if there is a place where, of course). Second spent on switching on the transmission can cost you the back of your car body. That is, in other words - you always have to be ready for a quick maneuver, even if the need for it does not foreshadow anything (the remark by passing - accidents, as a rule, does not foreshadow anything.) Naturally, on a slippery road this rule is even more important.
Refuse the habit (if it is) for anyone to put pressure on the brake. Braking adversely affects the stability and controllability of the car. In the emergency, braking is not always right choices, and in some cases - gross mistake, only worsening position. In many cases, avoid an accident is only a maneuver. More about braking:
remember that when braking, the handling of the front wheels is sharply reduced. So if in the process of braking (for example, at the entrance to the traffic light), it was necessary to restructure (a hole in the next row), release the brake at the time of rebuilding, and after rebuilding the brake on.
Intensive braking becomes doubly dangerous if the adhesion is squeezed at the same time. Therefore, when switching transmissions in the braking process at the time of squeezing the clutch, the effort on the brake pedal must be slightly weakened.
Never brake in turn. Preparatory measures (braking, switching, etc. need to finish before entering the turn). Do not attempt to turn in the process of intensive braking - it is almost impossible. First enter the turn, and only then do the arc on the arc, if it is inevitable. For braking in turn, see also below.
If you do not have any ABS - learn how to make the moment immediately after which the wheels are locked. At this point, braking is most effectively. If during braking the wheels were blocked, make yourself loosen for a moment the effort on the pedal, then continue to brake. On the ice and slippery road, it is always necessary to slow down in such a method, with an interval of clicking about 1 second (the less, the better).
All dangerous areas are better held on direct (not rotated) wheels. Including - pits, big irregularities, bumps and other obstacles (with rotated wheels other than the loss of stability, it also threatens damage to the steering mechanism). It also concerns large puddles at the risk of occurring aquaplaning. If you see that it is not possible to drive around the obstacle, immediately align the wheels and hold hard steering wheel (both hands). If such obstacles were on your way in the turnover arc - try to do the same (if possible). After that, quickly return the steering wheel in the original position to continue turning. Also, do not drive to the obstacle on the inverted wheels. Braking should be discontinued immediately before that, with such a calculation so that the pendant springs have time to straighten. It unloads the front axle and reduces suspension shock loads when driving around irregularities.
If you have burst the wheel (especially the front) and you managed to keep the car, in no case should not be braked sharply.
On a slippery road and especially in winter it is impossible to make any sharp driving movements, a brake and gas. For example, a sharp discharge of gas on the front drive can lead to the rear axle. A sharp pressure on the rear drive - besides the result. Intensive braking and a sharp steering turn also leads to deposits. Even in the case of loss of stability, contraloan measures must be performed smoothly (but, nevertheless, quickly and clearly).
Remember that in the summer the most slippery road - at the beginning of the rain (the dirt, oil and other mud on the road on the road when the water appears to form a film on the road). Depending on the road surface, the clutch of the wheels with the road can worsen more than twice. Pay attention to the nature of the road surface - rough, smooth, etc.
Turns
Several very general comments on turns.
This topic is large, so I will limit it only to several main moments (on the example single turn with a constant radius) ..
Input in turn.
For the correct passage of turning is fundamentally important in turn. From this may depend on whether you will succeed with it from it :)). As mentioned above, all preparatory actions must be completed before the start of rotation. That is: reduced speed, the necessary transmission is included. At the entrance, the steering wheel is immediately rotated on the necessary angle and at the same time - pressing the gas pedal. Also exist various methods loading front axles immediately before turning for better clutch Controlled wheels with expensive, but we will not stop on this. The point of starting the rotation (input) should be chosen in such a way that it is subsequently when driving on the arc did not have to be protected the steering wheel (this is the so-called early input). This is dangerous, since the movement along the arc is an unstable state (compared, for example, with a straightforward movement), and the end of the steering wheel may turn out to be so to speak the "last straw".
Movement on the arc of rotation.
After entering the turn on the arc immediately starts overclocking and the steering wheel is gradually returning back. The acceleration mode in turn is most safe, as it is to a certain extent opposes the centrifugal force (for this it should not be large at all). Complete gas reset in turn leads to a decrease in the resistance of the car. Among other things, in the acceleration mode, the optimal load distribution over the axes of the car is ensured.
Brake in turn.
As already mentioned, braking in turn is an unwanted forced measure. If necessary, turning the best engine to turn the engine. Only light slow motion is permissible to the work brake, and on the front drive on a slippery road it should be done with the left foot, without throwing gas. If the speed is critical and higher and still requires more intense braking, you will have to briefly align the wheels and intensively slow down at the time of alignment, then turn the steering wheel again. Unfortunately, this is not always possible and requires certain skills.
Currently, more and more vehicles are available with automatic transmission, but a manual box has its own advantages to which the complete merging with the machine and understanding its work, improved cross-country conditions. Next, we will consider in more detail all the subtleties of the operation and driving a car with the manual transmission.
Features of the manual gearbox
Mechanical gearbox is the type of transmission, in which the switching of steps and transmitting torque is carried out by manually by the driver by the choice of steps, according to the assessment of current conditions and the characteristics of further actions.
A simpler language assignment of the manual transmission - regulation of the high-speed range and selection of its direction.
The number of steps in the manual transmission is from four to seven, in addition to neutral and rear.
The feature of transport with the manual transmission is the presence of clutch pedal, in addition to the brake and gas available in all types of transport. Steaming steps is carried out when the clutch pedal is squeezed.
Advantages of transport with MCPP:
- inexpensive repair and easy maintenance;
- high reliability;
- sufficient range of driving options;
- the ability to tow vehicles on any length of the path;
- running a car with "Tolkach";
- improved patency in difficult conditions;
- increased dynamics and efficiency.
By cons MCPP include:
- the complexity of changing gear for a beginner driver;
- inconvenience and increase in fatigue with movement in traffic jams due to constant switching steps and clutch release;
- the risk of breakdowns of the MCPP and the clutch basket with illiterate switching steps and work with the clutch is increasing;
- reduced engine resource when moving on sufficiently small or large revs.
Purpose of gear and pedals in the machine with manual transmission

The biggest distribution was obtained by 5-6 step MCPP. The lever for selecting steps is used to ensure the interaction of the motor with the manual transmission.
Purpose pedals in car with manual transmission
To avoid confusion and addiction in all types of transport with MCPP, the location of the pedal is identical.
Before the drivers, there are 3 pedals:
- Clutch pedal - Extreme left. Its function is to transmit torque from the motor to the wheels. Always pressed when switching steps. It is necessary to squeeze into the floor, to the end, and let go smoothly and smoothly. Pressed clutch pedal is equivalent to a neutral stage - provides a rupture of the communication of the motor and wheels.
- Brake pedal - located in the middle, its function is the braking of transport when pressed on it by pressing the pads to the discs and drums of the braking system.
- Accelerator Pedal (Gas) - Extreme right. Adjusts the feed fuel mixes Due to the opening (pressing on the pedal) or the closure (pressure decrease) of the throttle. Pressing on the pedal leads to an increased amount of fuel mixture and, as a result, an increase in the speed mode. Releaseing "gas" or lowering pressure - the rotor of the motor and speed occurs.
It is necessary to place legs on the pedals as in the picture below.

Purpose of gears
Each stage should be used to move with certain parameters. Despite the differences between the machines in power, dynamic characteristics and other parameters - exist general principles Selection of steps and the conditions required for this.
When perverse on any level of motor turnover should be in the range of 2500-3000 rpm. - with a calm, uniform ride and 3500-4500 rpm. - When overclocking or more dynamic driving manner.
The transmissions and their characteristics with a calm movement manner (on the example of the five-speed MCPP):
- Rear transmission ®. The rear is used to implement some maneuvers when moving back - parking and departure from it, maneuvering during the details of obstacles and other situations. Movement is carried out on the incomplete pressed coupling pedal for traffic safety.
- Neutral transmission. The gearbox is in the free position in the middle, is checked by the swinging of the handle to the right and left. An uncomplicated swinging of the handle shows that a neutral stage, taking the connection of the motor and wheels, is idling.
- First transmission (1). It is used to start moving (forward). The maximum speed range when moving - 50-70 km / h, but preferably proceed to the following at 15-25 km / h.
- Second gear. The appropriate speed range is 20-50 km / h, switch to the following desirable at 40-50 km / h. One of the important and frequently used steps, especially when moving in the city and difficult conditions (off-road, cool descents).
- Third transmission. Suitable range - 40-70 km / h. The transition to the 4th stage occurs at 60-80 km / h.
- Fourth gear. Designed for movement with a speed interval of 60-90 km / h. It is used when driving on roads with an uncomplicated movement (in the city or on the highway).
- Fifth speed. Used for uniform movement on the highway or highway with a stable speed of over 90 km / h. The transition to the 5th stage is recommended at 90-100 km / h. The appropriate mode of operation of the motor and the reduced fuel consumption is possible at 90-110 km / h.
Attention! The more power in the vehicle, the more high speeds should be enhanced by steps.
Reference. In cars S. diesel engines Rapped range is significantly lower than that of gasoline. This is due to the peculiarity of the motor and the achievement of the maximum torque (means and greater power) on more low revolutionsTherefore, diesel for more traveled and powerful.
Speed \u200b\u200blocation options
1) The back step is parallel to the first. In the absence of special protection to select the rear stage (the button on the handle or pressure on it), the novice driver can take the back from the first when choosing and start moving in the direction that it can provoke an accident.

2) Finding the rear stage opposite the fifth, which protects against the start not in the direction.

Driving transport with manual transmission has a lot of their nuances, having mastered the driver to fully control the machine under any conditions and will not be afraid of driving in difficult conditions.
How to touch
For a beginner, the most complex when driving on the machine, equipped with MCP, - start moving.
In order to touch with a smooth surface follows:
- press the clutch pedal to the end;
- move the handle to the first speed;
- start smoothly reduce pressure on the clutch pedal, at the moment of a minor drop of revolutions per 100-200 rpm., And the shock (setting point) increase the rotation of the engine to 1300-1800 rpm. Soft pressed on the gas pedal;
- continue carefully to let the clutch, adjusting the motor turnover of the accelerator pedal.

At the beginning of the movement from the inclined surface, the beginner driver should be transported onto the handbrake to avoid rollback. When the car's push, the handbrake must be squeezed and gently increase the pressure on the gas pedal.
Incorrect clutch (throwing) is characterized by:
- jerk machine, jerks;
- often the vehicle stalls after several jerks.
The clutch throwing is fraught with increased wear of the manual transmission, clutch and motor.
At the intersections and in some situations it can lead to an accident:
- rear, the drivers expect that there is ahead of the standing transport will go, and it will not stall, and can crash into the rear bumper;
- the stitching machine in the middle of the road at the crossroads can get a blow to the side of the passage of the unregulated intersection with a difficult move or when traveling to a ring in a dense stream.
Proper gear shift to increased and low

The correct switches are considered to be such in which the rotation of the motor does not fall below the recommended interval (2000-3000 rpm).
With the required rise of revolutions (2500-3500), during acceleration, it is necessary to quickly translate the handle for increased transmission, with a soft press on the accelerator pedal after complete clutch release. With a slow change, the engine turnover will fall, which will lead to a difficult rate of speed or impossibility to dial it.
Tip! Due to the fact that at the first time the change of transfers to overclock the newcomer will not be fast enough, it is recommended to increase the turnover to 3000-3500 rpm to increase the transmission to 3000-3500 rpm., When moving on a rise to 4000 rpm. Otherwise, the car may stop typing speed.
To go to a reduced stage, it is required:
- let go of the gas pedal;
- when choosing a reduced stage to reduce the speed - gently pressed on the brake and reduce the speed to the interval of the previous, lower transmission;
- squeeze the grip;
- choose a lower stage;
- smoothly release the clutch;
- to save or set the speed (with accelerated acceleration) at the very end of the pedal of the clutch of add gas;
How to slow down and slow down on mechanical gearbox

Braking of a car with a mechanical transmission has its own characteristics. Braking turns should not fall below indicators for idle move.
Basic rules when braking a car with a manual transmission in a straight line:
- accelerator pedal is released;
- the brake is squeezing until revolutions close to idle indicators;
- clutch squeezes;
- at high speed for smooth braking, a reduced stage is selected and the process is repeated;
- at low speed, the lever of the PPC moves to a neutral position and stopped stopping the brake by further pressing.
For emergency braking Only the brake is squeezing, the engine will contribute to braking by reducing revolutions.
The brake system is equipped with a vacuum brake amplifier to facilitate the press of pedals. The amplifier works only when the engine running and with greater efficiency at more high revolutionsthan at idle.
In the event that the car stalls on a neutral stage or when squeezed, the brake pedal will not be squeezed and braking distances It will grow at times, right up to braking about the car that is ahead.
Turning, i.e. Reducing the speed while continuing the movement, is carried out by releasing the accelerator pedal and pressing the brake with control over turns that should remain above the idle speed.
With a slight reduction in speed, when the turnoves remain noticeably above idling, you can continue to move on the same stage or, if necessary, lower it.
To significantly reduce speed when you press the brake and achieve revolutions close to idle, the lower level is selected and the switching to it occurs without the participation of the accelerator pedal.
A strong drop in revolutions is lower than idle indicators, may adversely affect the further operation of the machine, approaching the repair.
How to slow down the engine and handbrake

The braking principle of the engine consists in lowering the stage when revolutions are reached, close to idle. Reduced steps can be with any higher on any low, except first and rear. To do this, it is necessary to lower the speed up to the range of the desired stage and switch.
Handbrake is designed to hold transport in a standing position.
Braking with a handbrake at high speed in most cases leads to blocking rear wheels, drift and complete loss of control over the machine. It is known a lot of deaths when braking manual brake at considerable speed.
If brake failure and in some other situations, it may be necessary to resort to the braking by the handbrake.
To avoid dangerous consequences when using a handbrake on a moving car, it is necessary:
- neatly, not up to the last clicks to slow down the handbrake, avoiding locking the rear wheels;
- emergency braking is possible only when driving in a straight line with a non-slip road and at the location of the front wheels strictly for movement directly, avoiding any driving movements.
If possible, braking in high speed by the handbrake should be avoided, it is preferable to slow down the decrease in the steps up to the second.
What can not be done with the manual transmission
The mechanical box is a reliable type of transmission, but its incorrect operation is capable of significantly reduced service life and lead to significant breakdowns.
What can not be done on the manual mCP:
- include rear transmission until the machine stops (transmission failure);
- squeeze the clutch with the exception of the moments required to switch the steps (there is an increased wear of the release bearing and clutch);
- hold the foot on the clutch pedals while driving (leads to increased clot wear);
- choose high gear (3,4,5) with insufficient speed and low revs (high load on the engine and a box);
- squeeze the clutch when stopping for more than 40 seconds, you should choose a neutral transmission (increased clutch wear);
- switch the steps without squeezing the clutch (failure of the manual transmission);
- constantly keep your hand on the gearbox lever (increased wear of various gearbox mechanisms);
- incomplete clip clutch when switching steps;
- throw clutch.

Under some rules and thoughtful driving experience, the management of the machine with the manual transmission will come quickly, despite the seeming complexity of such a transmission.
The main advantage of the machine with the manual transmission is complete control over it, which is realized only with the rolled kilometers.
M. A. Genningson.
Tutorial ride by car
To readers
Learning to drive a car is not so difficult, as it may seem at first. Professional driver's level is very different. As in any other case, in driving you can be a master, but you can just be a driver. But a prerequisite for everyone who decided to move by car is to learn a reliable, safe ride. It should always be remembered that the car is a source of increased danger, therefore it is necessary to treat learning with all seriousness.
The main goal of this tutorial is to help future drivers in purchasing a car management skills. These skills can independently work on any safe for themselves and the surrounding platform. As for the road across the road, here you will need an assistant who has driving experience at least three years. The tutorial is given recommendations on driving a car in various conditions. His task is to minimize the role of your voluntary assistant-driver to a minimum, that is, only to the Safety of your actions on the road.
Time for classes is recommended to remove so much so that it is not for you, but in pleasure, but no more than two hours at a time. Otherwise you will be tired.
The last wish address not very decisive people. Listen to the skeptics that may question your abilities for driving a car, beat off the hunt for learning and destroy your faith in yourself. We give a characteristic example. Suppose someone from familiar drivers invited you to try to learn driving on his car. After explanations, how and what to do, you do "everything is wrong." As a result, listen to a categorical conclusion: "Led car is not given to you, you should not start." Do not give me values. After all, it is known that you can be a good driver, but not every driver is able to teach the driving of another person. The old saying is true: "There are no bad students - there are bad teachers."
Section I. Primary learning
1. Brief view of the car on which you are going to go
Fig. 1. The simplest kinematic car schedule of classical layout
1 - Engine
2 - clutch
3 - KPP
4 - Cardan
5 - Main Transfer
6 - Differential
7 - half a half
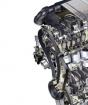
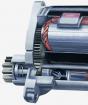
ENGINE (Fig. 2) leads a car in motion

Fig. 2. Engine
1 - cylinder block
2 - Piston
3 - Shatun.
4 – crankshaft
5 - flywheel
6 - intake and exhaust valves
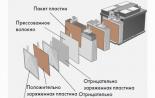
CLUTCH (Fig. 3) Provides a torque transmission through the friction force from the engine to the drive wheels, serves for short-term separation of the engine from leading wheels and their smooth connection.

Fig. 3. Clutch
1 - engine flywheel
2 - slave friction disc
3 - Lead Pressure Disk
4 - Tarbed spring
5 – released Bearing
6 - working cylinder
7 - Hydraulic Highway
8 - chief cylinder
9 - clutch pedal
KPP (The gearbox) is used to convert torque in size (I, II, III, IV gear), changes in the direction of movement (reverse transmission) and the long separation of the engine from the leading wheels (neutral transmission).
In the diagram shown in Fig. 4 shows the principle of transforming torque on one of the gears.

Fig. 4. KPP
1 - presenter (primary) shaft
2 - intermediate shaft
3 - slave (secondary) shaft
4, 5, 6, 7 - Permanent engagement gears
8 - synchronizer hub
9 - gear (connecting) coupling
10 - PCP switching lever
Cardan transfer (Fig. 5) serves to transfer torque under a changing angle.

Fig. 5. Cardan transfer
1 - Cardan Hinge
2 - Cardan shaft
MAIN GEAR (Fig. 6) serves to transmit torque at right angles and increase it.

Fig. 6. Main Transfer
1 - Leading gear
2 - driven gear
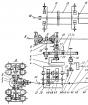
DIFFERENTIAL (Fig. 7) It is used to rotate leading wheels with different angular speeds (on turns).

Fig. 7. Differential
1 - semi-axes gear
2 - Satellite
3 - half a half
2. Preparation of the driver's workplace
Any car is mandatory equipped with a driver's seat adjustment device (longitudinal movement of the seat and tilt of the back) and rear-view mirrors (salon and side).
So, sitting in the car and adjust the driver's seat "for yourself." When adjusting, it is necessary to proceed from the following: the legs should be free to be free to pedals, and the bending of the legs in the knees should be small at any position of the pedals (Fig. 8). It is easy to feel the left foot controlling the clutch pedal. To do this, we must put the foot of the foot on the pedal, without pressing it. If you have a miniature foot and the heel does not pull to the floor, it is not scary - the foot will work on weight.

Fig. eight
In this position, the foot should not experience inconvenience. Then the clutch pedal is squeezed completely (until the stop), while the foot should not reach. An insignificant bending in the knee is saved. This we achieve the longitudinal movement of the seat.

Fig.9.
The tilt of the back of the seat is adjustable in such a way that the hands on the steering wheel are comfortable. The correct position of the hands on the wheel rim is shown in Fig. nine.

Fig. 10
Hands should also be slightly bent in the elbows (Fig. 10).
The next thing to pay attention is to review - this is the review of the rear. Rear view mirrors are adjusted so that salon mirror The rear window of the car was covered as much as possible, and in the side - the board of the car by tangent.
3. Acquaintance with car management bodies
Major governments:
* Rule
* Clutch pedal
* Brake pedal
* Pedal accelerator
* PPP control lever (gear shift)
* Parking brake lever ("Handbrack").
The management authorities also include:
* Pointer turns
* Switch overall lights
* headlight light switch
* Engine wiper switch
* ignition switch (lock).
Now let's get acquainted with each body of the Office separately.
Rule. We already know how to keep the steering wheel. In the figured in fig. The 9 position of the hand has the greatest freedom of management, ready for any quick maneuver and do not get tired, as they are in their weight on the steering wheel. The steering wheel must be kept with two hands, avoid control of one hand. To tear off the hand from the steering wheel, only if necessary, for example, when intercepting the steering wheel on the turn, when switching gear, when turning on the windshield wipers on the go, etc. The dyeing in controlling one hand can lead to trouble: when driving a wheel with an obstacle or when crossing the car Wheels steering wheel with one hand can not hold.
Clutch pedal. Managed left foot. When the pedal is released, the discs in the clutch are closed, when the engine running and the transmission is enabled through the grip, the torque from the engine is transmitted to the drive wheels. When the pedal is squeezed, the discs are open and the connection of the engine with the driving wheels is not. At this point, we can unhindered to include the necessary transmission.

Fig. eleven
The clutch pedal works as follows. The discharge pedal is performed completely (up to the stop) and fast enough. Clutch pedal release is cleaned smoothly, as if in two stages (Fig. 11).
First stage - When the pedal is released from position I, the gaps between the discs in the clutch are selected. This movement is done quite quickly. Distance but It is approximately 1 / 3-1 / 2 from the full stroke of the pedal and depends on the adjustment of the clutch.
Second phase - When the pedal is released from position II to position III, the clutch discs are pressed against each other. Torque transmission occurs. This movement is done smoothly with a small delay.
BRAKE PEDAL. Held right foot. Unlike the pedal of clutch, the brake pedal cannot be squeezed until it stops into the floor. Podal focus we feel in an intermediate position when brake pads Will be in brake drums or discs. Stopping the brake pedal is determined by braking efficiency. The smaller the speed of the car, the smaller the effort must be applied to the brake pedal. Otherwise, there will be an unpleasant "nod" of the car.
Pedal accelerator. It is controlled in the same way as the brake pedal - right foot. The right leg is completely coping with two pedals. We need or movement (accelerator), or slowing (brake). The accelerator pedal works in a very small range. Opening mode smooth. A working engine when you press the pedal will react by increasing revolutions.
Lever control gear. Right hand controlled. The lever is installed by the driver to a position corresponding to a specific transmission. In a neutral position (the transmission is not included), the lever has a rather tangible freedom of movement in the transverse direction. With the transverse movement of the lever, we choose which of the gears to include. Turning on the transfer is made by the longitudinal movement of the lever forward or backward.

Fig. 12
For a 4-speed gearbox, a diagram shown in Fig. 12. For your same car, the gear shift circuit is indicated in the instruction manual.
Parking brake lever. Right hand controlled. When the car moves, the lever must be completely lowered down, which corresponds to the defective state of the rear wheels. The parking brake is equipped with a ratchet device holding the lever in the inverted position (tightened up). When tightening the lever, the characteristic clicks of the triggering device (there should be 3-4). For releasing (disinhibition), the lever is provided a button at its front end. To make the button easier to press, the lever should be pulled up, and then click the button and lower the lever down.
4. Exhaust controls with a non-working engine
After reading the car control bodies, proceed to the exercises to work out management elements. So,
* sit comfortably and free
* Review from the car is good and front, and behind
* hands comfortably and right on the steering wheel
* Feet freely get to the pedals.
We train left leg. Squeeze the clutch pedal quickly and until it stops into the floor. Quickly release it on 1/3 of the stroke and then smoothly and slowly until complete liberation.
Let's do this exercise several times: let the leg get used to elasticity of the pedal.
We train my right leg. While the engine does not work, we will not press the accelerator pedal. The right foot is above the accelerator pedal, touching it slightly. We carry the leg on the brake pedal and click on it. To coordinate the right leg, this exercise has done several times with a different strengthening of the brake pedal.
We train to include transfers. Squeeze the clutch pedal. The right leg at the same time should be over the accelerator pedal, without clicking on it. Calmly and clearly translate the lever to the I transfer position. Next, when the clutch pedal is squeezed, we have shifted the gear sequentially on ascending and in any order.
Remember: the mechanism loves clarity and smoothness.
Recommendation. For ease of inclusion of the second transmission, it is not necessary to translate the lever to the neutral position. Surely slightly pressing towards yourself (left in the course), translate it until the end.
Performing the specified exercises, you inevitably looked at the car controls. Now do the same, without looking at the controls, get used to them. This will help you subsequently.
5. Engine launch
Making sure that the car on the parking brake, squeeze the clutch pedal and set the gear shift lever to the neutral position (or we are convinced that it is in this position). The fact is that the transmission enabled when the engine is not working is sometimes used to hold the car in place (instead of the "handler"). In this case, if we, without turning off the transmission and without squeezing, try to start the engine, the following will occur: when you turn on the starter, namely, we run the engine, the car will make a jerk forward. This is fraught with trouble. After making sure that the PPC lever is in a neutral position, turn the ignition key (Fig. 13) clockwise until the starter is triggered. As soon as the engine starts, the ignition key must be immediately released.

Fig. 13
Key positions:
I - ignition off, you can enable dimensions and headlights
Oh - everything is disabled
II - Ignition Included
III - starter position (spring-loaded)
Recommendation.If you are not sure that the transmission is neutral, unlock the clutch and start the engine in this position. When the engine is launched, do not throw the clutch pedal, and slowly try to let it go. In case the car hurts, immediately press the clutch pedal and turn off the transmission. And in order to avoid any accidents, check if the "handblast" is delayed before starting the engine. This precautionary measure will exclude the movement of the car in the event that the transmission turned out to be enabled. The engine then will simply stall.
It should be known that it requires a rich combustible combustible mixture for a reliable start of a cold engine. When injector Engine or carburetor S. automatic control Air damper The composition of the mixture at startup is automatically adjustable. In a car with a conventional carburetor to start a cold engine, a manual air damper drive is provided, which must be covered to ensure the enriched composition of the mixture at the time of starting. This is achieved by extending the control knob. Extending the air damper handle, run cold EngineAs considered above. After a few seconds, the engine turnover work as it warm up it will begin to increase. It is useful to correct the correction of revolutions (by hearing) by the position of the control knob, i.e., slightly combining the handle, achieve stable, but small revolutions (approximately 1500 rpm).
When starting a heated engine, the air damper must be fully open (drowning handle) to avoid re-enclosures of the mixture and "throwing" spark plugs.
6. Tort the car from the place, movement in direct, braking and stop
Up to this point, we were engaged in self-study in your car on the spot of its parking lot. Topping the car from the spot requires compliance with certain security conditions. To purchase the initial driving skills, you need to choose any pad free of people, cars, etc. If this site has the size of at least 30x30m, this will first be enough for a start. Of course, the car drift on this site should be carried out by the driver.
Before trying to touch the car from the place, you must clearly imagine how to stop it. To stop the car, the following is done: the left foot squeezes the clutch pedal, the right leg acts on the brake pedal (the degree of pressing is determined by the need). Squeezed clutch at the same time eliminates the further forced movement of the car engine. Brake pedal, naturally, stop moving the car.
Psychologically, it is very important to convince yourself of what you know how to respond to the process that has come out. If anything is incomprehensible, something is wrong - the clutch pedal "in the floor", the brake pedal is pressed. After that, you need to turn off the transmission.
So your car stands on the site. And in such a way that there is a lot of free space before him. Making sure that the car stands on a neutral transmission with a tightened "handler", run the engine.
Exercise 1. Termination of the clutch
The right foot is above the accelerator. Squeeze the clutch pedal, turn on I gear. Holding a grip squeezed, take off the car with the "handbrake". The car is prepared for the exercise.In order not to miss the moment of triggered, the clutch pedal starts to let go very slowly, watching the behavior of the car. You will feel the time of the clutch, you will feel the engine speed. When the clutch is triggered, the engine will be lit, the turnover will fall (decline).
The left foot should remember this triggering position.
As soon as you feel that the engine responded with a decrease in revolutions, then the clutch pedal is not needed (in this exercise). After some delay, press the pedal "to the floor" again and turn off the transmission.
If the engine reduced turns, but not stalled, the purpose of the exercise is achieved. If the engine is stamped, then before re-starting, do not forget to turn off the transmission.
Do this exercise several times.
Exercise 2. Tort the car from the spot
To stronger a car from a place, the engine needs a certain power that depends on its turns.On the idling turnover, which runs the engine without a load when the accelerator pedal is released, its power is minimal. At the time of touching the car, the engine is loaded, overcoming the resistance to rolling the car, and so that he does not stop, you need to add turns to it, slightly pressing the accelerator pedal.
Let's try to start just add speeds, i.e. Work only with the right foot. Press the accelerator pedal is very careful. The engine without load will respond sensitively. Turns control by ear.
Now proceed to the exercise. Preparatory operations The same as in the exercise 1:
* squeeze the clutch pedal;
* turn on I transmission;
* Releasing clutch pedal, we find the position of the trigger (the engine turns slightly fell).
Then, adding the turnover of the accelerator pedal, the clutch pedal let go literally by 1-2 mm, holding the left foot in the voltage. At the same time, the car will start moving forward. At the time of starting the car, the accelerator pedal is slightly released (with a stable motion, the engine is no longer needed), and the clutch is completely released.
Raming the car in a straight line several meters, squeeze the clutch and the right foot is slowed down. After stopping the car, we immediately turn off the transmission.
If during braking the car "nodded", then the brake pedal was pressed too much.
Do not hurry to repeat the attempt, calmly analyze your actions.
1. When attaching a car, the car jerked - the clutch was abruptly
2. Engine strokes - when the clutch is discharged, there were insufficient
3. The engine "roars" - the turns are too large and added earlier than the clutch worked, i.e. without load
After analyzing their actions, try again, but do not forget to make sure that there is a lot of space in front of the car. The lack of space may at the beginning of the movement to scare you and provoke an error.
In the event that there is no sufficient space in front of the car, this exercise is performed when moving back. Do not be afraid of movement reverse. You need to smoothly touch the car without interfering in the trajectory of his movement, i.e. The same thing you did just when moving forward.
When moving back it is necessary to sit so that it is convenient and clearly visible, where the car moves. To do this, we turn on the seat in the half turn to the right. Put on the left hand on the rim of the steering wheel from above in the center, we throw the right hand over the back of your seat, freeingly leaning on it. We are convinced that we are clearly visible through the rear window of the car all the space behind it. In this position, without looking at the pedals, let's try to squeeze the grip and smoothly release it (not including transmission). The right foot is slightly adding revolutions (by ear). Representing a car in motion back, imitate it to stop: squeeze the clutch and press on the brake. If it happens, it means that you are done correctly.
Embed to exercise. Squeeze the clutch and turn on the rear gear. Holding the grip squeezed, sit comfortably. Car and we are ready to move. Everything else we do the same, paying attention to the work of the legs and motor turnover.
Once again we emphasize that before the start of movement it is necessary to remember your further actions, i.e. Clearly represent what you need to do to stop the car.
Exercise 2 is very important in the learning process. Try to fulfill it to achieve good results, but do not bring yourself to fatigue. Fatigue dull attention.
To work out the start of the car, you can recommend an intermediate exercise, in which the clutch pedal is not allowed to end. The initial actions are the same as in the previous exercise.
Squeeze the clutch pedal, turn on the transmission, let go of the clutch, we find the position of its triggering (the engine responded with a decrease in revolutions). Further, adding speeds by ear, the clutch pedal is first 1-2 mm, having achieved this slow movement of the car, and the clutch is no longer released. After rolling the car for 1-3 meters, the clutch must be completely squeeze and turn off the transmission.
Immediately, let's say that the execution of this exercise makes the clutch in an unfavorable mode (the slave disk is working longer with the slip), but in terms of the study gives best result In training legs for clutch management.
7. Trajectory curve movement, maneuvering
Exercise 1. Movement in a circle of an arbitrary radius
The initial place of this classes is the same as in the previous exercise.Estimating an arbitrary trajectory, smoothly touch the car on the I gear and slowly move in a circle, first counterclockwise.
When working out the skills of taxi, it is important that the task does not distract you from the main thing - the skills in any situation stop the car. The fact is that at the initial stage of training the car, it will be quite possible, it will not move at all along the trajectory you are conceived. In this case, the correction in taxi can be safely implemented only with full control over the movement of the car. If at the time of the exercise, you suddenly turned out to be not enough time to accept right solution, It follows without spraying on other actions, calmly stop the car.
Now specifically let's say what to pay attention to the exercise.
1. It is not necessary to look at the "nose" of the car directly, but to the place where the car is sent to you (in fig. 14 shows arrows).

Fig.14.
2. It is necessary to take into account some inertia of the car steering (as opposed to the motorcycle, bicycle), since the steering mechanism has a free stroke (backlash) within 10 ° provided by the structure. During the taxi, this backlash is chosen quickly enough.
3. When moving on the curve, it is not necessary to strive all the time to trust the steering wheel towards turning. The desired trajectory is provided by a certain position of controlled wheels.
When performing the exercise it is useful to make intermediate stops. Driving a few circles (5-6), change the direction of movement and perform the same exercise clockwise.
Exercise 2. Acquisition of driving skills when moving in the "eight" (Fig. 15).

Fig.15
In this exercise, you must pay attention to the correctness of the taxi. The steering turns are performed freely with the interception, as follows as shown in Fig. 16a and 16b.

Fig.16a. Rotate right

Fig.16b. Rotate left
In the process of performing the exercise under consideration, make intermediate stops.
To successfully perform subsequent maneuvering exercises, it is very important to be able to move the car to any small distance. This is achieved by the competent work of the clutch.
When the clutch pedal is released, for some time, for which the car drives a certain distance. In other words, if you try to try the clutch pedal when driving a car, let's immediately squeeze it and click on the brake, you can make sure that the car will take a few meters during this time. But it is necessary to promote the car quite a bit, literally on centimeters. How to do it? To do this, it is enough to move the car on a semi-alone clutch, after which the clutch pedal immediately squeeze.

Fig.17.
I - completely squeezed pedal
II - the position of the clutch
III - Completely released pedal
IV - the position of the pedal (conditional), in which the movement of the car will begin
As we already know, position II (Fig. 17) defines the moment of starting the clutch. From position II car will start moving. Therefore, the smaller we release the pedal from position II with the subsequent release, the smaller the distance conducted a car. This will be the goal of our next exercise - put the car for the minimum distance.
Exercise 3. Movement of the car for the minimum distance.
Include I transfer and find the moment of triggered (position II, Fig. 17). Further, at the same time adding slightly engine turnover, we first accept the clutch pedal to the conditional position IV, literally a few millimeters. After the car moves from the place, the clutch pedal completely squeeze. At the same time, it is not necessary to use the brake pedal, since if you do everything right, the car will not have time to rolling and stop under its own weight.In this exercise, it is necessary to put for yourself the task of phased movement of the car on as far as possible (10-20 cm).
Try the same thing when moving back. Having worked this exercise, you will gain confidence that the car can be touched. There will be a pleasant feeling of complete control over the car.
Exercise 4. Maneuvering with the use of the reverse.
The trajectory of movement is chosen arbitrarily, for example, as shown in Fig. 18. In this exercise, the main thing is to pay attention to, it is on a driving when moving by reverse. The movement by reverse on the straight, we have already considered.In the proposed exercise when moving with reverse move, we carry out a turn. It is very important for the driver to choose this position behind the wheel for himself, so that it was convenient, the movements were relaxed, the zone was well visible, where the car should be directed.

Fig.18a

Fig.18b.
In fig. 18a shows the movement of the car with a reverse move with the right turn of controlled wheels. In this case, the driver must turn around a bit to the right, so that the glass zone of the rear right door and the rear window of the car is visible. You can turn the steering wheel as one, left hand, and two hands. It depends on the steepness of rotation and from the speed of movement.
In fig. 18b depicted the movement of the car with a reverse move with the left turn of the controlled wheels. In this case, the driver must choose for itself a convenient position: or turn around, as in the previous case, but much more so that the rear window zone and partly glass of the rear left door of the car are visible; Or, that, probably, more comfortably with a steep turn, turn on the left side and look through the side glass of the left rear door. Try both options. Moreover, the position during maneuvering by reversing the driver can change. If you felt that when driving are inconvenient, change the position, but stop the car. The main thing is that the zone is viewed into which the car is sent.
8. Driving with gear shift
To move the car in various road conditions and at different speeds, it is necessary that the torque of the torque was variable on the driving wheels. This provides a transmission box (PPC).
For each transmission there is a range of speed speeds having a lower and upper limits and the engine defined by turnover.
An exemplary speed range for each transmission for a 4-speed gearbox looks as indicated in Table. one.
I - 0 - 40
II - 10 - 60
III - 30 - 90
IV - 50 - Max
The driver when moving chooses a convenient speed mode, and the transmission uses according to the selected speed. To overclock the car to the desired speed, it is necessary to sequentially accelerate the car on each transmission along the ascending (I, II, III, IV transmission). For example, the selected high-speed mode on IV transmission is 60 km / h. The final speed is not maximum for the car, therefore, and overclocking on each transmission should not be maximum:
* Tort the car from the place on the transmission I and acceleration to 20 km / h;
* Switching to II transmission and acceleration up to 40 km / h;
* Switching to III transmission and acceleration up to 60 km / h;
* Switching to IV Transfer and maintaining the selected speed - 60 km / h.
In this case, the engine will work on each transmission approximately in the same range of turns: from idle speed (700-800 rpm) to medium (2000-2500 rpm).
Exercise 1. Movement with switching on II transmission.
To perform this exercise should be enough space. You will move in a straight line without being distracted by a taxi.Recommendation.The process of switching to II transmission for ease of execution is divided into several steps.
1. Tort the car from the place and smooth overclocking on the I transmission.
2. Climb the clutch pedal with simultaneous release of the accelerator pedal.
3. Calm translation of the gear shift lever with I transmission I transmission.
4. Quickly fast, but smooth release of the clutch pedal.
5. Add engine speed for subsequent overclocking.
As the skills acquire the 4th and 5th stages, you can combine.
At the 1st stage, during overclocking, the speed sufficient to transition to II transmission can not be monitored by speedometer. And visually, on the eye, and by engine speeds (turns must be medium).
At the 2nd stage, do not hurry when the clutch pedal survival certainly immediately switch the transfer. Looking down and dropping the turnover, you will move on inertia enough time for the calm translation of the lever PPC (3rd stage). The 4th and 5th stages are the case of technology.
Possible errors and their reasons:
1. After overclocking at the time of switching, the engine "roared", i.e. He scored unnecessary turnover without load - when the clutch survival, they forgot to let go of the accelerator pedal.
2. After overclocking at the time of switching, the car slowed down sharply. - Clean the clutch was late. You let go of the accelerator pedal, and the clutch remains on. The engine worked as a retarder on I gear.
Take this exercise.
Switching on the ascending II on III and III on the IV transmission is similar to those discussed above. It is only necessary to take into account that the movement at higher transmissions is possible at high speeds. Therefore, the training will need more space. It can be any road free from driving. However, when moving through it in the learning process, an experienced driver should be sitting with you.
Exercise 2. When the speed is reduced to a lower gear.
Returning to Table 1, pay attention to the lower speed limit on each transmission. It shows that it is unacceptable to move at a speed of lower limit for a specific transmission. The engine will in this case will work with interruptions on the revolutions, below the idle speed, can even stop. At the time of operation, the engine will experience very harmful "oil starvation" for him.If, when moving, a situation that requires a reduction in speed, then, slowing down the speed to the minimum permissible for this transmission, it is necessary to go to a lower gear suitable for this speed. At the same time, switching downwards in the reverse order is not necessary.
We give examples.
First. We are moving on IV transmission at a speed of 60 km / h. Ahead of the intersection on which we need to turn. Turning, we reduce the speed of about 50 km / h (lower limit to IV gear), squeeze the clutch, continuing inhibition. Turn on II transmission, since the speed selected by us to pass the turn is about 10 km / h.
Second. Moving at the same speed on IV gear. Ahead of the traffic light prohibiting movement. We reduce speed up to 50 km / h, squeeze the clutch, continuing to slow down to a complete stop in front of the traffic light. We put the transfer to the neutral position.
Of the two examples, it can be seen that the intermediate transmissions were not required.
Try the specified transition exercise:
* With IV on III
* With IV on II
* With III on II gear.
The transmission should be transmitted only if the speed of movement is almost equal to zero.
9. Check in the garage
For further classes, dimensional visits are required - wooden, plastic, ski sticks, etc. The main thing is that they are about one meter size or a little more; In order to randomly arrive at them, damage to your car; In order for the spikes on which they will be installed, did not damage the wheels of the car. Their enough 7-8 pcs.
We put the car on the site and arrange the vests around it, as shown in Fig. nineteen.

Fig. nineteen
The challenge is to leave the garage and call him back. And you need to do this exercise from different sides.
When leaving the garage, it is necessary to take into account that when the trajectory of the front and rear wheels is different. Rear wheel It goes on the inner radius. Therefore, leaving the garage, do not rush immediately turn, otherwise the front / Fig. 20) will be shot down (and if it is a real garage, then the board of the car will suffer). So that this does not happen, roll out the car in a straight line by half, then turn in the selected side by controlling the inner board of the car.

Fig. twenty
Exercise 1. Departure from the garage with turning to the right and return back to the back.
When leaving the garage, you must focus on the right front angle (right front entry). We leave the garage to the right side and put the car, as shown in Fig. twenty.For check-in to the garage, we deploy at a driver's seat in such a way that it is clearly visible. The checkout itself is divided as it were for three stages.
At the 1st stage, we focus on the nearest sweat, which you need to be hung at a distance of 30-40cm from the car on the steep radius. At the end of the 1st stage, the car must be located approximately 45 ° to the garage, the nearest vest should be visible in the glass of the rear right door and be on board the car at a distance of 30-40cm, the controlled wheels are completely twisted to the right (Fig. 21a).

Fig. 21A.
At the 2nd stage, all the attention was directed to the middle target of the vest, which the car should go through the center. Watching the movement of the car over a steep arc inside the garage, we wait for the rear of the car in the center of the middle core (Fig. 21b).

Fig. 21B.
At the 3rd stage, focusing on the rear target (or on the central sip), align the car to inside the garage he moved strictly in a straight line.
It should be noted that the correction of the possible error inside the garage by the use of use will not bring, it can only worsen the position.
In the final phase inside the garage, the car should not go on the arc. Adjusting the back of the car Even at a slight distance will entail a significant shift towards the front (controlled) part of the car (Fig. 22).

Fig. 22.
Exercise 2. Departure from the garage with turning to the left and return back.
This exercise differs from the previous one only orientation of the driver in its place.Work on the arrival in the garage will require patience. Useful when training, outstanding landmarks, stop the car in intermediate positions, leave it to analyze its actions.
10. Turn in a closed space
To conduct a classes on the site, we will make a corridor from Veshk, as shown in Fig. 23.

Fig. 23.
Exercise 1. Early on the left side with the use of the reverse.
In order for the reversal to be the most efficient, three conditions are needed:* Use the corridor across the width;
* work steering wheel in the entire range;
* Preparation of the car before stopping the rotation of the controlled wheels to move in another direction.
So, we will try to fulfill the reversal rational. We enter the corridor, pressing to the right side (approximately half a meter from Veschk). In the middle of the corridor, before the failure, we unscrew the steering wheel left and in this position we pass 2/3 of the corridor width. The rest of the path is passing, quickly twisting the steering wheel in the other direction. those. Right. Stop the car needs to be about half a meter from restrictive vesicles.
Starting with a reverse move, we continue to rotate the steering wheel to the right to failure. Thus, also pass 2/3 of the width of the corridor. The rest of the way to the stop rotate the steering wheel in the opposite direction, i.e. Left. After the stop, renew the movement forward with the rotation of the steering wheel left.
Recommendation.When performing exercises on maneuvering, it is not necessary to be afraid to use "Nakata", i.e. Movement with clutch disclosure. In this case, the car can move more slowly and manage it will be easier.
With the acquisition of skills and experience, your movements will be more rational.
11. Car parking
Car parking can be carried out in three ways (Fig. 24):

Fig.24a, parallel to the roadway;

Fig.24b, perpendicular to the carriageway;

Fig.24B, at an angle to the carriageway.
Parking perpendicular to the roadway is similar to arrival in the garage. Parking at an angle to the roadway does not represent difficulties if you cope with perpendicular parking.
Let us dwell on the car parking parallel to the roadway. If there is a place for your car near the sidewalk, the place for your car is limited, but enough, it is advisable to travel during this gap with reversal. The fact is that with the help of the front controlled wheels "nose" of the car is easily entered.
Exercise 1. Parallel parking.
We put your vest and the car regarding them, as shown in Fig. 25
Fig. 25.
For example, we use the graphic image of the phased location of the car during the arrival (see Fig. 26).

Fig.26.
In position 1, controlled wheels must be rotated to the right. At position 2, the distance from the side of the car to the nearest vest should be ~ 0.5 m. From position 2 to position 3, the car should move in a straight line. In position 3, controlled wheels must be turned left. The distance from the rear right corner of the car to the line of ~ 0.5 m. When moving from position 3 to position 4, it is important to control the right-hand wing of the car. Position 4 shows the result you need to achieve after the workouts done. From provision 4 possible correction with the displacement of the car forward.
12. Check-in to the overpass. Topping the car standing on the rise
For a successful race at the overpass, it is necessary:
* properly coordinate the car;
* Save straightness when arriving at the overpass;
* To be able to stop the car in any position on the overpass, not allowing its rolling.
Training on the coordination of the car should begin without arrival at the overpass.
Exercise 1. Arrangement on the overpass.
We put the vests (without letters) regarding the car, as shown in Fig.27. At the same time, the vehicles will determine the rifts of the overpass.
Fig.27
We take into account that in close proximity to the overpass, the car should move strictly in a straight line. That is, maneuvering should be done in advance. Otherwise, sending the front wheels correctly on the overpass, but continuing to move along the arc, you will not fall in the rut of the overpass rear wheels.
Do several times this exercise. Now try to do the same with the displacement of the car relative to the laid leaves in the other side.
Exercise 2. Stopping the car on the overpass.
To perform the exercise, choose a natural bias (approximately 16 °) and put on it the veins in the same way as it was above.By sighting the car on an improvised flight. Stop it on the rise. In order for the car after stopping, it did not roll back, continuing to keep the brake pedal tightly, tighten the parking brake. During the stop on the rise, we will pay attention to the sequence of actions: when the clutch pedal is squeezed, the "handler" is first delayed, and then the transmission is turned off and the pedals are released.
Exercise 3. Tort the car on the rise.
So, the car stands on the lift on the parking brake. Our task is to free the car from the parking brake at the initial moment of its start.The sequence of actions is the following.
1. Turn on I gear and put the right hand to the "handler".
2. Find the moment of triggered and in this position it is delayed left foot (remember that at the time of the clutch, the engine will react to a decrease in revolutions).
3. Adding turns, lowered down the brake lever, after pressing the ratchet button.
4. Then everything is done as under normal touching.
If your actions are correct, the car will not roll back.
Possible errors and their reasons:
1. When starting the engine, the engine is not released in time
2. The engine "roars", the car rolled back - "the handbrake" released ahead of time (the clutch has not worked yet). When rolling a car back, involuntarily occurs the desire to move the car forward due to the larger pressing on the accelerator, forgetting about the clutch
So, if the goal is clear, we must begin to work out actions. The main thing at the initial stage of training is not hurry to do everything at once. Study the actions consistently as we have considered.
Recommendation. In the case of a car roll back, you need to calmly continue to smoothly release the clutch before it is triggered. At the same time, at the time of the clutch, the car will first suspend, and then start moving forward.
In the exercise examined, the most attention should be paid to the work of the clutch.
Section II. Driving on roads
By purchasing sufficient skills in driving a car, you have fulfilled only one of the requirements of the 21st section of the rules of the road.
In order to go on the road to continue learning, you need to fulfill the following requirements.
1. To know and strictly perform road rules.
2. The car must have in front and behind the identification signs of the academic ride and be equipped with a rear view mirror for the training:

3. You must have a learning driving with an experience of at least three years.
When learning on the road, you must be fastened by seat belts.
In addition to the overall prohibition of educational ride
On the motorways indicated by the following sign, there are roads in the cities on which training ride is also prohibited.

In Moscow, this is:
* Center within the Garden Ring, including the Ring itself
* All Primilar Square Berezhkovskaya Prospect Prost. Vernadsky
* Vnukovo highway
* Volokolamskoe highway
* B. Doromomilovskaya st.
* Ilyinskoye highway
* Novoarbat prospe.
* Komsomol Prosp.
* Krasnogorsk highway
* Kutuzov prosp.
* Leninsky prosp.
* Leningrad Prosp.
* Leningrad highway up to 29 km
* Lomonosovsky prosp.
* Minsk ul.
* Minsk highway up to 19 km
* Ave. Mira
* Michurinsky prosp.
* Mosfilmovskaya st.
* Mozhaisk highway
* Proletarian prosp.
* Pushkinskoye highway
* Rublevo-Assumption Highway
* Rublevskoe old highway
* Smolenskaya ul.
* Tverskaya (Gorky) ul.
* Tverskaya-Yamskaya (Gorky) ul.
* University Ave.
* Assumption Second Highway
* Nab. Shevchenko
* Sheremetyevskaya st.
1. The beginning of the movement and stop at curblock (at the sidewalk)
Before you start, you must:
* Make sure that you will not create noise to other participants in the movement;
* Enable rotation pointer.
Recall that the warning signal (turn signpost) does not benefit the driver in motion.
If the car is standing at the sidewalk and in front of him the road is free, start moving comfortably under a very sharp angle without making sharp maneuvers. In this case, for a moving vehicle, you will not create inconvenience. Whether your car has a sidewalk or moving at a low speed in close proximity to it - for the driver of another vehicle, almost the same thing (Fig. 28).

Fig. 28.
If the obstacle is in front of your car (for example, another car), then the start maneuver requires great caution. The advantage of vehicles moving along the road. In this case, you will need acquired clutch skills so that the departure is slow and controlled. Such a departure implies in the event of a change in the situation suspension in any position (Fig. 29, pos.2).

Fig.29
In order to safely stop the sidewalk, it is necessary:
* a clearly to know where we can do it;
* in advance to submit a warning signal (right signal of rotation);
* Smoothly reduce the speed and, if possible, approach the curb to the curb at an acute angle.
It is very important that the approach to the curb stone is after a decrease in speed. An entrance to the sidewalk at high speed can lead to an error and unpleasant consequences. When contacting a wheel with a curb stone, you can damage the wheel or, even worse, losing control over the control of the car due to increased resistance on the right wheel.
Where the stop is prohibited, indicated in the 12th section of traffic rules
2. Movement in a series of distances
Movement speed and distance should be chosen as to exclude the hitting on ahead of the traveling vehicle, even in the case of its sharp braking.
When choosing a distance, the following factors should be taken into account:
* Movement speed (the higher the speed, the greater the distance);
* visibility (illumination, fog, etc.);
* Road coating condition;
* The state of your vehicle;
* Own condition (fatigue, reaction decrease, etc.).
Movement in its row on the road is the easiest and safest. In this case, you are required to comply with the distance and competent use of transmissions when changing high-speed modes Movement.
3. Movement with rebuilding from a number in a row
This maneuver requires increased attention from the driver. In this case, two conditions must be performed. It is necessary:
* Save the road to the vehicle moving in its row.
* Submit a warning signal.
Consider several examples of rebuilding.
1. The speed behind the car goes into the next row (Fig. 30).

Fig. thirty
Rebuilding is currently impossible. If the rebuilding is caused by the upcoming turn and this turn is already close, it is necessary to reduce the speed in advance and wait for a convenient case for safe rebuilding. The main thing (especially at first, there is no experience) do not hurry, do not succumb to the impatient manifestations of other drivers (beeps, light headlights) and do not make rapid actions. Remember! Each action associated with changing the motion mode must be controlled.
2. The speed behind the reaching car is approximately equal to yours, and there is a sufficient distance (Fig. 31).

Fig. 31.
Rebuilding is possible. In this case, for greater rebuilding security, the speed of movement can be slightly increased (if the situation allows).
3. The speed of your car is above the velocity of the car moving in the next row (Fig. 32).

Fig. 32.
In this case, the rebuilding is possible after the car in the neighboring row will be visible through the rear window in the rearview mirror.
If you need to rebuild on a multibone road with overcoming several rows, you should not "cut" the road diagonally. In this case, an error is possible in the speed assessment and distance at once several vehicles moving in neighboring ranks.
This maneuver is safer to perform stages from a number of in a row, that is, after rebuilding in the next number to evaluate the situation in the following, etc. (Fig. 33).

4. Travel of unregulated intersections
Unregulated intersections are divided into equivalent and unequivocal, i.e. From the main and secondary roads.
The passage of the unregulated intersection is one of the most complex elements on the road.
Driving up to the intersection, the driver must clearly know:
* Further direction of your movement;
* Who has preferential right in motion at this intersection.
The direction of movement at the intersection requires the corresponding location of your car in front of it. For example, when moving in the forward direction, the car may be located in any row. When moving at the crossroads to the right or left, it is necessary to take the right or left row respectively.
If the direction of movement intersects, the preemptive right in motion at the crossroads have:
* Vehicle with a flashing bearing included;
* Vehicle located on the main road;
* Tram;
* Vehicle that does not interfere on the right.
We give examples.

Fig. 34.
In Figure 34, despite the fact that the vehicle with a flashing bearing is in the secondary road, it has an advantage.

Fig. 35.
In Figure 35, the advantage in motion has a vehicle located on the main road. This rule is obeyed and tram.

Fig. 36.
In Figure 36, with an equal right to move (equivalent crossroad), the advantage has a tram (despite the fact that a tram interference on the right).

Fig. 37.
As Figure 37 shows, one who has no interference on the right (in the absence of a tram and vehicle with a flashing bearing) on \u200b\u200bequivalent roads).
In order to correctly assess the situation at the crossroads, time is necessary. The smaller the speed with which we will approach the intersection, the more time there will be time to assess the specific situation and make the right decision.
The practice confirms that the movement in the 15-20-meter zone in front of the intersection at a speed of no more than 10 km / h allows the driver to calmly understand the atmosphere. We know that the transmission II should be selected for movement at such a low speed. If, in advance reducing the speed, in 15-20 m to include II transmission, then all your attention you can focus on the main thing:
* In the absence of interference, continue to move in the intended direction;
* If there is no interference, not allowing to move on, stop in front of the crossroads.
Consider the actions of the driver on the example of specific intersections.
Crossroads with Stop Sign
In the presence of a sign prohibiting the passage of crossroads without stopping, the driver's position is largely simplified. Before him is a specific task - to stop. It must be performed, and then solve other tasks. Question: Where to stay and how?

Fig. 38.
According to traffic rules, in the absence of the "Stop" line, it is necessary to stop before intersectable passage. It is necessary to take into account that leaving the conditional line (Fig. 38) is unacceptable without stopping. If you stop long before this line, the intersection will be worse visible, which will create inconvenience when resuming motion.
When stopping, in addition, you should consider how to locate the car. If the further direction of movement is direct or left, the car must be coordinated strictly perpendicularly intersectable carriage part (and when turning left-in the left row); When turning right, the car must be stopped on the trajectory on which movement is scheduled.
Crossroads with a sign "Landing the road"
As in the previous case, we are on a minor road. The difference is that this sign does not require an unconditional stop. Therefore, the temptation appears to overcome it from the go.
In order for the passage of the intersection to be confident and secure, it is recommended to act as follows.

Fig. 39.
1. For 15-20 m, it reduces the speed of about 10 km / h and included II transmission (Fig. 39, pos.1).
2. Moving at low speed, to strive all the attention first on the left side (if from this position the left side of the intersection is poorly visible, it is necessary to watch first in the direction of the best viewing).
3. When interference is detected from the specified side, you can safely stop before intersectable passage. In the absence of interference from this direction, continuing the approach to the intersection, we fix all the attention in the opposite direction.
4. For 3-5 m to the intersected roadway (Fig. 39, pos.2), a decision should be made on the possibility of continuing movement.
If you did not have time to correctly appreciate the situation at the crossroads, go beyond the intersected passage part unacceptable. Nothing happens if you, without oriented, without necessity, stopped before intersectable passage.
Equal intersection
At the equivalent crossroad, in the absence of a vehicle with a flashing light and tram, there is a "interference right" rule. Therefore, all vehicleslocated to the right of you, you must give way to the road.
Fig. 40.
The most complex maneuver at the equivalent intersection is to turn left. In this case, the interference can be from two directions - to the right and towards. To skip the vehicle from the right direction, your car must be before intersectable passage (Fig. 40, pos.1). When you turn left to skip the oncoming vehicle moving directly or right, the car should stop at the intersection in this position from which the rotation will begin (Fig. 40, pos.2), i.e. In the middle of the intersection. Controlled wheels should stand straight to avoid unauthorized departure to the oncoming lane at the time of waiting.
5. Travel adjustable intersections
The intersection is adjustable if the order of movement on it is determined by the regulator or traffic light.

Fig. 41A.

Fig. 41b
In fig. 41A, 41b shows the allowed directions of movement at two main positions of the regulator.
The adjustor raised his hand with a rod up, demands attention from vehicles. The actions of the drivers should be the same as during the yellow signal of the traffic light.
When adjusting the traffic of the traffic light, special attention should be paid to the traffic light with an additional section. The included additional section allows motion in the specified direction. But in this case, when the main section of the traffic lights, it prohibits the movement (red or yellow), then, moving in the direction allowed by the additional section, it is necessary to skip vehicles from other directions. For example, we need to turn right as shown in Fig. 42.

Fig. 42.
Remember that the main red (or yellow) section of the traffic light shows that movement from another direction is allowed. The driver moving on the green light signal may not know that the resolution arrow is on with your direction. He knows one thing: with your direction - red light. If there are additional sections in the traffic light, in the direction of which you do not need to go, do not occupy the relevant series sections. Otherwise, you can interfere with other vehicles and, according to the rules of the road, you will be obliged to release the corresponding series by leaving the direction in the direction indicated section (Fig. 43).

Fig. 43.
Another recommendation. Never hurry to touch the car when the green traffic light is turned on. Attempting to start moving soon, so as not to delay anyone, will lead to the fact that an error will be made and the engine will stall. With calm actions, the delay at the intersection will not be more than 2-3 seconds.
6. Overclock
Obgon, i.e. Ahead with an exit from the occupied strip is one of the most dangerous actions on the road. It requires increased attention from the driver if he is made with the departure to the oncoming lane.
In addition to the general requirements listed in the rules of the road, when completing the overtaking, it is useful to know a number of technical techniques that help make overtaking safely.
If you have decided to overtake a traveling vehicle ahead, you should move your car in advance to the left (approximately half the width of the car) so that the opposite band is clearly visible. With such a small displacement, you will not create interference with counter vehicles (Fig. 44).

Fig. 44.
In addition, it is necessary to maintain a sufficient distance to overtake, do not approach it too close. When the counter car is taught with your fellow traveler you are going to overtake, this distance can be used to increase speed.
The larger the speed difference between the overtaking and overtaken, the less time it is necessary to make overtaking and the safer will be overtaking with departure to the oncoming lane.
Figure 45 graphically shows competent overtaking.
The speed of the overtaken and overtaking in fig. 45a are equal, the distance is preserved, since the counter strip is occupied. At the same time, the overtaking slightly is shifted to the left for the best visibility of the oncoming strip.

Fig. 45A.
In Figure 45B, the counter car stood with the overtaken. At that moment, overtaking increases speed, the distance is reduced (if the oncoming car is free).

Fig. 45b
In Figure 45, the counter strip was freed. The difference of speeds of overtaking and overtaken is sufficient. Safe overtaking occurs.

Fig. 45V.
Rebuilding in your row after the overtaking follows no earlier than it is visible in the rearview mirror the one who you just overtaken.
It must be borne in mind that the highest transmission is not always useful for a rapid increase in speed. For example, you are moving at a speed of 50 km / h on the IV gear. Ahead is moving a car with a little less speed, suppose - 45 km / h. For its overtaking with a speed difference, 5 km / hour will need a lot of time and a large portion of the path. During this time, the atmosphere on the oncoming lane may change. It is possible to increase the speed of up to 60 km / hour on the same IV gear, but the increase will be slow (the transfer is weak). If we use the III transmission (it works in the speed range of 30-90 km / h), then acceleration will be more intense, with considerable less time to increase speed.