Replacing and adjusting the clutch of the car Toyota Corolla. All itself - replacement of clutch on Toyota Auris and Corolla What clutch is better to choose
Replacing clutch on Toyota
corolla
with a robot
Shift. Everyone has a lot of heard that the robot on Toyota is very capricious and it is worthwhile to bypass it.
If you hit this site, apparently you are the owner of this car and you need qualified help. I will try to paint everything clearly.
First of all, the clutch fails in MMT. The average mileage of the clutch in our practice is 70 - 90 thousand mileage. It all depends on the intensity of driving and conditions in which the car is used. With urban ride, mileage is less, as the clutch works constantly. But when used in intercity, it is greater.
There are several tips in order to extend the life of the grip. The first is switch MMT to neutral When stopping on long traffic lights and traffic jams. This will remove the load from the clutch actuator and the clutch itself. The second one is not aggressively ride. All load when switching transmissions is clutch. And the third - from time to time it is worth riding on manual gear control mode. The control unit over time remembers your ride style and will try to repeat it in automatic mode.
Change the oil in MMT every 60 thousand run. The manufacturer does not provide for the replacement of oil in MMT. He calculates it for the entire service life - 100 thousand kilometers. In practice, problems arise with MMT.
Mechanical malfunctions PPC Multimode.
Mechanical malfunction is a mechanical wear of clutch details. Mainly wear and clutch overheating, In which the clutch loses its functional abilities. The main sign of the failure of the clutch is a slip. This leads to a loss of torque at high speeds or sharp start. With mechanical malfunctions the system is included in emergency mode And resets the transfer to neutral. Highlights the error code P0810. To troubleshoot a malfunction, you need to replace the clutch kit, which includes a basket, clutch disc and released Bearing.
Crunch in MMT when switching from the second to third gear. This is connected with the wear of the synchronizer of the transmission of the transmission. The reasons from the part are not in the timely replacement of oil, in non-adaptation of the clutch or its violation. In the running version, it leads to the failure of the package of gear inclusion of a third transmission and gear selection mechanism.
Grumble from MMT when moving the car. Because of the non-timely replacement of oil or his leakage, the bearings of the primary and secondary shaft fail. Eliminated replacement rear bearings Primary and secondary shafts.


Malfunctions Electrics PPC Multimode.
Faults in the electrical system of this checkpoint are expressed in several versions. The first is a fault in setting up or initializing the clutch. Characteristic signs - twitching at the start. The second is a reset to neutral when the clutch overheating. The red icon in the form of a gear indicating a malfunction in the transmission lights up on the scoreboard. After some time waiting, the system starts working again. When conducting diagnostics, you can find out the nature of the malfunction on the error code. Consider a pair of the most common. The first is P0810 - clutch management error. This error occurs both in the mechanical clutch malfunction, and when electronic malfunction. This is Error P0900 is a break in the actuator pin drive motor circuit. This error directly indicates the chain rupture in the wiring or failure of the clutch actuator motor.
The drive motor changes separately. The cost of the motor - 6000 rubles.
Consider in practice the replacement of clutch on the robot.
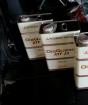
To replace the clutch, we need a clutch kit - this is a disc with the clutch basket and the clutch bearing. It is desirable everything in the original.


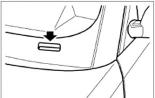
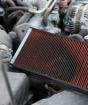
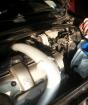
Disconnect the air flow sensor connector, air duct clamps and the latch of the air filter housing cover. Then we unscrew the bottom of the air filter housing.


We unscrew the cable cushion bolt, but do not take it out. Disconnect all connectors from the checkpoint. Then unscrew the upper fastening bolts.

We unscrew the hub nuts and fastening the ball support to the lever to remove the drive shafts. We preliminarily drain the oil from the checkpoint.

We unscrew the front axle cushion and pull out the drive shafts from the box for the convenience of dismantling the gearbox.


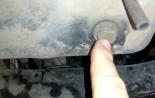
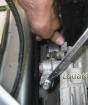
We establish the stop stands on the checkpoint and the engine so that it does not resist and slightly lift the gearbox to remove the top bolt of the CAT fastening, which we died in advance from above. As can be seen in the photo, from the left oil seal of the drive "zaglivily" the oil, because of which this cavity was painted in black. When installing, we will replace it with a new one to eliminate oil leakage. After you unscrew the cppon fastening bolts in a circle and pull the batter from the motor, it sits tightly on guide bushings. And here is the gearbox on the floor.


We remove the old grip from the flywheel and check the flywheel itself for wear. Wear should not exceed 03 - 05 mm and its surface must be smooth and smooth. As a rule, the flywheel fails very rarely.

We establish a new clutch on the flywheel and center the clutch disc. We change the release bearing to the new one. And install the PPC. The assembly procedure is exactly in the reverse order.
After assembly, an initialization (adaptation) of the clutch is carried out.
Toyota Corolla's clutch initialization and Toyota Auris.
Before you start independent clutch initialization, remember - if you cannot correctly hold initialization, P steering will stop turning on And to transport the car to the service will have to cause a tow truck.
In place SST, you can use a simple wire, connect the specified contacts to them.
1. Prepare a car (A "):
1. Stop the car.
2. Translate the gear lever to N.
3. Turn off the ignition.
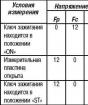
2. Using SST, connect the contacts TS and CG connector DLC3.
3. Wait at least 10 s.
4. Turn on the ignition (IG).
5. At least 7 times within 3 s press brake pedal.
The buzzer emits 2 sound signals with an interval of 0.25 s.
6. Press the brake pedal.
7. Hold down the brake pedal, shift the shift lever in the following sequence.
1. When initializing the ECU: N\u003e E\u003e M\u003e -\u003e M\u003e -\u003e M\u003e -\u003e M\u003e -\u003e E\u003e N.
2. When initializing the clutch: N\u003e E\u003e M\u003e +\u003e M\u003e -\u003e M\u003e +\u003e M\u003e -\u003e E\u003e N.
3. When initializing the transmission: N\u003e E\u003e M\u003e -\u003e M\u003e -\u003e M\u003e +\u003e M\u003e +\u003e E\u003e N.
8. Release the brake pedal.
9. Press the brake pedal again.
The buzzer emit sound signals with an interval of 0.5 s indicated below the number of times (the interval between the cycles is 2.5 s).
1. Double when initializing the ECU (1 cycle)
2. Three times when initializing the clutch (1 cycle)
3. Four times when initializing the transmission (1 cycle)
Note:
1. If the buzzer does not make up sound signals, as described above, turn off the ignition and wait at least 15 s. Then repeat the steps starting from step (a ").
2. If the sound signals of the buzzer are published with a 1 second interval (and not 0.5 s), turn off the ignition and wait at least 15 s. Then repeat the steps starting from step (a ").
10. Not less than 3 times within 2 s Press the brake pedal.
The buzzer will publish 2 sound signals with an interval of 0.25 s.
11. Turn off the ignition and wait at least 10 seconds.
12. Initialization is completed.
13. Disconnect SST from TS and CG connector DLC3 connector.
Replacing the clutch on Toyota Corolla with robotic shifting. Everyone has a lot of heard that the robot on Toyota is very capricious and it is worthwhile to bypass him, so I want to say that everything is wrong. Robots on Toyota Corolla and Auris are pretty strong. Regarding their fellow, Honda, Mitsubishi, Opel and Peugeot. The first models of S. robotic boxes They walked with small defects, but Toyota corrected the position upgrading no refinement in serial production. And the review of the models of old issues, with a replacement for new model It was performed completely free.
Now consider what advantages in robotic. Everything was thinking in order to unload the driver from the obligation to switch the transfer. Especially it is very boring in traffic jams and maintain the inherent inhabitants and fuel consumption of the mechanics, and they succeeded. The only minus in it is smooth delays in gear shifts. The difference in consumption is about 2 liters per hundred kilometers of run.
The frequency of clutch replacement on the robot depends on the intensity of the ride. It is about 70 to 120 thousand km. Mileage
To replace the clutch we will need Clutch set, this disc with a clutch basket and clutch outlet bearing. It is very desirable everything in the original.

Disconnect the air flow sensor connector, air duct clamps and the latch of the air filter housing cover. Then we unscrew the bottom of the air filter housing.

We unscrew the cushion cushion bolt but do not take it out. Disconnect all connectors from the checkpoint. By that, unscrew the upper fastening bolts.

We unscrew the hub nuts and fastening the ball support to the lever to remove the drive shafts. We pre-drain from the checkpoint.

We unscrew the front axle cushion and pull out the drive shafts from the box for the convenience of dismantling the gearbox.

We set the stop stands on the gearbox and the engine so that it does not allow and slightly lift the gearbox to remove the upper bolt of the gearbox that we have previously unscrewed. As can be seen in the photo from the left peel of the drive, the oil suggested from why this cavity is black. When installing it, we will replace it with a new way to eliminate oil leakage. Following, unscrew the cppon fastening bolts in a circle and pull out the mounting box from the motor. It is tightly sits on the guide bushings. And here is the gearbox on the floor.

We remove the old grip from the flywheel and check the flywheel on wear itself should not exceed 03 - 05 mm. And its surface must be smooth and smooth. As a rule, the flywheel fails very rarely.

We establish a new clutch on the flywheel and center the clutch disc. We change the release bearing to the new one. And install the PPC. The assembly procedure is exactly in the reverse order.
After assembly, an initialization (adaptation) of the clutch is carried out.
Toyota Corolla's clutch initialization and Toyota Auris.
Before you start an independent clutch initialization, remember if you cannot correctly hold initialization. The transmissions will stop turning on and to transport the car to the service will have to cause a tow truck.
1.
Prepare (a "):
- Stop the car.
- Translate the gear lever to N.
- Turn off the ignition.
2.
Using SST, connect the contacts TS and CG connector DLC3.
3.
Wait at least 10 s.
4.
Turn on the ignition (IG).
5.
At least 7 times within 3 s Press Pedal.
- The buzzer emits 2 sound signals with an interval of 0.25 s.
6.
Press the brake pedal.
7.
Hold down the brake pedal, shift the shift lever in the next sequence.
- When initializing the ECU: N\u003e E\u003e M\u003e -\u003e M\u003e -\u003e M\u003e -\u003e M\u003e -\u003e E\u003e N.
- When initializing the clutch: N\u003e E\u003e M\u003e +\u003e M\u003e -\u003e M\u003e +\u003e M\u003e -\u003e E\u003e N.
- when initializing the transmission: N\u003e E\u003e M\u003e -\u003e M\u003e -\u003e M\u003e +\u003e M\u003e +\u003e E\u003e N.
8.
Release the brake pedal.
9.
Press brake pedal again.
- the buzzer will publish sound signals with an interval of 0.5 s indicated below the number of times (the interval between the cycles is 2.5 s).
- twice when initializing ECU (1 cycle)
- three times when initializing the clutch (1 cycle)
- four times when initializing the transmission (1 cycle)
Note:
- If the buzzer does not make out sound signals, as described above, turn off the ignition and wait at least 15 s. Then repeat the steps starting from step (a ").
- If the buzzer sound signals are published with an interval of 1 s (and not 0.5 s), turn off the ignition and wait at least 15 s. Then repeat the steps starting from step (a ").
10.
At least 3 times within 2 seconds Press Brake Pedal.
- The buzzer will publish 2 sound signals with an interval of 0.25 s.
11.
Turn off the ignition and wait at least 10 seconds.
12.
Initialization is completed.
13.
Disconnect the SST from the contacts of TS and CG connector DLC3.
Mark. Toyota Corolla - Reliable and hardy, serious repair will require rarely, especially if you are a responsible driver, in time react to changes in performance characteristics vehicle And prefer to diagnose, and not eliminate the consequences.
But by a good driver you would be, there is a natural wear of the elements of systems and mechanisms of any car, so it will not be completely repaired.
Regarding the clutch of Toyota Corolla, then such a restoration will be needed approximately once at 90,000-100,000 km. Here are the factors that you have to alert:
- uncharacteristic, previously missing creak;
- crispy sounds;
- increased noise;
- well-felt slippery;
- the appearance of a grinding when switching speed;
- strong vibration during gear shift;
- jerking with active drive;
- tsp and failure of the pedal.
It should be emphasized that such manifestations can be avoided by taking preventive measures, then the problem will not find you surprise, but completely repairing the clutch toyota will not be able to avoid, because anything is not invented.
The presence of several of the listed features is an exact indication that the clutch is needed in the car. Replacing the clutch can be carried out by masters of the car service, but it is not so difficult to do it yourself.
What is most susceptible to breakdowns
In the clutch system, Corolla You may face a malfunction:
- bearing;
- cylinder;
- forks;
- baskets;
The gentle driving mode can significantly prolong the life of these parts.
Replacing the device
With long-term operation, the mechanical wear of some system elements occurs. Most often, overheating, violations in the system are serious, threatening unforeseen consequences. Usually such a manifestation is a slip, which can be overtaken both on a sharp start and when driving at high speed. Confirmation of your fears may be a R0810 error in diagnostics.
Eliminate such a malfunction is possible only in one way: you need a replacement of a complete set of clutch, i.e. Bearings, baskets and disks.
Manual box - manual transmission

Robotic box
It may occur as a breakdown electrical system Transmissions and a mechanical malfunction in the robot.
The breakage of the electrical part may be due to several reasons:
- the occurrence of the error in the Toyota Corolla settings;
- there was a violation during the initialization of the transmission.
Such a fault is manifested in the form of a strong jerking of Toyota Corolla at the start. Similar manipulations occur upon exit to the neutral position. The scoreboard displays the error code and it helps to accurately make sure of the diagnosis, comparing codes and symptoms.
After a period of time, the system begins to work correctly. If the error in control (it is under the code Р0810), then the breakdown and electronic, and mechanical one is likely.
The P0900 code indicates the cliff of the motor chain or its breakdown.
In Toyota, Corolla "Robot" Replacing the clutch can be carried out independently, if you adhere to such a plan:
- Buy the original set consisting of a clutch disk, basket, frost bearing.
- Disconnect the separation of the air flow sensor, unplug the clamp from the duct and the latch from the air purification filter, after removing the bottom of the filter.
- Unscrew the screw on which the gearbox is attached and release the connectors, but the bolt itself do not completely pull out.
- Split bolts at the top.
- Drain the oil from the Toyota Corolla gearbox, after unscrewing the wheel nuts and dismantling the ball. Track the shafts.
- The queue behind the front cushion under the checkpoint, then remove the drive shafts out of the box.
- With the installation of stubborn racks on the motor and the box, you can take the previously unscrewed bolt with the checkpoint.
- Take the box mounting bolts, unscrew them only in a circle, then pull the gearbox from the engine using the mount. Thus, the box can be dismantled.
- From the flywheel, remove the spoiled part, check the correctness of the work of the flywheel (whether it is completely smooth and without the opposition of its surface).
- Go to the clutch mount to the desired location, center the disk.
- Replace the bearing and mount the box on the same algorithm, but in reverse order.


Clutch initialization
The successful replacement of the clutch of Toyota Corolla depends not only on the mechanical side of the process, but also from initializing the replaced mechanism. Before you decide on this manipulation yourself, adequately appreciate your capabilities, the process is quite complex, and in the case of its unsuccessful outcome you will be forced to deliver the car to the service center using the tow truck.
Initialization algorithm:
- Turn off the ignition, lever in N.
- Connect the TC and CG connector DLC3.
- Hold 10 seconds and turn on the ignition.
- Quickly press the brake pedal (seven times in three seconds).
- After two beeps, press the brake and hold it, initializing the computer, grip and transmission, switching transmissions.
- Action Scheme:
- ECU: N\u003e E\u003e M\u003e -\u003e M\u003e -\u003e M\u003e -\u003e M\u003e -\u003e E\u003e N.
- Clutch: N\u003e E\u003e M\u003e +\u003e M\u003e -\u003e M\u003e +\u003e M\u003e -\u003e E\u003e N.
- Transmission: N\u003e E\u003e M\u003e -\u003e M\u003e -\u003e M\u003e +\u003e M\u003e +\u003e E\u003e N.
- Move the brake and leaving once again. If you heard a double, triple and four-time beep with an interval of 2.5 seconds, you have successfully initialized the mechanism. If this did not happen, hurry to call the tow truck and send Toyota Corolla to the car service.
The clutch system Toyota Corolla robot is largely reminiscent of the grip for "mechanics, that is, also has a clutch disc, a pressure disk. Release bearing. The difference consists in the presence of an electric motor, a hydraulic actuator with the built-in main cylinder of clutch.
Buy a set change the clutch assembly on Corolla in our service operational. IN average price replacement on the robot is about 8000 rubles, including adaptation.
Procedure of work when replacing the clutch Toyota Corolla Robot 2007 2008
1. Remove the air sensor, remove air filter Together with air ducts.
2. Access two front wheels.
3. Access their ball supports, draining the pre-oil from the box.
4. Accept the PPC Pillow.
5. Move the drive shafts of the PPC.
6. Unscrew the cppon fastening bolts.
7. Tighten the box from the engine.
8.Clove with flywheel clutch basket.
When installing a new clutch (basket and disk), the pre-this assembled node must be centered using a special device. Before installing, it is desirable to replace the release bearing. His resource is about the same with the clutch and if it looks outwardly normally, all the same, its resource is almost exhausted. And his separate replacement will require labor-intensive and expensive work described above.
A feature of the clutch replacement Toyota Corolla Robot 2007 2008 is that clutch initialization is needed after repair. And for this you need special equipment. Therefore, you need to contact a hundred.
Replacing the clutch Toyota Corolla Robot on car services on average costs 6000-6500 rub. Plus initialization - 500 rubles.
Prices for the main clutch nodes Toyota Corolla Robot
Clutch disc:
· Original (Toyota) - 10,000 - 11000
· not original:
For quality repairs:
- Exedy-rub.
For budget repairs:
- Asam-rub.
- Fenox-rub.
Clutch basket:
· Original (Toyota) - 6500-10000 rubles.
· not original:
For high-quality repair basket and disk on replace Toyota Corolla Robot 2007 2008 can be bought:
- Exedy price - 10,000-12000 rubles;
- LUK - 17000-18000 rub.;
- SACHS - 17000-18000 rub.
For budget repairs:
- AISIN - 7500-8000 rub.
Purpose bearing:
· Original (Toyota) - 6000-7000 rubles.
· not original:
For high-quality repair, replacement of the clutch set assembly Toyota Corolla Robot:
- Exedy - 10000-11000 rub.
- Jakoparts - 10000-11000 rubles.
- LUK - 12000-13000 rubles;
- SACHS - 30000 rubles;
For budget repairs:
- Aisin - 2500-4000 rubles.
You can also purchase a clutch kit, which includes the above elements:
· Original (Toyota) - 9500-11000 rub.
· not original:
For quality repairs:
- LUK - 17000-19000 rubles;
- Jakoparts - 15000-1600 rubles.
- SACHS - 18000-30000 rub.
For budget repairs:
- AISIN - 7000-8000 rub.
We can not only buy a disc and shopping cart on Toyota Corolla Robot and Mechanics, but also our craftsmen are replaced by the Corolla 150 clutch kit and others. Assembly. Change, remove the clutch for one day from the date of your call.
Replacing the clutch robot on Toyota Corolla is one of those procedures faced by car data owners. For the most part, this is due to the fact that japanese manufacturer flawed robotic clutch For its cars and therefore they are very capricious in operation and very often fail. As a rule, for them only 70,000 - 100,000 mileage on our roads and they begin to exit and gradually die.
Replacement on the service This part will cost you in a penny. Therefore, there is a proposal not to spend a lot of money on the service, but buy a robot clutch and make a replacement, so to speak, at home - to make all your own hands.
Most weak place In the Corolla, which always suffers is a clutch. And before talking about his replacement, it is worth talking about how to extend his life. The first and most important that you have to do is try to switch to a neutral when you stand for a long time on traffic lights or traffic. In addition to the clutch this type It is necessary every 60,000 kilometers of mileage to change the oil, and not as it is provided for by the technical passport of the car. The fulfillment of such actions will help extend the youth of this technical node. However, all this is not for long, a maximum of 150 thousand runs. After that, humus and malfunctions will be gradually emerging, it is possible to eliminate them only to the replacement of the robot.
Phased replacement of the clutch robot on Toyota Corolla
If your clutch has already failed, you should not hurry to a hundred, it can be replaced by your own hands, while maintaining a lot of money. To replace it, we need a garage with a pit, skillful hands and a complete clutch set. This includes:
- Clutch Final Bearing;
- Disk with clutch basket.
Before buying the last set, you need to make sure that the box is original. You can do this by requesting the relevant documentation from the seller of this node.
So, when we have all this, you can proceed to phased replacement Clutch robot. At the first stage, we need to disconnect the air flow sensor, all the bodies of the air ducts, remove the air filter. We pay attention to the photo, so as not to get confused.

After that, we need to unscrew, but do not pull the bolt fastening of the transmission cushion, it is necessary to disconnect all the connectors from the checkpoint, and then unscrew all the fastening bolts. Again, watch the photo.


After completing all these actions, you can go to the disassembly of the ball. First of all, we will unscrew the hub nuts and all the fastenings of the ball support, which go to the lever, this will allow us to remove the drive shafts. IMPORTANT: Pre-drain oil from the box!


Having done all this, go to unscrewing the front cushion of the gearbox, after which it is processed to pull out the drive shafts from the box - it will provide convenience to remove the checkpoint.


After the drive shafts were taken out, we need to raise the box so that the upper bolt of fastening the checkpoint with ease is pulled out. We take it out - who did not understand this bolt, which we unscrewed, but did not pull out at the very beginning. It is important to pay attention to the gland if there is an oil around it, when installing the design, we will have to replace it, to eliminate oil leakage.
Pulling out the bolt, unscrew all the bolts of fastening the box and slightly pull it away from power aggregate. The process of removing the box is completed.


After removing the box, we begin to remove the grip from the flywheel. We check it on wear, its wear should not exceed 0.5 mm, and the surface must be smooth and most importantly smooth.

After checking the flywheel, start installing a new clutch and be sure to center the clutch disc, after which we change the bearing. On this process of replacing the clutch robot on Toyota King is completed. You can install everything in place. We do it just as disassembled, only in reverse order.


Initialization
After everything is installed in place and the car is actually ready for leaving the garage, we need to produce the clutch initialization process - this is necessary for the transmissions to switch correctly and did not spoil new parts. This process is quite complicated, so it is best to contact a specialist who will quickly make a configuration with knowledge. By initialization, the car is completely ready for the trip.
It is very important here to know that this procedure needs to be performed every 20,000 kilometers. Performing the procedure, you extend the life to your clutch and let him perform its work.