Repair of the carburetor do it yourself from A to Z. Carburetor Repair: Possible Difficulties Basic Carburetor Malfunctions
Stopped pulling the car or badly start? And do you think that the moment of repair of the carburetor VAZ 2107? Then I recommend to get acquainted with this article, here you will find useful information repair, removal, installation and bulkhead carburetor VAZ 2107.

The carburetor scheme on the VAZ 2107: 1-lead lever of the drive of the second chamber; 2-Regulatory screw of the amount of the mixture idle move: 3 - the heating unit of the carburetor; 4 - motor crankcase ventilation; 5 - acceleration pump drive lever; 6 -Electromagnetic shut-off valve; 7 - air damper lever; 8 - carburetor cover; 9 - bolt fixing the liquid chamber; 10 - body of the liquid chamber; 11 - the carburetor body; 12 - the throttle valve of the second chamber; 13 - Sector of throttle control lever: 14 - Tags for proper Installation Bimetallic trigger spring
Relative values \u200b\u200bof fuel jets for carburetors "Solex"
Ratio | Diametersdiffuser |
||||
| 23,0 | 24,0 | ||||
| Economical | 95.0 | 102,0 | 107,0 | ||
| Economically power | 98 5 | 105,8 | 111,0 | ||
| Moderate power | 102,3 | 109,8 | 115,2 | ||
| Power normal | 106,4 | 114,2 | 119,8 | ||
| Power dynamic | 110,8 | 119,0 | 124,8 | ||
| Sport | 115,7 | 124,2 | 130,3 | ||
| Factory values | 95,0 | 102,0 | 107,0 | ||
| Air Number of Diffuser | 1428,0 | 1498,0 | |||
Step 1. Removing the carburetor from the car VAZ 2107
If you need to replace the carburetor on the VAZ 2107 or the repair of the carburetor with your own hands, first, it is necessary to remove the carburetor from the car VAZ 2107, because much more convenient will perform the carburetor.
Therefore, we turn to the removal of the carburetor:
1.1. Remove the air filter housing, disconnect the tubes of the crankcase gas recirculation system, unscrew the drive of the starting device and the fuel line, disconnect the gas drive, the return spring and the vacuum fibergiation tube. Disconnect the power supply of the solenoid valve and the EPHX system connectors (if it is installed on carburetor VAZ 2107).


1.2. Disconnect the telescopic trigger of the starting system, we unscrew the top part of the carburetor body and remove from the car.


1.3. We unscrew the 4 carb fastening nuts and remove the lower and middle part from the car.

1.4. After removing the carburetor, remove the collector's gasket and close the collector with a cardboard (or other material), thereby protecting the intake manifold, from foreign items.
The process of installing a new carburetor occurs in the reverse order of removal.
Important: Do not stretch the bolts too much, the approximate force is (6.6-15.4 n m). Also, if possible, change all gaskets on the carburetor to new, because from the effects of gasoline and others negative factors They quickly come into disrepair, and you yourself do not know about the quality of Russian spare parts. Although if the gasket under the carburetor 2107 is still in order, you can leave, but it is better to change all the gaskets on the carburetor 2107.
Step 2. Disassembly of the carburetor VAZ 2107
2.1. We disassemble the top of the carburetor, remove the starting diaphragm of its thrust and the case, remove the float and the needle valve, unscrew the filter plug and remove it.
2.2. The disassembly of the middle and lower part of the carburetor can be started with the removal of the vacuum drive of the second chamber, then remove the jets of the main and auxiliary systems and emulsion tubes, remove the accelerator pump diaphragm (be careful not to lose the springs), remove the nozzle of the accelerator pump and small diffusers.
Important: If you have little experience in the repair of carburetors on the VAZ 2107, then I recommend to record the digital designations of the jets and the location of their installation.
2.3. Disconnect the throttle valves and the middle part, be careful not to lose the starting traction and the spring when disassembling this node!
2.4. We remove the node of the amount of idle ("bullet") and unscrew the quality screw. On this parsing, it is also over when disassembling, the carburetor gaskets of the VAZ 2107 and rubber screws and connections are deleted.
Here is a great video from Naila Poroshin about full, disassembly and assembly of the ozone carburetor 2107-1107010:
Step 3. Cleaning the carburetor VAZ 2107
3.1. Small details and jets, emulsion tubes, nozzle, quality screws, put in a jar with acetone for 15-20 minutes, then we get them with tweezers and clean the toothpicks (remove the nagar from the air jaws of the main system), blow with compressed air.
Washed parts lay out on a clean surface, preferably light cotton fabric.
3.2. Details of the case of the carburetor, the caps of the diaphragms and sprayers, put in a container with a solvent or gasoline for 15-20 minutes, then we rinse with a brush and blow with compressed air, then also put in the clean container.
3.3. Fasteners and hardware are placed in a specially prepared container and we also rinse, drain the solvent, then we leave it to the tank before the assembly.
3.4. The 2nd camera vacuum drive mechanism is tested for tightness and do not disassemble, it is enough to wash it in gasoline and wipe it with a rag.
Useful video for cleaning the carburetor from dirt and nagar:
Step 4. "Punching" of the carburetor
This operation is designed to control the presence of casual channels of the main and auxiliary carburetor systems. Punching 10-20 cubic syringe filled with gasoline. In the channel, for example, the idling is fed by gasoline under pressure from the syringe and after the expiration of gasoline from the channel output, we can judge its throughput and purity. In order to understand how the VAZ 2107 carburetor is happening, it is necessary to get acquainted in detail with the device of this carburetor in specialized literature.
Step 5. How to assemble the carburetor VAZ 2107
5.1. I recommend the carburetor assembly to start from the middle part from the installation of emulsion tubes and fuel and air jaws, nozzles and small diffusers. You can connect all the elements of the carburetor you can without any problems looking at the video that you will find a little lower.
5.2. The bottom part is joined to the partially assembled middle part. throttle valves. Do not forget to install starting and spring, between the bottom and middle part, the thrust is installed immediately before connecting these parts.
5.3. After connecting the lower and upper parts, we set the accelerator diaphragm and the vacuum drive of the second chamber, the quality screws and the amount of the mixture.
5.4. The top is starting to collect with the installation of the cardboard gasket, then screw the needle valve and install the float, put the filter, spin, plug the filter.
5.5. We collect the node of the starting aperture and install it, without forgetting to put the starting craving and the rubber seal between the case and the part, we hang telescopic traction.
5.6. All the seals of the diaphragm and gaskets change to new, with the exception of the vacuum drive of the second chamber (if it is working).
Step 6. Checking the carburetor launcher
6.1. Checking the starting system is carried out on the removed the assembled carburetor (the screws of the upper cover can be not tightened, to hold their hands). We assign the starting mechanism manually and check the width of the slice on which the first chamber is opens, the distance should be 0.8 mm, this clearance is regulated by the starting line, bending or straightening it, we can achieve changes in this gap. Next, simulate the work of the starting aperture and we take it manually to the extreme position, while the launcher (the upper part of the carburetor) must open the slot, approximately 5 mm.
6.2. Check the level of fuel and tightness of the needle valve, accelerator pump.
6.2.1. We set the assembled middle and lower part of the carburetor on the car (without attracting), we put the upper part (without attracting), connect the fuel line and pour gasoline with a fuel pump. Fill in the float chamber and remove the upper part and control the fuel level if the fuel level is higher or lower, then give it to normal. We present a throttle damper in motion and check the operation of the accelerator nozzle and the tightness of the fuel pump, if necessary, eliminate leaks.
Step 7. Installation of the carburetor on the VAZ 2107
7.1. The installation of the carburetor on the VAZ 2107 is also starting with the setting of the middle and lower part to the new collector gasket, then attract the carburetor to the collector, install the recycling tubes and the vacuum fibergiation actuator (EPHX system), the throttle and return spring drive.
7.2. We establish the top of the carburetor, connect the telescopic thrust, fuel line and the starting device.
Step 8. Start and adjustment of the carburetor

8.1. Before starting and adjusting, it is required to be 100% confident in the health of the ignition system and the correct adjustment of the ignition advance angle!
8.2. Include the mechanism of launching the carburetor (the screw of the amount of the mixture in the middle position, the quality screw is unscrewed by 3 turns).
8.3. As it warm up, you beat off the starting device damper to the maximum value. The heated engine should work steadily at 850-900 revolutions per minute.
8.4. VAZ 2107 carburetor adjustment by screwing the number of idle speed, if the revolutions are not even, then add quality screw to an idle stroke alignment, if the speed is smooth initially, then try to reduce the quality of the mixture, achieving easy non-uniformity of work, then equalize the revolutions. The carburetor must succumb to configuration if this does not occur, drill the cap in the middle part and make additional adjustment by the second quality screw.
8.5. For accurate tuning, we use the CJ gas analyzer, a serviceable carburetor value from idling, ranges from 1% to 2.5%.
Photo Instructions for repairing the carburetor on the VAZ 2107
Checking the needle valve for performance
In this photo, the instructions are shown the process of removing and checking the needle valve, I recommend to follow it to check the valve valve without any problems.


How to disassemble and check the parts of the carburetor cover for faults
If you need to check the parts of the carb, this photo instruction for you!


How to repair the pneumatic drive throttle on the carburetor VAZ 2107
Did you break the throttle pneumatic damper on the carburetor? Then this instruction is for you!


Repair of the case and the process of disassembling the carburetor on the VAZ
It is time to carry out the corps? Then I recommend to follow the instructions below and you will not have problems with the repair of the carburetor body.


One of the most common models of production "AvtoVAZ" can be considered "eight" or its modification - "nine". Car owners VAZ 2108/2109 in practice were convinced of the performance of their vehicles and their unpretentiousness in service. In order to prevent all problems in the work on time, you need to carefully monitor her technical condition. One of the main tasks of the driver is considered to control the operation of the carburetor device on the vase. Almost all types of repair and adjustment of the car owner can perform with their own hands, as the design of the carburetor has a simple device.
Models of carburetors on VAZ 2108/2109
Carburetor mechanisms of the Solex series are produced at Dimitrovgrad Auto Agregate Plant. Designs are meant on the configuration of the front-wheel drive vehicles of the VAZ, in which the motor unit is located transversely body.
The standard model for equipping the VAZ 2108/2109 is considered the DAAZ carburetor 2108-1107-10. It works in a pair with a motor, which has a volume of 1.3 liters. Motors 1.5 liters are installed carburetors 21083-1107010.
DAAZ carburetor is used to equip all cars in the eighth and ninth model
Modern equipment of VAZ 2108/2109 is provided by carburetors of more advanced models, as they have a starting device in automatic mode:
modification 21083-1107010-31 has one step automatic control and start in the specified mode;
modification 21083-1107010-35 is already equipped with two levels of air damper management, which provides more stable work force aggregate;
modification 21083-1107010-62 is similar previous version The carburetor mechanism, but has an addition in the form of an electrical system for mixing the fuel and air mixture.
Design "Sallas"
The carburetor mechanism of all modifications on the VAZ 2108/2109 is emulsion and consists of two cameras internal combustion. In the upper part of the carburetor there is a lid that prevents the dirt fall into the cavity of the device, and fuel lines are bodied to them. The middle part is the housing itself, which is mounted diffusers and cameras. At the bottom of the carburetor there are a float chamber and throttle valves.
Key elements of the system are considered:
accelerator pump;
float;
throttle thrust;
economyer forced idling;
main dosing system;
launcher;
ecoostat;
the system of idling car.
The principle of operation of the carburetor "Solex" is reduced to the fact that gasoline is served through the intake valve in the fitting. Fuel is sent immediately to the float chamber. The fuel level in the cavity should always be on a certain mark to avoid failures and jerks in the operation of the motor. Level control is carried out by the movements of the needle valve mechanism.
After the chamber, gasoline is sent to emulsion wells, where it is served in strictly limited quantity Through fuel jets. It is in the wells that air flows split large drops of gasoline, forming a single fuel and air mixture with it.
If you are interested in repairing a fuel pump in VAZ 2108/2109 cars, it is recommended to study the following material in detail:
The mixture is supplied to diffusers, and through them - into the device of the power unit. Thus, the main task of the carburetor is to form a fuel-air mixture in the desired consistency and to direct it into the engine.
Interaction of multiple elements provides uninterrupted operation of the motor
Carburetor repair VAZ 2108/2109
On VAZ 2108 and 2109 you can buy everything required spare parts for independent carburetor repair
Without the need, it is impossible to dismantle the flaps (both on the air and choke), since they are quite difficult to set back, which invariably leads to incorrect engine operation.
Instructions for repair "Solex" DAAZ 2108-1107-10
A solenoid valve mechanism is neatly twisted from the device housing, from which you can immediately pull out and the jets inserted into it.
The jetwork is washed in tanks with acetone and is purged with compressed air from a canister or pump.
After that, unscrew the five screws that hold the carburetor cover. The cover is removed strictly vertically a slow motion, so as not to pull the float from the chamber.
The float is dismantled with its axis by pressing the sewn on the axial line lock. The device after that is easily removed.
The gasket is mandatory removed from the lower part of the carburetor and is examined for damage and deformations. If there are reverent places or breaks, it will be necessary to change the sealing element.
The fuel valve is turned away by the fuel valve. It is recommended to check it on immediately for performance. If when you click on the starting device, the needle goes easily and smoothly, does not have a backlash, then the valve can not be changed.
Next, check the starting device. You will need to unscrew the four screws that the device itself is fixed to the lid, and remove the diaphragm from it. This product must maintain the properties of elasticity and have no damage and deformations. The refund spring should be elastic.
The fuel filter is unscrewed from the socket and is placed in a container with acetone. After washing it is recommended to blow it and immediately screw it back.
Pump sprayers are best removed with scolded. It is necessary to pose them and pull out from the carburetor. For some time, the elements are placed in acetone, after which they are blocked. It is recommended to immediately replace the rubber gaskets of sprayers.
Next, you can see the inspection of the accelerator itself. You will need to unscrew the four locking screws, pull out the device and inspect it with a diaphragm and spring. It is best to rinse the details of the pump, in the event of a strong wear of the details - to replace.
Similarly, the recovery and repair of the economizer is made.
After that, you can unscrew the jets. If the holes in them have increased, it is better to immediately install new jets.
Flipping by carburetor fastenings
Step by step fulfilling all these actions, you can qualitatively disassemble and repair the carburetor.
Video: Repair of the carburetor on the VAZ 2108 and 2109 do it yourself
Diagnostics of carburetor
The fact that there are faults in the work of the carburetor, characteristic features can be testified:
from the moment of pressing the gas pedal until the car is accelerated, there is a temporary failure;
rods in the work of the power unit at high speeds;
truck series when moving along a flat surface;
a noticeable reduction in vehicle speed characteristics;
fuel consumption increased markedly;
the engine is badly started "on the cold";
motor instability on idling.
Each of these signs, as well as their combination, suggests that problems have arisen in the carburetor and it needs repair or adjustment.
If there are fuel flux, you need to stretch the connections. It is possible that it is weakening that the compound was the reason for the incorrect work of the carburetor
What to do if the motor does not start or immediately after the launch
The likely cause of such a malfunction is to lower the fuel level (or its absence) in the float capacity. In addition, if the motor does not start, it is necessary to immediately inspect podcast space On the subject of gasoline waste - it is quite possible that fuel does not fall into the carburetor. If this is not the case, it is necessary to wash the float chamber and set the float in the even position relative to its axis.
Unstable motor work at idle
After the motor was headed or stopped after a long ride, there may be failed failures in its work. There may be several reasons for such behavior:
holes of the jackets were very clogged;
there was a failure in the work of the economizer;
damage to the quality screw laying.
Anyway, but you have to remove the carburetor, disassemble it and thoroughly rinse all the details. Sealing gaskets are recommended to be replaced even with a small wear.
Difficulties when starting in winter
Most VAZ2108 / 2109 car owners experience problems when starting the power unit under reduced temperatures. Difficulties can be provoked by the incorrect operation of the starting device. The air damper is closed too quickly, therefore the amount of air that enters the emulsion channel may not be enough to prepare the fuel and air mixture. It will be necessary to adjust the operation of the starting mechanism with your own hands.
The engine is filled
Due to the excessive dosage, the float chamber may not withstand loads and supply an excessive amount of fuel into the system. This leads to the fact that the engine is filled with gasoline and cannot correctly perform its functions. It is necessary to check the performance fuel valve And his tightness.
Sharp jums when moving - what to do
If a vehicle In the process of driving, suddenly harsh jerks or shocks, then the cause of the problem lies in the fuel supply system. The motor simply does not receive the volume of the fuel and air mixture. It is possible that the valve mechanisms were unloaded or filters were very clogged.
How to remove a carburetor knot with VAZ 2108/2109
Dismantling the carburetor is necessary in almost all cases repair work. It is recommended to remove the device on the cooled engine, as all work is carried out in the immediate vicinity of the intake manifold and its pipes, which can be easily burning.
Video: Dismantling of the carburetor on Vaz do it yourself
To facilitate work, it is best to immediately unscrew the screws of the air filter fastening screws, as it will interfere with the dismantling and prevent direct access:
- After that, you will need to disconnect two drives from the carburetor housing (one goes to the air damper, the other is on the throttle). In addition, it is immediately recommended to disconnect the back of the return spring and its retainer.
- Next, a wire is turned off from the economisezer screw of the forced idling.
- After weakening the clamps, it will be necessary to remove the fuel supply nozzle and the hose that works "on the return".
- The screw fastening of the heating unit is unscrewed, the block is removed.
- From the fitting at the top of the carburetor, the ventilation hose and vacuum hose is disconnected.
- After disconnecting all highways, dismantling the carburetor node itself is allowed. To do this, you will need to unscrew four nuts that fasten the carburetor with stiletts to the intake collector. The device is pulled out with the gasket.
How to rinse the carburetor knot without his disassembly
The traditional method of flushing carburators is considered to be its complete disassembly into separate components, which is not always able to perform the inexperienced Vase owner. To simplify the procedure, a technique washed and cleaning the carburetor without its disassembly to the components. The basis of this technique is the use of special aerosols in the canopy. The most affordable carburetors cleaners are considered to be the ABRO and Mannol production aerosols - they can be bought in any automata at a cost of 100-150 rubles.
These cleansers are perfectly coping with cleaning carburetor mechanisms, besides, it is very simple to use them. To wash the carburetor "Solex", it is recommended to drown out the motor, give it to cool and proceed to the procedure:
Remove the air filter box by car, remove it to the side.
From the carburetor housing, unscrew the solenoid valve.
On the spray with an aerosol, wear a special narrow nozzle and treat the liquid canals of the jets, the first and second chamber, dampers and all visible elements of the carburetor.
After that spray the aerosol on the external parts of the mechanism.
If the carburetor did not have time for one procedure, it is possible to handle it again with the same aerosol.
After such a cleaning VAZ 2108/2109 significantly increase its dynamic characteristicsSince dirt sticking will not prevent the normal operation of all parts of the carburetor.
Video: How to clean the carburetor on Vaz with your own hands and without removing it from the car
How to Replace Carburetor Details
Replacing the float, accelerator pump diaphragm, seals do not represent special difficulties. Most often, during repair, remklects selected by type of carburetor are used, which include everything you need to replace items.
The procedure for replacing is not regulated: it is enough to remove the damaged part and install a new one in its place. Chief Criteria: Identity of elements when replacing.
How to adjust "Solex" DAAZ 2108-1107-10
The process of setting up and adjusting the efficiency of the carburetor mechanism is advisable to start with a float compartment. This is due to the fact that there is a fuel, the level of which should be strictly fixed. If the gasoline level is lower or higher than the norm, then the adjustment of other components becomes meaningless.
Float adjustment
The procedure for performing adjustment includes several stages:
First, start the motor and give it to work for 3 minutes, after which itching.
Remove the box of the air filter and remove it aside, as it prevents free access to the carburetor.
From the "Salex" housing, the first thing is to disconnect the nozzle through which gasoline is supplied.
Unscrew the five screws on the lid to the flat scolding to remove it.
Measure the distance from the edge of the float chamber to the fuel level. It should be equal to 25.5 mm. In case there are differences, it will be necessary to set the desired parameter by selecting the bracket of the float.
And it will also be necessary to set the axis of the float in such a way that it can move freely.
Adjusting the float chamber and the float on this is considered completed.
Adjusting the launch device
Adjust the carburetor on the VAZ 2108 and 2109, as well as to repair it, you can and with your own hands. This work must be performed on the carburetor, which was removed from the motor and installed on a flat surface. If the diaphragm of the starting mechanism was damaged, then it is necessary to initially replace it and only then proceed to adjusting work:
Turn the air damper adjustment lever and close it completely.
Lower the rod of the launcher with the blade of dumping and keep in such a position.
Measure the width of the gap between the damper and the chamber wall. The existing indicator should be 1 mm. If it is not, then the adjustment will be required.
It will be necessary to weaken the lock nut, which is placed on the surface of the accelerator pump and pass the scroll of the quality screw. If you turn the screw in one direction, then the gap will increase, when turning to another - decrease.
Once again to measure the thickness of the gap.
By the same principle, the air damper is adjusted on the second chamber.
You can measure the width of the gap using a drill with a diameter of 1 mm
How to adjust idle
This procedure can be carried out only on the carburetor installed in the machine, after the engine warmed well. In this case, the air filter will no longer impede access, so it remains in its place under the hood:
Motor drowned.
Until the end to complete the quality screw of the fuel-air mixture, and then unscrew it no more than four turns.
Again to start the motor, pass on all the lighting devices, acoustics and stove to increase energy consumption.
Working the amount of quantity you need to set the number of revolutions of the working motor at 750-800 per minute.
Quality screw is set to the maximum idle rate - 900 rpm (in winter it is allowed to increase this parameter to 1000 rpm).
After that, it will be necessary to spin the quality screw back until the interruptions in the engine work do not feel. At this moment you need to stop and make back one turn.
The idling load on the VAZ 2108/2109 is necessary so that the car show a stable operation in the installed mode without high consumption of the fuel and air mixture.
To repair and replace the muffler in VAZ 2108/2109 cars will help this material:
Tuning carburetor
Not all car owners VAZ 2108/2109 know that the carburetor has been improving with their own hands. Tuning will allow not only to increase the resource of the power unit, but also increase the speed characteristics of the machine. To do this, it will be necessary to ensure a decrease in the resistance of the air flow, which is absorbed into the carburetor.
To carry out tuning, you need to remove the carburetor, clean it inside and outside to ensure the full work of all its components.
After that, it is necessary to extract all the jets and throttle valves from the case. The cavity of two internal combustion chambers must be increased using lathe. The larger the volume of the chamber, the less air resistance in them. And also simultaneously with the boring chambers, it is recommended to increase the cavity of the diffusers. Work on the machine is better to trust the specialist, as it is possible to avoid damage to the case.
In addition, you will need to pick up new jets, with larger diameter holes. It is recommended to install fuel and air jets with an increase in the opening by 0.05 mm. This is enough to increase the bandwidth of the parts of the carburetor.
In addition, a needle can be changed on the economizer device. It is best to make a replacement for a rubber product. A rubber needle withstands a longer high load mode and has an increased operation. Only such equipment will allow to get rid of the "hanging" of the motor harsh pressed on the gas pedal.
Increase in inland cavities minimizes air resistance
Assembling "Salex" in reverse order
Installing the carburetor mechanism on the intake manifold is possible after washing and repair, as well as some steps of adjustment. It is important to properly connect all fuel and other hoses so that there are no problems with the operation of the engine. Assembling the carburetor DAAZ 2108-1107-10 is carried out in the following order:
A gasket is superimposed on the installation site. It serves to reliably connect two units - carburetor and intake manifold.
After that, the carburetor itself is rolled on the studs and is fixed by four nuts.
After the node was carefully attached, the hoses are allowed. The first thing is connected vacuum and ventilation hoses.
On the one hand, the pipe is connected to the fuel supply, on the other - the reverse fuel supply hose.
The EPHH drive wire is connected to the corresponding screw.
At the end of the work, you can fasten two wires (air and throttle).
Strict connection sequence due to carburetor structural features
Upon completion of the installation of the carburetor, it is recommended to turn on the ignition and check the efficiency of the motor aggregate. In the event of oil or fuel floss in places of hoses, it is necessary to turn off the ignition and carefully check all connections.
All the works that the car owner performs to serve its car must wear awareness. There is no need to disassemble the carburetor and replacing its parts, if there are no obvious signs of faults. In addition, during self-adjustment, it is necessary to adhere to a clear regulation of actions. Both poor-quality repair and incorrect adjustment may seriously affect the performance of the carburetor.
Most of the VAZ-2107 carburetheluent power supply systems have been equipped with a carburetor supply system, although injector versions were produced for export. "Sevenki" with an injector on domestic market appeared only in last years production. Therefore, most of the VAZ-2107 with a carburetor nutrition system, which is already outdated.
But obsolete, does not mean bad, according to some criteria, the carburetor "bypasses" the injector. Positive qualities include the minimum amount of electronics, which affects the reliability of the power supply system, high maintainability, unpretentiousness to the quality of gasoline.
But in order to maintain the VAZ-2107 nutrition system in a working condition, some of its nodes require periodic maintenance. It concerns this primarily carburetor.
The VAZ-2107 uses the "Ozone" carburetor, in contrast, for example, from. The "ozone" carburetor is distinguished by a relatively simple design and unpretentiousness, which allows the service of the node by independently without resorting to the service station.
But we note that at the VAZ-2107 of various years of release, which were equipped with a carburetor system, used modifications of ozone, although the difference between them is insignificant and it boils down to the use of various auxiliary nodes on the device, but the overall design is the same.
Signs of problems with the carburetor
Dust, contamination and third-party particles that fall inside the carburetor with fuel and air are settled on the inner walls of the channels, which in the design of the node design, which leads to a violation of functioning. The design of the carburetor includes a number of nodes, the component elements of which are wearing and damaged, which affects its performance.
Symptoms indicating the carburetor malfunction:
- Hindered motor launch;
- Dropping speed dynamics;
- Jerks, dips at acceleration;
- Unstable idling;
- Unauthorized motor stop;
These signs and other engine systems are given (the same ignition system), but if the carburetor has not been serviced for a long time, then the cause of poor motor operation lies in this node.
Types of service
Maintenance of carburators "Ozone" is partial and complete. The first is washing the node without dismantling it from the engine. It is performed using special cleaning products, such as "Carb Cleaner". Use the tool according to the instructions and continue the operation of the car. But the effect of partial maintenance - short-lived and helps not always. Ultimately you will have to fully service.

Complete configuration of the "ozone" carburetors is reduced to the full disassembly of the node, cleaning channels, checking the performance of mounted nodes, defecting parts, assembling using spare parts and subsequent adjustment.
Tools and equipment for work
For serving works will be required:
- Set of standard keys;
- Screwdriver;
- Passatia;
- Winds;
- The carburetor flushing means ("Carb Cleaner" or analog);
Remkomplekt for carburetor. Various types of repair kits are produced, one of which includes only gaskets, while others are all parts (jetters, screws, emulsion tubes, etc.). Acquire a better complete set.
Since the carburetor consists of a plurality of small parts, disassembling it into composite parts, washing and defecting and the setting is carried out in stages so as not to lose sight.
Cleaning, Defecting, VAZ 2107 Carburetor Check
For full service it is necessary to dismantle the node with a car. This is done by dismantling the air filter housing, disconnecting the node of the nozzles, tubes, cables and wires of the electromagnetic valve. After it remains only to unscrew the 4 carb bentor nuts to the intake manifold and remove the node. 

The "ozone" carburetor includes three parts. Works with each of them are better held alternately: they removed one - disassembled, cleared, collected and proceed to the next component.
Cover carburetor
We start with the lid. Service includes such steps:
- We unscrew the screw mounting screws.
- Disconnect the telescopic drive of air damper control.
- Remove the cover with the housing along with the starting device and the float.
- We unscrew the screws of the starting device and disconnect the craving from the lever axis of the flap.
- Remove the axis of the float and remove the float along with the locking needle.
- We unscrew the filter cork installed on the fuel supply fittings (if the cork is not unscrewed, apply several unsalted key to the key). Remove the filter element (grid).
- Remove the gasket.
- The lid is laundered from dirt. Channels in it blow up using a cleaning agent (if there is no funds at hand, you can purge to compressed air).
- We rinse and blow the filter grid. We put it in place and tighten the cork.
- We inspect the state of the shut-off needle (rubber cuff on it). Install the float with a needle in place.
- Check the position of the float (affects the level in float chamber). This is done like this - we turn the cover vertically (so that the stop needle closes the feed channel) and measure the distance from the float in the surface of the lid. The distance is 6.5 mm, with this indicator, the level corresponds to the norm. If you do not converge, adjust and tighten the position of the float bending the tongue.
- Check the tightness of the shut-off needle. To do this, turn the cover with a float up and create a discharge in the inlet of the mouth (pull the air from the fitting). If the stop needle "does not hold", replace it.
- Using the vacuum, check the integrity of the trigger diaphragm (when creating a vacuum, the device must move the device). When necessary, we repair a starting device using a new membrane from Remkomplekt.
- Install the starting device on the carburetor cover (replacing the device's sealing cuff), connect the thrust and telescopic drive.
After laying a new gasket and set off the lid to the side.
Video: Ozone carburetor 2107-1107010
Housing
The next stage is the cleaning and defecting of the housing:
- We dismantle the vacuum drive of the valve of the second chamber.
- Disconnect the throttle housing, unscrew the fastening screws (below it).
- Disconnect the accelerator pump along with the diaphragm.
- Unscrew the air and fuel jets (remember or mark, where which stood), remove the emulsion tubes installed under air jilometers.
- We unscrew the accelerator pump sprayer.
- Unscrew the accelerator bypass jigger.
- We unscrew the electromagnetic idling valve.
- Remove the diffusers.
- We inspect the jets and channels shot parts for contamination, if necessary, rinse them.
- We check the lower plane of the housing (which is adjacent to the throttle body) to bend. When the bending is detected, replace or align the case.
- Purify the channels (you can simply splash the cleaning agent to all visible holes).
- Check the performance of the vacuum drive of the throttle valve of the 2nd camera.
- Check the density of landing diffusers.
- We put the details on the spot (it is important not to confuse their location) and auxiliary nodes.
- We replace the gasket.
After these operations, lay the case to the side.
Throttle housing
The next step is to set the throttle housing:
- Unscrew the "quality" and "quantity" screws;
- Carefully clean the case and blow the channels in it;
- We replace the cuffs on the screws and put in place;
After serving each component of the carburetor, they also carefully examine them on the correct assembly.
Next, we assemble the components together and install the carburetor in place, after replacing the gasket under it and thoroughly cleave the planting surface on the intake manifold.
Adjusting idling
After installing the carburetor on the VAZ-2107 engine, adjust the speed of the idle. This is done by the "quality" and "quantity" screws.
Adjustment technology is as follows:

After adjustment, check the correctness of it. To do this, the gas pedal is dramatically gaining momentum and release the accelerator. If the adjustment is performed correctly, with a sharp opening of throttle dampers, there will be no failures, and the speed set should be fast. After letting the pedal, the turnover will fall to the level of idling (800-900 o), power point should not blame.
Video: Ozone carburetor. Diagnosis and repair
The carburetor of VAZ 2106 is responsible for the formation and supply of fuel-air mixture into the internal combustion engine. It is a rather complicated device. However, in most cases, determine the malfunction and adjust the carburetor with your own hands by any car owner.
Purpose and device of the carburetor VAZ 2106
The car VAZ 2106 began to be produced in 1976 and immediately acquired great popularity from domestic motorists. For uninterrupted operation of a small engine required the presence of air, fuel, powerful spark and compression. The first two elements are mixed in, designed to prepare the fuel and air mixture of the optimal composition. On the VAZ 2106, the manufacturer established the "ozone" carburetor produced by the Dimitrovgrad Autogenic Plant (DAAZ).
The device is based on the principle of reactive traction. A powerful jet of air through the jets located in the diffuser carries fuel from the float chamber. As a result, the fuel and air mixture is forming in the proportions necessary for its ignition in the combustion chamber.
The carburetor consists of three main parts:
- The upper section is a lid with a damper for adjusting the air flow to the combustion chamber. With the help of the channel system, it is connected to the throttle of the throttle and the float chamber.
- The average section consists of diffusers, fuel jets and a float chamber. The diameters of the jets are shown in the table.
- The lower section includes throttle of two cameras.
Table: Calibration data of the carburetor "Ozone"
| Parameter | First camera | Second camera |
| Diameter, mm. | ||
| diffuser | 22 | 25 |
| mixing chamber | 28 | 36 |
| main fuel jet | 1,12 | 1,5 |
| chief Air Gypsyra | 1,5 | 1,5 |
| idling fuel jet | 0,5 | 0,6 |
| air jet of idle | 1,7 | 0,7 |
| fuel jailor econostata | - | 1,5 |
| air jet econostata | - | 1,2 |
| emulsion jet econostata | - | 1,5 |
| air jet start | 0,7 | - |
| gypsyer Pneumatic Drift Throttle | 1,5 | 1,2 |
| acpercement Pump Sprayer Holes | 0,4 | - |
| exposure jacket accelerator pump | 0,4 | - |
| Feeding the accelerator pump for 10 full moves, see 3 | 7 ± 25% | - |
| Mixture Spray Test Number | 3,5 | 4,5 |
| Emulsion tube calibration number | F15 | F15 |
Any deviation of the composition of the fuel and air mixture from optimal affects the operation of the engine. It makes it difficult to launch a cold and warm engine, its work is disturbed at idle and in working mode, the dynamics of acceleration deteriorates.
Carburetor service VAZ 2106
During the operation of the carburetor, narrow channels of jets are clogged. This usually occurs when using poor-quality fuels, late replacement of the air filter, etc. The composition of the fuel and air mixture is disturbed and its entry into the engine is hampered. As a result, the power unit begins to work with interruptions, its dynamic characteristics are reduced. In such cases, flushing with a special cleaning composition and subsequent purging by air are required.
Rates for adjusting the carburetor VAZ 2106
If the mixture comes from the carburetor into the engine will be too rich fuel, it can pour spark plugs. If the mixture is unnecessarily poor, the engine power will noticeably decrease. The main symptoms of the non-optimal composition of the mixture are:
- difficulty starting a cold engine;
- unstable engine work at idle;
- failures when you press the accelerator pedal;
- loud cotton made of silencer.
In most cases, the problem can be solved by the timely adjustment of the composition of the mixture using quality and quantity screws. Rotating these screws, you can change the value of the lumen of emulsion channels, the fuel level in the float chamber and ensure additional fuel flow, compensating for excess air. This procedure will take only a few minutes.
The car will not start
The reason for the launch of the cold engine when the crankshaft rotates, but the motor will not start, the ignition system and carburetor can become. If the ignition is most likely to be clogged by the jets, a mesh filter or other elements, which makes it difficult to supply the fuel into the float chamber. Eliminate this problem as follows.
- It is necessary to clean the scored channels and the jets with a special aerosol for washing the carburetor, and then blow their jet of compressed air.
- If there is no fuel in the float chamber, the mesh filter and the needle valve should be flushed. For this, the filter will need to be removed from the carburetor.
- It is necessary to check the presence of gasoline in the float chamber using an accelerator pump (UN). With a sharp press on the accelerator lever, it should be seen how the fuel in the mixer occurs from the spray channel in the mixing chamber.
When the throttle is pressed, the lever through the drive sector affects the pusher of the diaphragm, and the instantaneous fuel chamber occurs through the sprayer in the diffuser
The car stalls at idle
In idle mode, the flap is closed. Under them is formed a vacuum that ensures the flow of fuel through the hole under the flap of the first chamber. The reason for the situation in which the engine is started, but it works unstable, most often is a carburetor. It may occur to the depressurization of its hull. This will result in an excess air dropping fuel mixture into the carburetor. You may also fail the quality and quantity of the composition of the composition and the amount of combustible mixture. In addition, the disadvantage or absence of fuel in the float chamber leads to a depletion of the mixture entering the engine.
The current situation will require the investigator to perform the following actions.
- To eliminate the depressurization of the housing, replace sealing gaskets between its individual parts.
- Tighten all bolted connections.
- To prevent depressurization, replace the rubber ring of the solenoid valve and the quality screw.
- Check the condition of the hose of the vacuum controller of the ignition advance for wear and mechanical damage.
- To expose the optimal level of gasoline (in the "ozone" carburetor, it is in the middle of the inclined wall of the float chamber), having fastened the fastening tongue. The gap of the float (the distance between the float and the gasket adjacent to the carburetor lid) should be 6.5 ± 0.25 mm.
- Quality screw adjust the free movement of the fuel emulsion on the idle system, and the amount of the amount is the volume of the mixture supplied to the cylinders.
The appearance of the smell of gasoline in the cabin
In any case, the appearance of the smell of fuel in the cabin is due to its excess in the float chamber or a loose connection of the housing elements as a result of wear or mechanical damage to the sealing gaskets and rubber hoses.
The appearance of smell in the salon VAZ 2106 is a sign of high fire hazard. In this situation, you should immediately turn off the motor and take all measures aimed at identifying a malfunction. The launch of the VAZ 2106 is possible only after eliminating the reasons for the penetration of gasoline vapors into the car's salon.
To eliminate the causes of gasoline vapor to the salon:

Dips when pressed on the accelerator pedal
When you click on the accelerator pedal, throttle is open. Further, through the articulated lever, the accelerator pump comes into operation. If it is faulty, pressing the pedal will lead to interruptions and stop the engine. This is most often manifested when touching from the place and a sharp speed set. With a sharp press on the accelerator lever, a powerful fuel jet from the spray canal should be observed into the emulsion chamber. Weak jet may be a consequence:
- clogging of the supply channels, spray spray nose and discharge valve;
- depressurization of the housing;
- jumping a vacuum ignition timing tube.
To eliminate this fault you need:
- Replace sealing elements of the carburetor.
- Tighten the bolt connections.
- Replace the rubber sealing ring of the electromagnetic valve.
- Check for wear and mechanical damage tube of the vacuum regulator of the ignition advance.
- To repair the accelerator pump (rinse the supply channels, clean the spray spray nose from deposits, replace the diaphragm).
Video: Repair and prevention of the accelerator pump VAZ 2106
Cotton in the graduation system
The appearance of high-profile sounds in the exhaust system is a consequence of too rich fuel and air mixture. Such a mixture with a large content of the liquid phase, did not have time to burn in the working cylinders and heated to maximum temperatures, the cycle of the explosion in the exhaust system ends. As a result, loud cotton are distributed in the muffler. In addition to the carburetor, which creates a mixture with an excessive high concentration of fuel, the causes of such a situation can be:
- later ignition;
- loose fit of exhaust valves;
- non-compliance phases of gas distribution.
For elimination possible causes The appearance of this malfunction is necessary:
- Remove the valve cover, measure thermal and adjust it if necessary.
- Adjust the fuel supply to the carburetor, setting the desired locking valve clearance in the float chamber. The distance from the float to the lid of the carburetor with a gasket should be 6.5 ± 0.25 mm.
- Rotating the quality screw and changing the cross section of the fuel channel, achieve the free movement of the fuel emulsion along the no-stroke contour. The amount of quantity is adjusted by the volume of the mixture supplied to the cylinders.
- Set the ignition advance angle. To eliminate the possibility late ignition Loosen the octane-corrector fastening nut and turn the body to 0.5 dividing the scale counterclockwise.

The correctness of the ignition advance angle has a great influence on the ignition of the mixture: 1 - body; 2 - scale; 3 - Outan-Corrector Fastening Nut
Troubleshooting Carburetor VAZ 2106
Before repairing the carburetor, make sure the performance of other car systems, which may cause troubleshooting. To troubleshoot troubles:
- tap for setting the carburetor;
- special aerosol cartridge for flushing the channels of the carburetor from dirt and deposits;
- compressed air canal and jet can;
- clean rag for outdoor carburetor treatment;
- fire extinguisher in case of emergency situations.
Work on troubleshooting is starting with the disabling of the minus terminal of the AKB to secure the unforeseen situations.
Diagnostics of the carburetor faults does not require the use of any special devices or devices. However, it is advisable to have a certain experience. The specialist can quickly adjust the device for hearing, based on the testimony of the tachometer. Making sure that the source of problems is exactly the carburetor, you can start work.
Before adjusting, it is necessary to clean the channels and jets from contaminants, which make it difficult to enter the fuel into the emulsion chamber. Then the tool to clean the carburetor (preferably in the Aerosol form) should be washed with a mesh filter and a needle valve. As such a means, it is possible to use both simple acetone and Liqui Moly, Fenom, HG 3121, etc., and so on. In addition, the dirt should be removed from the throttle and air damper drives, ensuring their free movement. After performing these procedures, a carburetor should be collected.
Adjustment is made on a heated to operating temperature (not less than 85 o (c) Engine.
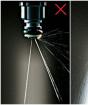
To clean the jets and canals from dirt, in no case use the wire or other foreign objects. The use of primary means will violate the geometry of the channels.
Adjusting the composition of the mixture using a screw screw
During operation, supply channels, lockable devices and adjusting screws are wearing. Worn elements Before configuring the carburetor, it is recommended to replace with new ones. For this, repair kits are used for sale.
Quality and quantity screws are on the front of the device. Rotating these screws, you can achieve the optimal composition of the fuel and air mixture.
Adjusting idling
Idling setting set minimum steady rotation speed crankshaft. This is done as follows.
- Fully wrap the quality screws and quantity by setting them into the starting position.
- Turn the quality screw by two turns, and the screw of the number is three.
- Rotating quality screw counterclockwise, we achieve maximum revolutions in idling mode.
- Rotating a screw of the quantity counterclockwise, we achieve a crankshaft speed of 90 rpm.
- Turning alternately alternately on one turn back and forth, check the maximum rotation frequency of the crankshaft.
- Quality screw reduce crankshaft speed up to 85-90 rpm.
Video: Setting the idling VAZ 2106
Adjustment of carbon monoxide in the exhaust
The toxicity of the exhaust is determined by the content of carbon monoxide (CO). Checking the concentration of CO in exhaust gases is carried out using a gas analyzer. The high carbon monoxide content is due to an excess of fuel or a disadvantage of oxygen in the fuel and air mixture. Adjusting the toxicity of the exhaust is carried out by adjusting screws in a manner similar to an algorithm for an idle setting algorithm.
Adjustment of the float chamber VAZ 2106
Incorrectly established fuel level in the float chamber may make it difficult to start the engine and cause it unstable work In idle mode. This level is lid removed The carburetor must correspond to the crossing line of the inclined part of the chamber wall to the vertical.
Adjustment is carried out by sweetening the float tongue in the following order:
- We install the carburetor cover vertically fuel fitting up.
- At the time when the tongue is touched on the bracket, the hike valve float is measuring the distance from the laying plane to the float (it should be equal to 6.5 ± 0.25 mm).
- If the actual value of this distance does not correspond to the regulated values, clamping the mounting bracket or the tongue.
Adjusting the position of the throttle valve of the first chamber
Lovely closed valves are the cause of excess fuel and air mixture in the engine intake manifold. The incomplete opening of them, on the contrary, can lead to an insufficient amount of the mixture. Such situations are usually caused by incorrect or configured adjusting the throttle drive. The magnitude of the gap between the flaps and the walls of the mixing chamber should be 0.9 mm. This will avoid the flap hot and prevent the appearance of the production on the wall at its touch of contact with the damper. The gap is regulated using a thrust screw as follows.

Table: Operators Float and dampers
Adjusting the position of the throttle valve of the second chamber
With a substantial change in the parameters of atmospheric vacuum when the first chamber is opened with an open valve of the first chamber. Its verification is carried out as follows:

Adjusting the accelerator pump
The accelerator pump provides an additional fuel supply at the time of acceleration enriching the mixture. In the usual mode, it does not require additional adjustment. If the manufacturer has been turned into a manufacturer's adjusting pump feed screw, after assembling the carburetor, adjust the fuel supply from the sprayer. This is done in the following order.
- To fill the fuel channels of the accelerator pump, we rotate the throttle drive lever.
- Under the spray nose we substitute the container.
- At the interval of three seconds, we turn the throttle drive lever until it stops ten times.
- Medical syringe with a volume of 10 cm 3 we collect from the tank of gasoline. For ten complete moves of the pump diaphragm, the collected amount of fuel should be about 7 cm 3.
- We observe the shape and direction of the jet from the sprayer. With an uneven and intermittent jet, clean the sprayer or change it to the new one.
- If necessary, adjust the screw feeding the fuel accelerative pump.
Adjustment of "Gas" and "Supply"
The length of the climbs of the "Supply" and the "Gas" rod should provide full closure and opening dampers in all modes of engine operation. The procedure for checking these nodes is as follows:
- when the "SUPPACE" handle has been drunk, the air damper must be fully opened, that is, it should be in a vertical position;
- with an extended "Supply" handle stretched, the air damper must be completely closed, overlapping the first chamber cross section without gaps;
- for adjustment, it is necessary to weaken the screw fixation screw of the "SUPPACE" drive tip;
- adjusting the drive of the Gas thrust is carried out by rotating the plastic tip until the valve fails to the desired position.
Cleaning jilometers
Before adjusting the carburetor, it is necessary to clean the channels and jets from dirt and deposits. For this you need:
- unscrew fuel and air jets;
- soak them in acetone or any other tool to clean the carburetor for ten minutes;
- blow the jacket with compressed air;
- install peeled and dried jets in the carburetor.
Working with the carburetor is associated with an increased source of fire hazard. Before starting work, all precautions should be taken.
The carburetor VAZ 2106 is a rather complex device consisting of a plurality of small elements. Nevertheless, rinse the jets and a strainer, and any car owner can adjust the supply of fuel-air mixture. To do this, you only need to consistently follow the instructions of the specialists.
Carburetor repair with your own hands or on the service may be required after a certain mileage of any car, or after it is inaccurative disassembly and cleaning. In this article we will look at the main fault fuel system And the carburetor, and how to get rid of them, and indeed, how to repair the car carburetor with your own hands, (or adjust) without resorting to the service of the car service, and that it will be needed for this.
Of course, in one article, it is unrealistic to describe the repair of carburetors of all models, and it is not necessary, since the principle of operation and restoration of most carburetrators of many cars is almost the same, with the exception of some nuances (in rather rare machines).
Therefore, this article will describe the repair of the most common carburetor "Solex" (or DAAZ-2108), which is installed at the factory for VAZ front-wheel drive cars, but many craftsmen install them and other cars (for example on UAZ, Volga and other cars, whose with a regular carburetor pretty big flow Fuel). And on the example of the repair of this carburetor, it will be possible to learn the skills of diagnostics (troubleshooting, detail defects) and the repair of almost any carburetor, including foreign cars.
But before removing the carburetor from the engine, prepare the place on the workbench or table, which should be free and clean. The surface of the table or workbench. Cover with a sheet of clean white paper, on which small details will be perfectly visible. And remember that in this case the key to success is purity. It is also necessary to stock clean capacities (boxes) for small parts.
It should be noted that dyeing, designed to unscrew the loopholes, etc., must have normal (not torn) face, it is better to use new screwdrivers to disassemble the carburetor, which should be kept specifically for repairing the carburetor. The carburetor itself should be removed from the engine and carefully launder from the dirt outside. Only after that it can be disassembled. And the diagnostics and repair of the carburetor in parts will be described, so easier for beginners.
Carburetor repair with your own hands - inspection and diagnostics in detail.
In the carburetors of the Type ofsel and Daaz 2108, the throttle valves are opened in series, a common mechanical lever drive, from the driving control pedal of the carburetor. The carburetor has:
The main details of the carburetor.
1 - air nozzle (diffuser) of the secondary mixing chamber, 2 - air jaw the main dosing system of the primary chamber; 3 - air damper primary chamber; 4 - accelerator pump sprayers; 5 - the diaphragm of the starting device; 6 - adjusting screw; 7 - adjusting screw of the amount of combustible mixture of idling; 8 - Pump supply nozzle to the vacuum ignition timing regulator; 9 - adjusting screw quality of the mixture (toxicity) at idle; 10 - throttle valve primary chamber; 11 - Cartizer gas suction fitting; 12 - acceleration pump diaphragm drive lever; 13 - cam acceleration pump cam; 14 - diaphragm; 15 - exhikomizer jet; 16 - Economizer; 17 - Diaphragm Economizer of Power Mode; 18 - electromagnetic valve EPHX; 19 - the fuel jet of idle; 20 - fuel fitting into a float chamber; 21 - fuel reverse fuel fitting into the tank; 22 - Carburetor Cover
The diaphragm emotorizer of power modes, with a significant opening of throttle dampers, injected the diaphragm 17 through the jib 15 (see Fig. 1. On the left) Additional fuel in the wellness well well of the main dosing system of the primary chamber and it helps enrich the fuel mixture.
Float mechanism.
To begin with, we begin diagnostics and repair from the simplest: the float mechanism, which is responsible for the level of fuel, which is very important. After all, with an increase or vice versa, a decrease in the level of fuel from the required plant, the carburetor will enrich or dew the composition of the working mixture on all modes of engine operation.
The float mechanism of the Salex and the new Daaz (for the eighth) on the principle of action is not at all different from the previous models, but it has a slightly other constructive solution. Due to the fact that the float chamber covers mixing chambers on both sides, instead of one float made from a sheet brass on ozes, a new float mechanism has two floors made from foamed (porous) ebonite. Such a design (similar to carburetors of motorcycles) provides a normal level of fuel and submitting it to emulsion wells of the main dosing systems even with a significant slope of the car.
In addition, instead of separate saddles and a conical needle (on old models), a new carburetor has an unintended shut-off fuel valve.
When checking and adjusting the desired fuel level, it should be noted that the new float mechanism is not regulated as on older daaas and ozone. Only the gap measurement between the float and the plane of the connector on the cover with the gasket is the same. But it should be noted that in new carburetors, two floors and the gap must check for each.
If the gaps are different, then the float holders should be adjusted and achieved the same gaps between each float and the plane of the connector on the lid, well, and then correct these gaps to the values \u200b\u200bdescribed in the factory instruction. The required gap of 1 ± 0.25 mm we achieve the bending of the tongue 6 in Figure 3 (about it more below). By the way, it does not prevent unscrew the fitting and flush the grid 11 shown in Figure 3.
Float camera carburetor.
a - float mechanism, b - device for draining fuel in benzobac;
1 - Needle (shut-off) Valve, 2 - Canal of supply of gasoline, 3 - Case of the shut-off valve, 4 - Spring of the ball, 5 - Bulb Deffer Needle Valve, 6 - Tag, 7 - Bracket, 8 - Float Camera, 9 - Float, 10 - Balancing hole, 11 - mesh filter, 12 - drain fitting with a jicker.
When adjusting the gasoline level in the float chamber, there is an important nuancewhich is not described in the instructions. If on older carburetors, for example, the "ozone", the gap is fixed with this position when the tramp tongue only begins to touch the spring-loaded ball (in a shock cone needle), then in new daises (for the eighth) when fixing the desired gap, the ball must be recessed by the tongue To the end (by the way, if you flip the carburetor, the ball is completely interpreted from the action of the float weight).
This little knows and when adjusting the fuel level, the gap is incorrectly exposed, and this level differs significantly from the recommended plant. The working mixture is impoverished and many drivers begin to rejoice that the motor becomes more economical.
But the mixture is impoverished and on those modes where it should be the opposite of the enriched: start the engine, start the machine from the place, dynamic acceleration with the inclusion of the secondary chamber.
As a result, the launch of a cold motor deteriorates significantly, there are failures during the operation of the motor, while the fuel economy is minimal.
The required clearance of the float mechanism.
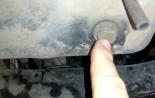
Therefore, when adjusting the level of fuel, special accuracy should be achieved in accordance with the required recommendations of the plant (the deviation from the desired gap shown in Figure 4 is allowed only ± 0.25 mm). Over time, the shut-off valve of the float chamber begins to lose the tightness and the level of fuel increases, which leads to the enrichment of the working mixture. Naturally, it is necessary to get rid of it, but about it below. First I will describe how to check its tightness.
To do this, you can use a conventional rubber pear purchased in the pharmacy. The nipple of the pear is cutting it so that it is tightly on the inlet fuel fitting of the cover of the float chamber (you can not cut a pear, but use the adapter from the rubber hose, suitable diameter).
The cover of the float chamber is removed and turned off by the connector plane up, while close with a finger of the bypass fitting (fuel sprocket fitting - its outer diameter is less than that of the inlet fitting). Now it remains to launch a pear with your fingers and watch it: if it restores its shape (that is, it gains air), then this means that the shut-off valve is faulty.
Chasta Cause of a malfunction (leakage) of the shut-off valve in the fall of dirt between the needle cone and its saddles. Therefore, before doing something to do thoroughly rinse and shut-off valve and fuel channels in the lid, well, of course, rinse the mesh fuel filter Under the plug, which is often clogged with mud.
The scheme for reducing the toxicity of exhaust gases.
1 - primary mixing chamber, 2 - throttle damper drive, 3 - screw adjustment of the quality of the working mixture, 4 - stubborn screw, 5 - Жиклера жикral channel, 6 - solenoid valve, 7 - ignition switch, 8 - battery, 9 - electronic Switch, 10 - ignition coil, 11 - sensor distributor, 12 - control unit.
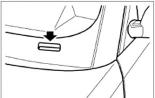
Checking the performance of this system is based on how it should work in good condition. When the ignition is turned on before the launch of the motor lock 7 (see Figure 2), when the throttle of the primary carburetor chamber is closed, the thrust screw 4, contacting the throttle lever 2, closes the chain between the terminal number 5 of the electronic control unit 12 and mass (body) car.
At the same time, the onboard voltage should be supplied (check) to the electromagnetic valve 6 of the economizer (EPHX), which should open the fuel supply through the fuel jaw of the idle. When the engine is started and when it is idling, it is at idle, on an electromagnetic valve 6 (more precisely on its terminal 18 cm. Figure 1) there must be a voltage conducted over the wire from the control unit 12 (Fig. 2).
With a sharp closure of throttle dampers, that is, with a forced idle course, the lever 2 must rest in the stubborn screw 4 and shunt the terminal at number 5 on the mass (body) of the machine. In this case, the voltage on the solenoid valve 6 (or 18 in Fig. 1) should turn off, and the needle overlaps the idling fuel jaw, thereby blocking the supply of gasoline.
And with a decrease in the rotation of the engine crankshaft to 1650 rpm, the voltage from the control unit should be received on the electromagnetic valve 6, while the fuel jigger is reopened and the supply of a combustible mixture from the idle system is renewed and the motor confidently works at idle.
The performance of this system is checked quite simply, with the help of the tester put into the voltmeter mode and measure the constant voltage (within 0 - 12 V) and the assistant that follows the tachometer and when turning up to 1650, the assistant notifies you about it, and you are in The turn is checked by the appearance of voltage on the terminal of the electromagnetic valve, connecting the plus probe tester to the valve terminal, and the minus to the mass of the machine. If the voltage does not appear, you should check the integrity of the wires and the purity of the terminals.
Well, if the voltage on the terminal appears, but the valve itself does not work, then the tester should be set to the module mode or buzzer and check the integrity of the valve selenoid coil. In this case, one tester probe is connected to the valve terminal, and the second to the mass. If the tester shows a break, then the electromagnetic valve should be replaced. But often the valve does not work due to dirt from entering (its jigger is clogged).
Below will be described the most common faults of most carburetors and in general, the power system, and the methods of their elimination.
Common carburetor malfunctions (and not only it) and their elimination.
Formation of poor working mixture.
Signs of the engine on the poor combustible mixture are: cotton (shots) from the carburetor (in the air filter), and loss of its power (if it is bad). It should be borne in mind that the engine work with the early ignition is also happening with the same signs. Therefore, before you look for a malfunction in the power system, you need to check the ignition setting.
The shots from the carburetor occur due to the fact that the poor mixture burns slowly, and at the same time, when the intake tact begins in the cylinder after the exhaust gases, the cutting mixture continues in the combustion chamber. Therefore, the incoming combustible mixture is ignited and the burning is distributed through the inlet pipe to the carburetor. Also, the shots from the carburetor can also be a consequence of a loose closure of the inlet valve. To eliminate the malfunction in each case, it is necessary to accurately determine the cause caused.
Determine and eliminate the listed faults need in the following order:
check the supply of fuel by the receptions specified above; With normal fuel supply, check whether there is no air suction in the connections. To do this, when the engine is running, close the air damper and turn off the ignition, after which it seems the locations of the joining the carburetor and the inlet pipeline.
The appearance of wet fifteen fifteen says that there are looseness in these places. To eliminate faults, you need to pull nuts and fastening bolts. Only without fanaticism, on a little bit, as the flange of the carburetor Solex or DAAZ 2108 is noticeably thinner than the flange on the ozone, and often the flange plane turns out to be behaved from excessive fasteners. And to eliminate this malfunction, it will be necessary to tinker with the wreck plane of the flange on the stove with abrasive paste. Sometimes the plane is strongly behavior and before displaying it on the stove with pasta, it will take to remove the plane first on the abrasive flat stone.
If the air supply is not detected, check the fuel level in the float chamber and adjust it if necessary.
Adjusting the level on the carburetors of most cars is made by rejecting the tongue 6 (Fig. 3) of the bracket 7 Float 9 from the needle locking valve 1 to increase the level or in the opposite direction - to reduce. Only as I said, (at distant from ozone), when adjusting the fuel level on the salts and daaases 2108, their valve ball should be completely recessed. Simultaneously with the adjustment, the ease of movement of the float and needle valve is checked, as well as the density of its closure and pulls the seat 3 of the valve. Naturally, the float should not hurt behind the walls of the float chamber.
Education of a rich working mixture.
Symptoms of a motor in a rich working mixture are: power loss, shots in a muffler and black smoke from it, overheating of the motor, increased fuel consumption and thinning of motor oil in the crankcase (in the pallet), and on the ignition candles, pistons and in the combustion chambers Black Nagara. By the way, confirmation rich mixes (however, as well as the poor), it is possible to be determined on the ignition candlelight, and in detail, which means the color of the nagar on the electrodes and insulator of the candles, I advise you to read here.
Black smoke outlet exhaust system With a rich mixture, the presence of incomplete burnt, charred particles of gasoline. And the shots in the silencer occur from the fact that some part of the gasoline (due to lack of air in the mixture) does not burn in the engine combustion chambers. And when leaving exhaust pipe And connecting with oxygen in the air, the unlawful part of the gasoline instantly flammifies and cotton occurs.
But it should be borne in mind that the shots from the muffler can occur due to a loose closure of some exhaust valve. Therefore, before sining on the carburetor is that it prepares a rich mixture, check and adjust the need.
And the loss of power with a rich mixture is explained by the fact that the rich working mixture is burning too slowly. Well, the dissolution of the engine oil in the engine pallet comes from the condensation of the vapor of the unburned gasoline, which appears on the walls of the motor cylinders and then flows through the walls into the pallet, well, or removed by oil-oil rings with engine oil.
The causes of the formation of a rich working mixture may be:
loss of tightness of the shut-off valve of the float chamber (how to restore tightness I wrote above) or weakening the landing of the valve seat. From wear or coating of an economizer valve, well, or from the meal of the drive aperture of the economiser of power modes.
From hiding the float on the wall of the float chamber, from the production of jets or their cleaning steel wire, from the incomplete opening of the air damper, from increasing the fuel level in the float chamber above the recommended level plant (as mentioned above, is eliminated by the legitimate of the tongue).
Spoiled jets replacing new from Remkomplekt, and the normal closure of the air damper is restored as follows. Remove the air filter from the carburetor, weakening the screw fastening screw in the hinge coupling of the axis of the axis of the air damper axis, then pull the air damper knob by 1.5 - 2 mm from its extreme front position and now fasten the cable screw.
In this case, the air damper must be completely closed (must completely overlap the diffuser). Well, what should be the level of fuel and how to regulate it, I wrote above. If everything is fine with the level of fuel, but the mixture is still rich, then you should check the tightness of the locking needle valve (how to do with the help of rubber pear, I wrote above). You should also check the density of the closure of the economizer valve, if it does not help, then it is necessary to replace the jets with new ones, maybe they are developed or have scratches in the calibration hole (checked using the lens).
Feed gasoline.
This happens with loosely screwed inlets of the float chamber, as well as wear or loosely risky hoses, from wear of rubber rugs. Any leakage of gasoline must be immediately eliminated (it is determined visually and is treated with the replacement of seals or hoses), since when the fuel is faced, the danger of fire appears in motor compartment. Well, of course, during leaks of gasoline is inevitable its overrun.
Hard launch of a hot engine.
This malfunction can be caused from incomplete opening of the air damper in the diffuser of the carburetor, from increased level Fuel in a float chamber (overflow) and in general from a rich working mixture. To start the motor, you should press the end of the gas pedal, and if it does not help, then check and adjust (as described above) the length of the air damper actuator, so that it is secured by its full opening and closing the handle to the cabin. Well, how to check and adjust the level of gasoline, was described above.
Cold engine will not start.
It may be from the fact that the air damper does not close completely, with the extended handle of the manual drive (chima) - how to check it and adjust it is described above. Same cold motor may not be allowed due to the lack of gasoline supply to the carburetor (checked by disconnecting the hose from the carburetor input fitting and then with a manual swap) if there is no gasoline supply, then check fuel pump (How to do this is a detailed article, reference to it higher in the text - the fault of the fuel pump).
If it turns out that the fuel pump is working normally, then the normal passability of the fuel hose from the tank to the pump should be checked. This is done using a tire pump connected to the hose when pumping the pump in fuel tank Bulk must listen. But after the hose purge, it is desirable to wash the tank and the fuel-machine grid in the tank from the dirt.
The engine works unstable or stalls at idle.
In general, this malfunction can be caused by several reasons that may occur even with a serviceable carburetor and power system. For example, when the ignition is incorrectly exhibited, with the ignition candles polluted by nagar or one of the candles - the motor troit (how to identify a non-working candle, how to check it and correctly clean it).
Also, such a malfunction may be due to the violation or improper adjustment of valve gaps (about their adjustment above), due to reduction (how to restore the compression of the motor without his disassembly, I advise you to read it), due to air supply through the gaskets between the block and the block and intake manifold, or through the gasket between the head and block. How to replace the collector gasket read in, and the replacement of the head laying is described
And before climbing the carburetor and check the power system, check and easily correct the problems described above. After that, it is necessary to check the absence of the drive of throttle dampers (and the dampers themselves), and if everything is in order, then the carburetor should be adjusted, or rather its idle system.
Adjusting the idle system.
For its adjustment, in most carburetors there are two screws, which are usually closed with plastic restrictive plugs (fillings) shown in Figure 5. These screws allow you to achieve normal nozzard revolutions with a normal amount of air ratio to the amount of fuel.
Typically, such an adjustment is performed on a service station, since the accurate adjustment requires an instrument for measuring CO (gas analyzer). At the same time, first perform adjustment within the limiting sleeves, and if it is not possible, then unscrew the adjusting screws, break the stops of the sleeves, then remove them, and tighten the adjusting screws back, produce the adjustment described below. If someone has a gas analyzer, then you can adjust yourself.
Stroke system adjustment screws.
a - the location of the screws, b - the device and the action of screws;
1 - screw adjustment of the amount of combustible mixture, 2 - quality adjustment screw, 3 and 4 - restrictive plastic sleeves (seals).
We start the engine and warm it up to the operating temperature (of course, when heated, we pushed it if the motor does not hold idle). Next, we install a gas analyzer sampler on the exhaust pipe and now the rotation of the screw 1 of the mixture (see Figure 5) is achieving the engine speed approximately 820 - 900 rpm (specify the required idling speed into the manual). In this case, the rotating screw of toxicity 2 (the mix of the quality of the mixture) is achieved by the permissible (according to GOST to 1.5%) the content of CO in exhaust gases.
After rotating the toxicity screw 2 and having achieved the CO norm, it should be adjusted again to the screw 1 (quantity of the mixture) the necessary idle speeds (as a rule they change) required for your engine. As a result, two screws and normal toxicity should be achieved and at the same time required idle speed. And after adjustment, it is desirable to press new sleeves seals.
By the way, to adjust the mixture is useful, a simple device, invented in Soviet times, is a transparent spark plug, which is shown in the video just below.
If there are no similar candles or a gas analyzer, and to the nearest one hundred to go far, you can try to adjust the carburetor as described below.
When the engine running is running, it is necessary to unscrew until it stops in the sleeve (seal) of the mix of the mixture 2, and the quantity screw 1 is to achieve the desired value of stable idle speed. Next to check the adjustment should be pressed on the gas pedal and immediately let it be released. At the same time, the engine should increase the crankshaft turns smoothly and without interruptions, and after the release of the gas pedal, the motor must work steadily from the minimum rotation of the crankshaft required for your engine.
If the motor stalls, then using the quantity of the quantity screw 1, the turns should be slightly increased and the gas pedal is checked. If such adjustment is not possible to achieve sustainable operation of the motor at idle turns, it means that the reason may be in clogging channels or carburetor jets, or due to the malfunction of the coercive idling economize (how to check the EPHH with the help of the tester, I described above).
But it is best to start checking the best of all from checking the purity of the idle gibber, which should be turned off and blow it, as well as blow out the idling channels with compressed air. After purging (cleaning) of the gibera and the channels of the idle system, the adjustment should be repeated as described above.
And last: not to have problems with the system, do not save on fuel and air filters and change them before the recommended time limit, especially if you drive on dusty easy roads. After all, the car manufacturer (especially imported) provides recommendations for replacing consumables based on the fact that the machine will ride according to normal and pure European roads, which are periodically wash with soap solution (in Europe, the roads are moaned).
And imported car manufacturers expect that their cars will ride on normal fuel, without impurities of water and dirt. We have fuel far from the ideal (how to check the quality of gasoline yourself, without a laboratory, I advise) Therefore, do not save on the filters.
And thanks to a decrease in the replacement of consumables (filters), the repair of the carburetor with their own hands, or its adjustment, I hope you will not need a long time, the success of this.