Description of the fuse block in Opel Astra H. Opel Astra
Circuit breakers
The labeling of the new fuse must coincide with the labeling of the defective fuse.
In the car there are three fuse blocks:
■ In the left front of the engine compartment.
■ For the non-aware compartment in the salon with left-hand steering or, in cars with right-hand steering, behind the glove box.
■ Under the lid on the left wall of the luggage compartment.
Before replacing the fuse, disconnect the corresponding switch or turn off the ignition.
The defective fuse can be distinguished by burnt filament. Replace the fuse only after eliminating the cause of its failure.
Some chains can be protected by several fuses.
In addition, fuses that do not have a specific purpose can be inserted.
Fuse removal fixture
Fuse removal fixture is stored in the fuse block installed in motor compartment.


Put the device to the fuse from above or on the side, depending on the type of fuse, and remove the fuse.
Fuse box in motor compartment

The fuse block is mounted in the left front of the engine compartment.
Release the lid latch and lift the cover up until the stop. Remove the lid by pulling it vertically up.


After replacing the blown fuses, it is necessary to close the cover of the fuse box and fix it by pressing on top. If the fuse box cover is not closed correctly, faults may occur.
Block fuse B. dashboard

On vehicles with left-hand drive, the fuse box is located behind the discharge box on the dashboard. Open the compartment and click left to unlock. Lower the compartment down and remove it.

On vehicles with right-hand steering, the fuse block is located behind the lid in the glove box. Open the front clothing box, then open the lid and lower it down.


This model is produced since 2004. For a long time, the owners of this car accumulated considerable experience and repair experience. Facing the problems of electricians, many drivers start rubbing in electronic systems, wires and connectors. And in this model find the cause of the fault of the electrician is not so easy even to the prepared people, because fuses and relays Opel Astra. H differ depending on the configuration.
Common problems, the ways to eliminate them and diagnose errors - all this may be needed to fix the arrest.
In basic and complete equipment, fuses and the Opel Astra H relay differ in numbering. For example, in the trunk in the basic version there is a small block of fuses and a relay, and in the full version - full. Under the hood, the numbering of the fuses of the basic version does not coincide with the full. This is due to the difference in electronic components and different electrical circuits.
This article discusses assembly blocks complete configuration.
Fuses in the trunk:
1 (25 A) - Electric windows in the front doors. If the glass lift suddenly stopped working as one of the front doors, check the first thing this fuse, then the wiring at the opening site of the door, between the body and the door.
The wire could solve or oxidize the contact connector. Remove the trim from the door and check the wires inside the door. Check the mass (brown wire between the body and the door). With the lifting removed, also inspect the drive of the drive drive and check its motor.
If the windows work incorrectly, you can program them. To do this, disconnect the battery for a while, connect back, turn on the ignition, when the window is closed, press and hold the window lifting button for 3-5 seconds. Press and hold the button for each door separately.
2 - not used.
3 (7.5 A) - dashboard. If the instruments or the panel lighting do not work, also check the fuse 18. It may be possible in the board of the panel itself or the wiring connections from the back of it.
4 (5 A) - air conditioning system. If the ceardicyer does not work, also check the fuse 14 in this block and fuses 4, 20, 32 in the engine compartment, as well as the K8_H125 relay under the hood. Incorrect settings can be installed in the car menu. Try to remove economical ECO mode, change climate control and air conditioning settings.
At negative temperatures, the air conditioner will not turn on due to the low gas pressure in the system, so it is better to include it in winter in warm Boxes (for lubrication of seals). Check the pressure, refuel and check the system for leaks if necessary. Check the coupling and compressor operation, the availability of the A / C button. The exact reason will help determine the diagnostics in the service using the device connected to the diagnostic connector.
5 (7.5 A) - Airbags.
6,7,8,9,10 - not used.
11 (25 A) - Heated rear glass . If the rear window has stopped, or heating is turned on only for a few seconds, check also the fuse 18 in this block and the relay K3_X131 in the block under the hood.
12 (15 A) - rear window cleaner. If the rear "janitor" does not work, check in addition, before. 15 in the engine compartment. A common problem is moisture in the mechanism of the motor and rear wiper. Due to rust formation, some details can jam.
To remove the mechanism with the engine, you need to remove the trim door trim, and then the mechanism itself. After removing, check the condition of the shaft, knocking the sleeve, which is hoping for it. If the shaft is clogged, rusted or not spinning, select it, clean and install it back.
13 (5 A) - Parking Assistance System.
14 (7.5 A) - air conditioning system. See before. four.
15 - not used.
16 (5 A) - the passenger detection system on front seat, Open & Start System.
17 (5 A) - tire pressure sensor, rain sensor, air quality sensor, rearview mirror automatic.
18 (5 A) - instruments and switches on the panel. See before. 3.
19 - not used.
20 (10 a) - shock absorbers management (CDC system).
21 (7.5 A) - Heated Side Zeaqual. Tsually turn on when you click on the heating button of the rear window. If the heating of the side mirror stopped working, check the wiring between the body and the door, as well as in the mirror itself. To do this, remove the lining or the entire mirror and check the contacts in the connector inside it.
Often the lower contacts are burning or oxidized. If the heated mirrors does not work together with the heating of the rear window, also check the fuse 11. Photo of the wiring and mechanism inside the mirror with a lining removed:
22 (20 a) - Glass Sliding Roof (Luke Power). See also before. 34.
23 (25 A) - electrical windows rear doors. If one of the brakes in the rear doors stopped dropping / climb, check the wiring harness, which goes out of the body and enters the door. Usually there is a brown wire, which goes to the ground.
Check also the serviceability of the button itself on the door, motor and the mechanism of the lift, removing the door trim. It does not hurt check and fuse 1 responsible for the operation of the front windows.
24 (7.5 A) - diagnostic connector. The OBD2 connector is under the handling, hidden behind the shelf overlay. TECH2, MDI or OP-COM scanners are usually connected to the error diagnostics.
25 - not used.
26 (7.5 A) - the electric appliance of the side mirrors.
27 (5 A) - alarm, ultrasound sensor. In the standard alarm Opel Astra H for setting the protection, you need to press 2 times the keychain button, after that the car will arise with a delay of 15 seconds. To simply close all the doors, you need to press the same button 1 time, then the security mode does not turn on. To open or close all windows, you need to press and hold the open / closing button, respectively.
28 - not used.
29 (15 a) - cigarette lighter, socket 12 V on the central console. Usually this fuse burns out with a short closure in the cigarette lighter connector. If you insert into it non-standard connectors from the devices, make sure that there are no extraneous washers that can fly and close the contacts. The devices are better to connect to the additional outlet 12 V (if any) or in a splitter.
30 (15 A) - rear socket 12 V.
31, 32 - not used.
33 (15 A) - Open & Start System.
34 (25 A) - glass sliding roof (hatch electric drive). See also before. 22.
35 (15 A) - rear socket 12 V.
36 (20 a) - socket for connecting the trailer, traction coupling device.
37 - not used.
38 (25 A) - Central locking, withdrawal "30". For problems with the alarm, see 27. If the central lock stops close the doors, check whether the light in the cabin is lit. If it burns, most likely failed the terminal switch in one of the doors and the block "thinks" that one of the doors is open. It is usually served alarm.
In case of failures with the central lock, you can try to throw the battery terminal for a while and connect back. To determine the exact reason, you can diagnose the methods described at the end of the article or in the service station when the device is connected to the diagnostic connector.
39 (15 A) - Heated driver's seat.
40 (15 A) - Heated front passenger seat. If the seats stopped to warm when this function is turned on, check the connectors and wires under them.
41, 42, 43, 44 - not used.
Relay in the trunk:
K1_Х131 - ignition lock relay, withdrawal "15".
K2_Х131 - ignition lock relay, output "15a".
K3_х131 - rear window heating relay. See before. eleven.
Fuses in the block under the hood:
The mounting unit of the engine compartment is located on the left driver's side, under the hood between the support of the rack and the left headlash. To get to it, you need to open the lid, going around it at the edges.
1 (20 a) - anti-lock brakes ABS.
.
2 (30 A) - ABS brake anti-lock. If the ABS lamp caught fire around the panel and this system stopped working, check and clean the ABS sensors and the speed sensors at the front and rear kers, their wiring and connectors. The case can be in the ABS control unit. A more accurate reason can be said based on the diagnostics result.
Usually, problems with ABS occur after replacing the hubs of the wheels or their bearings, when assembling units, the sensors or their connectors are incorrectly installed, which leads to the lag of wires or the absence of contact.
3 (30 a) - stove fan (climate control).
4 (30 a) - fan stove (air conditioning). If the stove ceased to work, the fan itself was clogged, its motor or thermal stitch was burned. Vormor is especially likely if the stove did not serve for a long time (several years). Disassemble the stove, clean all the nodes and lubricate the fan axis and bearings.
To get to the stove, you need to remove the glove box. If the stove works only in the last maximum position, you need to change the resistor. The case can be in the climate control unit or air conditioning. If the stove blows with cold air, check the level of antifreeze and the availability of air in the cooling system.
5 (30 or 40 A) - radiator fan.
6 (20, 30 or 40 A) - Radiator fan motor. If the cooling system fan stops, check the operation of its engine, feeding the battery voltage directly. If the engine does not work, remove it, disassemble and clean, checking the brushes or replace the new one. The case can be in the electronic control unit, temperature sensor, thermostat or wiring. Proper diagnostics will show the exact cause.
7 (10 a) - front and rear windows. If the washer stopped working when cooling, check the fluid level in the washer tank, whether it was frozen in tubes and nozzles. Step if necessary and change. Check also the health of the pump pump in the tank, feeding the voltage of 12 V and wiring.
8 (15 A) - Beep. If the signal stopped working, most likely the case in the CIM module, a submitter loop and its connector. In this case, the buttons located on the steering wheel (for example, volume) are usually stopped working. Common problem. If the case is in the SIM module, it usually helps the opposite of contacts on its board, repair of broken wires or replacing a new module.
9 (25 A) - front and rear windows. See above before. 7.
10, 11, 12 - not used.
13 (15 A) - fog lights. If you do not work, check the lamps, connectors and wiring.
14 (30 a) - cleaners windshield
. If the "wipers" do not work, most likely clogged or laughing the mechanism in the gear motor or the contacts of the wires. Disassemble it and clean it. Check also motor brushes.
Setting the interval of cleaners in the intermittent mode: Press the "janitor" lever down for their triggering, wait the desired time and enable intermittent mode their work (switch the lever up). Now the cleaners will work at a given interval. Values \u200b\u200bare allowed 2-15 seconds.
15 (30 a) - rear window cleaner. See before. 12 in the trunk block.
16 (5 A) - Open & Start System, Opening Roof, ABS, Stop Signal Switch.
17 (25 A) - Heated fuel filter (only for diesel engines).
18 (25 a) - starter. If it does not twist, check the relay K1_X125, the battery charge, the contacts of its terminals, minus contact to the car body, the serviceability of the starter, pulling the relay and wiring / connectors. If automatic transmission, check its selector, the proper of the brake pedal switch. The exact reason will indicate the diagnosis.
19 (30 a) - electronic gearbox systems.
20 (10 a) - air conditioning compressor. See before. 4 in the luggage block.
21 (20 A) - Electronic Engine Systems.
22 (7.5 A) - Electronic Engine Systems.
23 (10 a) - headlights, adaptive light (AFL system), tilt angle electrocormer. If Middle or Far Light stopped working, check and replace the lamp. To replace the lamp in one of the headlights, you need to turn the wheels in the opposite side, open a special hatch located in the wheel arch, to remove the gum-boot from the headlights through it, get the old lamp, turning it counterclockwise and install a new lamp, turning to fix in Connection clockwise.
To enable headlights "Road home", you need to turn off the ignition and get the key from the lock, open the driver's door and blink far Light (Briefly pressing the lever on itself). After that, when closing the driver's door, the Middle Light will include + lamp rear strokewhich will automatically go out after 30 seconds.
24 (15 A) - Fuel Pump. If the pump does not pump gasoline and the engine does not start, check the wires under the hood in the corrugation between the engine control unit and the fuse block. Usually they are larched there or disappears contact in connecting connectors to these blocks. The exact reason can determine the diagnostics and reading errors.
25 (15 a) - electronic gearbox systems.
26 (10 a) - electronic engine systems.
27 (5 A) - electric power steering. If the steering wheel began to spin tight, check the fuse fuse FB3, the oil level in the GUR tank. The tank is under the hood from the passenger side, in the recess not far from the windshield.
If the steering wheel is spinning only in the cold, it works normally when warming, most likely freezes the oil in the steering amplifier system, replace the oil to more resistant to temperatures. When problems with oil can fail or swam steering Reika. Also could fail the pump, in this case or repair, or the replacement is new.
28 (5 a) - electronic gearbox systems.
29 (7.5 A) - electronic gearbox systems.
30 (10 a) - electronic engine systems.
31 (10 a) - headlights, adaptive light (AFL system), inclination angle electrocormer. See before. 23.
32 (5 A) - Air Conditioning, Switch on Clutch Pedals, Fault Lamp in Brake System.
33 (5 A) - Outdoor lighting (control unit), headlights, adaptive light (AFL system), tilt angle electrocorrector.
34 (7.5 A) - steering module (control unit).
35 (20 a) - information and entertainment system.
36 (7,5) — twin system Audio, display, radio, mob. telephone.
The relay in the block under the hood:
K1_Х125 - starter relay. See before. 18 in the block under the hood.
K2_х125 - relay electronic block Engine control (ECU).
Kz_х125 - output "5".
K5_Х125 - Relay modes of windshield cleaner.
K6_Х125 - Front Wiper Relay. See before. 14 in the block under the hood.
K7_х125 - Headlight washer relay (pump). If it does not work, check the fluid level in the washer, as well as the absence of blockages and freezing in tubes and nozzles.
K8_х125 - air conditioner compressor relay.
K10_х125 - fuel pump relay. See before. 24 in the block under the hood.
K11_х125 - Radiator fan relay.
K12_х125 - radiator fan relays.
K1Z_Х125 - Radiator fan relay. See before. 5 in the block under the hood.
K14_х125 - Fuel filter heating relay (diesel engine only).
K15_х125 - Fan Relay Stove. See before. 3 in the block under the hood.
K16_х125 - fog headlight relays. See before. 13 in the block under the hood.
Power fuses in the engine compartment Opel Astra H:
The power fuse block is under the hood, next to the main fuse block, between it and the left support of the rack. To get to it, you need to open the lid.
FB1 (50 A) - Electrohydraulic HT.
FB2 (80 a) - incandescent time controller (only for diesel engine) .
FB3 (80 a) - Electro-hydraulic power steering. See before. 27 in the block under the hood.
FB4 (30 A) - autonomous heater Ih..
FB4 (100 A) - Additional electric heater in the cabin EH.
FB5 (80 a) - Block of fuses and relays in the trunk.
FB6 (80 a) - Block of fuses and relays in the trunk.
Error diagnostics:
To determine the cause of the fault, you can diagnose the system without the presence of a special device described below in the methods.
For mechanical gearboxes or EasyTronic boxes:
- continuing to hold the pedals, wait a few seconds before appearing on the display. on-board computer Error messages
For automatic gearboxes:
- insert the key to the ignition lock
- rotate the key by turning on the ignition, but not a winding engine
- press the brake pedal and keep it pressed
- switch the box lever to position D
- turn off the ignition, let go of the brake pedal
- press the gas pedal simultaneously and the brake pedal and hold them pressed
- rotate the key by turning on the ignition, but not a winding engine
- holding the pedals, wait a few seconds until the message messages appear on the display
In the diagnostic mode, the display will appear ECN with error codes. 4 Figures - error code, 2 digits - value.
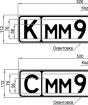
these two pictures print in C B. e.t E. on one sheet A4 on both sides\u003e Salaminate\u003e Throw in the glove box\u003eLocation and purpose of fuses option 2.
Full Size: 2592x1944px, 771 KB Full Size: 2592x1944px, 869 Kb
The price of the question is ~ 50 rubles. (* Download photo in full size 2592x1944- Photo of excellent quality)the purpose of the fuses depends on the type of block in luggage compartment :
Simplified equipment (mostly diesel caravans ) - Rear block (without REC)
purpose of fuses option 1 + small rear unit 1279x932 JPG.
1. ABS - 20 A
2. ABS - 30 A
3. System of heating and salon ventilation - climate control - 30 A
4. Single heating and ventilation system - air conditioning - 30 A.
5. Fan RA diatian * 30 a or 40 a
6. Radiator fan * 20 A or 30 A or 40 A
7. Central Castle -20 A.
8. Glass washers -10 A.
9. About Bohev Rear Glass and Outdoor Mirrors -30 A.
10. Diagnostic connector - 7.5 A
11. Device s - 7.5 A
12. Mobile phone / Radio / System Twin Audio / Multifunction Display - 7.5 A
13. In nutrine lighting - 5 A.
14. FROM teklochomattelwindshield- 30 A.
15. FROM teklochomattel Windshield - 30 A.
16. Beep, ABS, Stop Signal Switch, Air Conditioning - 5 A
17. Air conditioning - 20 A
18. Starter - 25 A
19 ---
20 signal -15A.
21. Engine electronic equipment - 20 A
22. Engine electronic equipment - 7.5 A
23. The adaptive light of the headlight (AFL), adjustment of the angle of inclination of the headlight - 5 A
24. Fuel pump - 15 A.
25. Electronic gearbox equipment - 15 A
26. Electronic engine equipment - 10 A
27. Heater, air conditioning, air condition sensor - 7.5 A
28. Electronic gearbox equipment - 5 A
29. Steering Server - 5 A
30. Engine electronic equipment - 10 A
31. Rear window wiper- 15 A.
32. Stop Signal Switch - 5 A
33. Headlight corrector, light switch, clutch switch, appliances, driver door module - 5 A
34. Control unit The steering column module (CIM) - 7.5 amps
35. Information and entertainment system - 20 amps
36. Cigarette lighter, front outlet- 15 A.In full configuration - the rear module REC is more complicated by the fuse diagram.
option 2.
2592x1944px, 771 KB+ rear (Rec) : 2592x1944px, 869 KB
1. ABS - 20 A
2. ABS - 30 A
3. System of heating and salon ventilation - climate control - 30 A
4. System heating and ventilation - air conditioning - 30 A
5. radiator fan * 30 A or 40 A
6. Radiator fan * 20 A or 30 A or 40 A
7. Glass washers -10 A.
8. Signal -15 A.
9. Headlight washer -25 A.
10. ---
11. ---
12. ---
13. Fog lights -15 A.
14. FROM teklochomattel Windshield - 30 A.
15. FROM teklochomattelwindshield - 30 A.
16. Beep, ABS,in switcher stop signal, air conditioning - 5 a
17. --- * heated live filter (diesel y D. vigatel) - 25a
18. Starter - 25 A
19. Transmission electronics - 30 A
20. Air conditioning compressor RA - 10A
21. Engine electronic equipment - 20 A
22. Engine electronic equipment - 7.5 A
23. Adaptive Light Headlight (AFL), headlight angle adjustment - 10 A
24. Fuel pump - 15 A
25. Electronic gearbox equipment - 15 A
26. Electronic engine equipment - 10 A
27. Electrohydro Steering Silver - 5 A
28. Electronic gearbox equipment - 5 A
29. Electronic gearbox equipment - 7.5 A
30. Engine electronic equipment - 10 A
31. Adaptive Light Headlight (AFL), headlight adjustment - 10 A
32. Brake system, air conditioning system, clutch management system - 5a
33. Adaptive light of headlight (AFL), headlight adjustment, light switch - 5 A
34. Control unit, modul Steering column (CIM) - 7.5 A
35. Information and entertainment system - 20 amps
36. Mobile Phone / Radio / TWIN AUDIO System / Multifunctional Display - 7.5 A
link:
To gain access located in the engine compartment, press the two locks and remove the lid. To access the fuses and the relay, located in the luggage compartment, you must rotate for 90º two lid locks and leak it down.
Fuses in the trunk
1 (25 A) - electrical windows in the front doors. If the glass lift suddenly stopped working as one of the front doors, check the first thing this fuse, then the wiring at the opening site of the door, between the body and the door. The wire could solve or oxidize the contact connector. Remove the trim from the door and check the wires inside the door. Check the mass (brown wire between the body and the door). With the lifting removed, also inspect the drive of the drive drive and check its motor.
 If a Powerforces Work incorrectly, you can program them. To do this, disconnect the battery for a while, connect back, turn on the ignition, when the window is closed, press and hold the window lifting button for 3-5 seconds. Press and hold the button for each door separately.
- 2 - not used.
- 3 (7.5 A) - dashboard. If the instruments or the panel lighting do not work, also check the fuse 18. It may be possible in the board of the panel itself or the wiring connections from the back of it.
- 4 (5 A) - air conditioning system.
If the ceardicyer does not work, also check the fuse 14 in this block and fuses 4, 20, 32 in the engine compartment, as well as the K8_H125 relay under the hood. Incorrect settings can be installed in the car menu. Try to remove economical ECO mode, change climate control and air conditioning settings.
At negative temperatures, air conditioning will not be turned on due to low gas pressure in the system, so it is better to include it in the warm boxes in winter (for lubricating seals). Check the pressure, refuel and check the system for leaks if necessary. Check the coupling and compressor operation, the availability of the A / C button. The exact reason will help determine the diagnostics in the service using the device connected to the diagnostic connector.
- 5 (7.5 A) - Airbags.
- 6,7,8,9,10 - not used.
- 11 (25 a) - heating of the rear window.
If the rear window has stopped, or heating is turned on only for a few seconds, check also the fuse 18 in this block and the relay K3_X131 in the block under the hood.

- 12 (15 a) - rear window cleaner. If a rear "janitor" does not workCheck in addition, before. 15 in the engine compartment. A common problem is moisture in the mechanism of the motor and rear wiper.
Due to rust formation, some details can jam. To remove the mechanism with the engine, you need to remove the trim door trim, and then the mechanism itself. After removing, check the condition of the shaft, knocking the sleeve, which is hoping for it. If the shaft is clogged, rusted or not spinning, select it, clean and install it back.
- 13 (5 A) - Parking Assistance System.
- 14 (7.5 A) - air conditioning system. See before. four.
- 15 - not used.
- 16 (5 A) - passenger detection system in the front seat, Open & Start system.
- 17 (5 A) - tire pressure sensor, rain sensor, air quality sensor, rearview mirror automatic.
- 18 (5 A) - devices and switches on the panel. See before. 3.
- 19 - not used.
- 20 (10 a) - control of shock absorbers (CDC system).
- 21 (7.5 A) - Heated Side Zeaqual.
Tsually turn on when you click on the heating button of the rear window. If the heating of the side mirror stopped working, check the wiring between the body and the door, as well as in the mirror itself. To do this, remove the lining or the entire mirror and check the contacts in the connector inside it. Often the lower contacts are burning or oxidized. If the heated mirrors does not work together with the heating of the rear window, check also the fuse 11.

Wiring and connectors inside the rearview mirror in Opel Astra H
Decoding:
- 22 (20 a) - glass sliding roof (hatch electric). See also before. 34.
- 23 (25 A) - electrical windows rear doors. If one of the brakes in the rear doors stopped dropping / climb, check the wiring harness, which goes out of the body and enters the door.
Usually there is a brown wire, which goes to the ground. Check also the serviceability of the button itself on the door, motor and the mechanism of the lift, removing the door trim. It does not hurt check and fuse 1 responsible for the operation of the front windows.
- 24 (7.5 A) - diagnostic connector. The OBD2 connector is under the handling, hidden behind the shelf overlay. TECH2, MDI or OP-COM scanners are usually connected to the error diagnostics.
- 25 - not used.
- 26 (7.5 A) - the electric attachment of the side mirrors.
- 27 (5 A) - alarm, ultrasound sensor.
 In the standard alarm Opel Astra H for setting the protection, you need to press 2 times the keychain button, after that the car will arise with a delay of 15 seconds. To simply close all the doors, you need to press the same button 1 time, then the security mode does not turn on. To open or close all windows, you need to press and hold the open / closing button, respectively.
- 28 - not used.
- 29 (15 a) - cigarette lighter, socket 12 V on the center console. Usually this fuse burns out with a short closure in the cigarette lighter connector. If you insert into it non-standard connectors from the devices, make sure that there are no extraneous washers that can fly and close the contacts. The devices are better to connect to the additional outlet 12 V (if any) or in a splitter.
- 30 (15 A) - rear socket 12 V.
- 31, 32 - not used.
- 33 (15 A) - Open & Start system.
- 34 (25 A) - glass sliding roof (hatch electric drive). See also before. 22.
- 35 (15 A) - rear socket 12 V.
- 36 (20 A) - a socket for connecting the trailer, a traction coupling device.
- 37 - not used.
- 38 (25 A) - Central locking, withdrawal "30".
If the central lock stops close the doors, check whether the light in the cabin is lit. If it burns, most likely failed the terminal switch in one of the doors and the block "thinks" that one of the doors is open. This usually serves alarm. In case of failures with the central lock, you can try to throw the battery terminal for a while and connect back. To determine the exact reason, you can diagnose the methods described at the end of the article or in the service station when the device is connected to the diagnostic connector.
- 39 (15 a) - heated driver's seat.
- 40 (15 A) - Heated front passenger seat.
If the seats stopped to warm when this function is turned on, check the connectors and wires under them.
41, 42, 43, 44 - not used.
Fuses in the block under the hood
Decoding:
- 1 (20 a) - anti-blocking of brakes ABS.
- 2 (30 A) - anti-blocking of brakes ABS.
If the ABS lamp caught fire on the panel and this system stopped working,  check and clean the ABS sensors and speed sensors at the front and rear wheels, their wiring and connectors. The case can be in the ABS control unit. A more accurate reason can be said based on the diagnostics result. Usually, problems with ABS occur after replacing the hubs of the wheels or their bearings, when assembling units, the sensors or their connectors are incorrectly installed, which leads to the lag of wires or the absence of contact.
- 3 (30 a) - fan stove (climate control).
- 4 (30 a) - fan stove (air conditioning).
If the stove ceased to work, the fan itself was clogged, its motor or thermal stitch was burned. Vormor is especially likely if the stove did not serve for a long time (several years).  Disassemble the stove, clean all the nodes and lubricate the fan axis and bearings. To get to the stove, you need to remove the glove box. If the stove works only in the last maximum position, you need to change the resistor. The case can be in the climate control unit or air conditioning. If the stove blows with cold air, check the level of antifreeze and the availability of air in the cooling system.
- 5 (30 or 40 A) - radiator fan.
- 6 (20, 30 or 40 A) - the radiator fan motor.
If the cooling system fan stops, check the operation of its engine, feeding the battery voltage directly. If the engine does not work, remove it, disassemble and clean, checking the brushes or replace the new one. The case can be in the electronic control unit, temperature sensor, thermostat or wiring. Proper diagnostics will show the exact cause.
- 7 (10 a) - front and rear windows. If the washer stopped working when cooling, check the fluid level in the washer tank, whether it was frozen in tubes and nozzles. Step if necessary and change. Check also the health of the pump pump in the tank, feeding the voltage of 12 V and wiring.
- 8 (15 A) - beep. If the signal stopped working, most likely the case in the CIM module, a submitter loop and its connector. In this case, the buttons located on the steering wheel (for example, volume) are usually stopped working. Common problem. If the case is in the SIM module, it usually helps the opposite of contacts on its board, repair of broken wires or replacing a new module.
- 9 (25 A) - front and rear windows. See above before. 7.
- 10, 11, 12 - not used.
- 13 (15 A) - fog lights. If you do not work, check the lamps, connectors and wiring.
- 14 (30 a) - windshield cleaners. If the "wipers" do not work, most likely clogged or laughing the mechanism in the gear motor or the contacts of the wires. Disassemble it and clean it. Check also motor brushes.
Setting the interval of cleaners in the intermittent mode: Press the "janitor" lever down for their triggering, wait the desired time and turn on the intermittent mode of their operation (switch the up lever). Now the cleaners will work at a given interval. Values \u200b\u200bare allowed 2-15 seconds.
- 15 (30 a) - rear window cleaner. See before. 12 in the trunk block.
- 16 (5 A) - Open & Start system, opening roof, ABS, Stop signal switch.
- 17 (25 A) - heating the fuel filter (for diesel engines only).
- 18 (25 a) - starter. If it does not twist, check the relay K1_X125, the battery charge, the contacts of its terminals, minus contact to the car body, the serviceability of the starter, pulling the relay and wiring / connectors. If automatic transmission, check its selector, the proper of the brake pedal switch. The exact reason will indicate the diagnosis.
- 19 (30 a) - electronic gearbox systems.
- 20 (10 a) - air conditioning compressor. See before. 4 in the luggage block.
- 21 (20 a) - electronic engine systems.
- 22 (7.5 A) - electronic engine systems.
- 23 (10 a) - headlights, adaptive light (AFL system), tilt angle electrocorrector.
If Middle or Far Light stopped working, check and replace the lamp. To replace the lamp in one of the headlights, you need to turn the wheels in the opposite side, open a special hatch located in the wheel arch, to remove the gum-boot from the headlights through it, get the old lamp, turning it counterclockwise and install a new lamp, turning to fix in Connection clockwise.
To enable headlights "Road Home", you need to turn off the ignition and get the key from the lock, open the driver's door and blink away (short-term pressing of the lever). After that, when closing the driver's door, Middle Lights + the reverse lamp will be included, which will automatically go out after 30 seconds.
- 24 (15 A) - fuel pump. If the pump does not pump gasoline and the engine does not start, check the wires under the hood in the corrugation between the engine control unit and the fuse block. Usually they are larched there or disappears contact in connecting connectors to these blocks. The exact reason can determine the diagnostics and reading errors.
- 25 (15 A) - electronic gearbox systems.
- 26 (10 a) - electronic engine systems.
- 27 (5 A) - electric power steering.
If the steering wheel began to spin tight, check the fuse fuse FB3, the oil level in the GUR tank. The tank is under the hood from the passenger side, in the recess not far from the windshield.

If the steering wheel is spinning only in the cold, it works normally when warming, most likely freezes the oil in the steering amplifier system, replace the oil to more resistant to temperatures. When problems with oil can fail or swing steering rack. Also could fail the pump, in this case or repair, or the replacement is new.
- 28 (5 A) - electronic gearbox systems.
- 29 (7.5 A) - electronic gearboxes.
- 30 (10 a) - electronic engine systems.
- 31 (10 a) - headlights, adaptive light (AFL system), tilt angle electrocorrector. See before. 23.
- 32 (5 A) - Air Conditioning, Switch on clutch pedals, malfunction lamp in the brake system.
- 33 (5 A) - Outdoor lighting (control unit), headlights, adaptive light (AFL system), tilt angle electrocorrector.
- 34 (7.5 A) - steering module (control unit).
- 35 (20 A) is a system of information and entertainment.
- 36 (7.5) - TWIN AUDIO system, display, radio, mob. telephone.
Relay in the block under the hood
- K1_Х125 - starter relay.
- K2_H125 - Relay of the electronic engine control unit (ECU).
- K5_Х125 - Relay modes operating windshield cleaner.
- K6_х125 - Front wiper relay. See before. 14 in the block under the hood.
- K7_х125 - headlight washer relay (pump). If it does not work, check the fluid level in the washer, as well as the absence of blockages and freezing in tubes and nozzles.
- K8_H125 - air conditioning compressor relay.
- K10_х125 - Fuel pump relay. See before. 24 in the block under the hood.
- K11_Х125 - Radiator fan relay.
- K12_х125 - Radiator fan relays.
- K1Z_Х125 - Radiator fan relays. See before. 5 in the block under the hood.
- K14_х125 - fuel filter heating relay (for diesel engines only).
- K15_Х125 - Fan fan relays. See before. 3 in the block under the hood.
- K16_х125 - Relay of foglights. See before. 13 in the block under the hood.
Power fuses in the engine compartment Opel Astra H
- FB1 (50 A) - Electro-hydraulic hard top HT.
- FB2 (80 a) is an incandescent time controller (for diesel engine only).
- FB3 (80 a) - Electro-hydraulic power steering. See before. 27 in the block under the hood.
- FB4 (30 A) - Autonomous heater IH.
- FB4 (100 A) is an additional electrical heater in the EH cabin.
- FB5 (80 a) - fuse block and relay in the trunk.
- FB6 (80 a) - fuse block and relay in the trunk.
Look interesting video On this topic:
In all opel models Astra H is usually installed two fuse blocks
- in open space (driver's party)
- under the lid of the external sheat in the trunk (driver's side)
Depending on the configuration of your car, the block data circuits can be different - with different quantities and location of the elements.
The fuse block in the engine compartment is located on the left.
Before searching for it, be sure to drain the engine and turn off the ignition (Turn the key to the OFF position). If you do not do this, you can get a blow to the current or close any contacts with a screwdriver, which can lead to fire.
To open the lid, you can use a screwdriver. Left on the lid there are two clamps.
![]()
Insert the screwdriver in the slot between the lid and the clip
- Beg the latch slightly and lift the lid that it would not be snapped when you release it
- Do the same with the second clamp
- Lift the cover up (in a vertical position), after which the lid can be removed by pulling it up and remove it.
In some models, Opel (Opel Astra A) The fuse block consists of two parts.
Remove the lid from the big mounting block Relays and fuses can be pressing on both sides to the internal clamps that hold the cover tightly on the housing.

![]()
From the mounting unit of the main fuses, the lid can be removed simply pulling up. It contains the main fuses is unlikely.
Under the lid you will see a set of fuses and relays.

Each fuse is responsible for a separate device in the car and is designed for a certain current strength, so it will be useful to know the values \u200b\u200bof the fuses.
Color identification of fuses on the rated strength of the current.
Fuse color and current
purple - 3 a
Beige - 5 a
Brown - 7.5 A
Red - 10 A
Blue - 15 a
Yellow - 20 A
Transparent - 25 A
Green - 30 a
Pink - 30 A
Green - 40 a
First type of equipment

Protectable outline and nominal current
1. ABS - 20 A
2. ABS - 30 A
3. System of heating and ventilation salon - climate control (HVAC) - 30 A
7. Central Castle - 20 A
8. Glass washers - 10 a
9. Heated rear window and mirrors - 30 A
10. Diagnostic connector - 7.5 A
11. Tools - 7.5 A
12. Mobile Phone / Radio / TWIN AUDIO System / Multifunction Display - 7.5 A
13. Middle Light - 5 A
17. Air conditioning - 20 A
18. Starter - 25 A
19 ---
20 Signal - 15a
23. The adaptive light of the headlight (AFL), adjustment of the angle of inclination of the headlight - 5 A
24. Fuel pump - 15 A
27. Heated, air conditioning, air condition sensor - 7.5 A
29. Steering Amplifier - 5 A
31. The rear window janitor - 15 A
32. Rear brake lights - 5 A
33. Adaptive Light Headlight (AFL), Headlight Adjustment, Ignition Relay, Door Lock Control System - 5 A
34. Steering column module control unit - 7.5 amps
36. Cigarette lighter - 15 A
* 1 - The nominal strength of the current depends on the installed equipment and engine power.
Second type of equipment

1. ABS - 20 A
2. ABS - 30 A
3. System of heating and salon ventilation - climate control - 30 A
4. Single heating and ventilation system - climate control (HVAC) - 30 A
5. Cooling system fan * 1 - 30 A or 40 A
6. Cooling system fan * 1 - 20 A or 30 A or 40 A
7. Glass washers - 10 a
8. Signal - 15 A
9. Headlight washer - 25 A
10. ---
11. ---
12. ---
13. Fog lights - 15 A
14. Glass cleaners - 30 A
15. Glass cleaners - 30 A
16. Beep, ABS, brake lights, air conditioning - 5 A
17. ---
18. Starter - 25 A
19. Transmission electronics - 30 A
20. Air conditioning system - 10a
21. Engine electronic equipment - 20 A
22. Engine electronic equipment - 7.5 A
23. Adaptive Light Headlight (AFL), headlight angle adjustment - 10 A
24. Fuel pump - 15 A
25. Electronic gearbox equipment - 15 A
26. Electronic engine equipment - 10 A
27. Steering Amplifier - 5 A
28. Electronic gearbox equipment - 5 A
29. Electronic gearbox equipment - 7.5 A
30. Engine electronic equipment - 10 A
31. Adaptive Light Headlight (AFL), headlight adjustment - 10 A
32. Brake system, air conditioning system, clutch management system - - 5A
33. Adaptive Light Headlight (AFL), headlight tilt adjustment, headlight switch -
5 A.
34. The steering column control system - 7.5 A
35. Information and entertainment system - 20 amps
36. Mobile Phone / Radio / TWIN AUDIO System / Multifunctional Display - 7.5 A

N9 Work Contour Relay Designation
1 cooling system fan K11 x125
2 fan cooling system K12 x125
3 PAPERS PLAYMERS K7 x125
4 Fog lights K16 x125
5 Front cleaners (slow / fast) K5 x125
6 Front cleaners (on / off) K6_Х125
7 Ventilation salon K15 x125
8 Heated fuel filter ( diesel models) K14_х125
9 starter K1 x125
10 fan cooling system K13 x125
11 Compressor to / in K8 x125
12 ECM K2 X125
13 Fuel pump K10 x125
14 Terminal 15 KZ x125

N9 Work Contour Relay Designation
1 Heating rear window KZ x131
2 Terminal 15 K1 x131
3 terminal 15a K2 x131
The fuse block in the cabin is hidden in the trunk on the left side.
In hatchbacks, you can get to the block by opening the cover of the cover, turning two round locks and lowering the lid.

In the sedans you can find a small cover with two handles. Pull the twigs, turn off the clips and get the cover up.

Depending on the configuration, the fuse panel may have a different look.
In full configuration, the number of fuses and relays are much larger than the fuse diagram more difficult.
A simple small fuse block in the basic configuration.

1. Fog lights - 15 A
2. ---
3. Socket in baggage compartment - 15 A
4. Reverse lamps - 7.5 A
5. Rear windows - 30 A
6. Air conditioning system - 10 A
7. Front windows - 30 A
8. Heated mirrors - 7.5 A
Complex, large fuse block in full comlination

1. Front windows - 25 A
2. ----
3. Tools - 7.5 A
4. Heating of the cabin, air conditioning system, climate control - 5 A
5. Airbags - 7.5 A
6. ---
7. ---
8. ---
9. ---
10. ---
11. Heated rear window - 25 A
12. Rear window janitor - 15 A
13. Parktronic - 5 A
14. Salon heating, air conditioning system - 7.5 A
15. ---
16. Man detection system on the automotive chair, Open & Start system - 5 A
17. Rain sensor, air quality sensor, air pressure sensors in car wheels, inner mirror - 5 A
18. Tools, switches - 5 A
19. ---
20. CDC - 10 A
21. Heated mirrors - 7.5 A
22. Luke on the roof - 20 a
23. Rear windows - 25 A
24. Diagnostic connector - 7.5 A
25. ---
26. Electric folding mirrors when parking - 7.5 amp
27. Ultrasonic Sensor, Alarm - 5 amps
28. ---
29. The cigarette lighter connector in the front panel - 15 A
30. Cigarette lighter connector - 15 A
31. ---
32. ---
33. Open & Start system - 15 A
34. Folding roof - 25 A
35. Rear connector - 15 A
36. Electrical equipment for towing - 20 A
37. ---
38. System Central Castle - 25 A
39. Heated seats (left) - 15 A
40. Heated seats (right) - 15 A
41. ---
42. ---
43. ---
44. ---

Blocks of fuses in Opel Astra J (Opel Astra J).
In the new Opel Astra J installed three blocks of fuses.
Block of fuses in the windscreen space
- Block fuses behind a non-storage box on the dashboard or behind the lid in the glove box.
- Block in the luggage separation of the car
The main block of the fuses is located in the front of the left side of the subcontrol space.
![]()
There are two shields on the lid on top and bottom, click on them and pick up the cover up. Adability by pulling the cover up you can remove the lid.
![]()
1 engine control unit
2 oxygen concentration sensor
3 fuel injection, ignition system
4 fuel injection, ignition system
5 -
6 Heated mirrors
7 Fan regulator
8 lambda sensor, engine
9 rear window sensor
10 sensor rechargeable battery
11 trunk opening lever
12 Adaptive module front lighting
13 -
14 rear window cleaner
15 engine control unit
16 starter
17 gearbox control unit
18 heating rear window
19 Front Electrical Window
20 rear power windows
21 ABS.
22 Left headlamp far Light (halogen)
23 Head washer
24 Right Light Headlight (xenon)
25 Left Light Headlight (xenon)
26 Anti-fog headlight
27 Heated diesel fuel
28 -
29 electric parking brake
30 ABS.
31 -
32 Airbag
33 Adaptive Headlight System
34 -
35 Power windows
36 -
37 Adsorber ventilation electromagnet
38 Vacuum pump
39 Fuel Management System Control Unit
40 Windshield washer system, rear window washer
41 Right Light Headlight (halogen)
42 radiator fan
43 Windshield Purifier
44 -
45 radiator fan
46 -
47 Beep
48 Radiator fan
49 Fuel Pump
50 Headlight Level Adjustment
51 Air damper
52 Auxiliary Heater Diesel Engine
53 Transmission Control Module, Engine Management Module
54 Monitoring of electrical wiring
The fuse block in the dashboard may be in different places depending on the configuration.
On auto-duct cars, the fuse box is located behind a non-discharge box on the dashboard.

To get to the block, you must open the compartment, click left to the internal box, and completely unlock it down. Next, the cover of the compartment can be removed.
On a car with right-hand steering, the fuse block is hidden behind the lid in the glove box.

In order to dob to it, it is necessary to open the front door box and find a small cover on the left above. After that, you can open it using a spoor handle - the fuse block itself is behind the lid.

1 Displays
2 Outdoor lighting
3 Outdoor lighting
4 Radio.
5 Information and Entertainment System
6 Power Outlet Front
7 Power outlet on rear seat
8 Left Light Headlight
9 Right Light Headlight
10 Door locks
11 Fan heating and air conditioning system
12 -
13 -
14 diagnostic connector
15 Airbag
16 -
17 air conditioning
18 -
19 Stop Signals, Reverse Lanterns, Salon Lighting Platones
20 -
21 devices
22 Ignition Switch
23 Body equipment control unit
24 Body equipment control unit
25 -
26 -
The fuse block in the baggage department is
Under the cover of the sheat on the left wall of the luggage compartment.

You can remove the cover by turning the screw element of the attachment and pulling the lid on yourself.

1 Module trailer
2 nest trailer
3 Parking Assistance System
4 -
5 -
6 -
7 -
8 Anti-theft alarm
9 -
10 -
11 trailer module, trailer socket
12 -
13 trailer socket
14 -
15 -
16 -
17 -
18 -
19 Steering Wheel Heater
20 Roof ventilation hatch
21 Seat heating
22 -
23 -
24 -
25 -
26 -
27 -
28 -
29 -
30 -
31 amplifier, sub-low Loudspeaker
32 Active system Damping, Warning System of Traffic Strip
If in this article you found useful information for yourself or vice versa see errors or not reliably specified data - please email us in the comments.