Connecting fog lights Lada Vesta. Connecting PTF (fog lights) Lada Vesta - choice
Special optics from fog - this is not a luxury, but necessary element modern carhelps to avoid road transport trouble in limited visibility conditions. We are not only about the fog, the definition hits the definition, snowfall, a blizzard, shower.
PTF on Lada Vesta is not in all confinement.
On modern domestic cars such optional equipment, It is established exclusively in the luxury configuration or as an additional option. If there was no visa on our vest when buying fog, it will be needed to do install yourself.
It is important to remember one immutable truth - even installing such trifles as a pair of headlights leads automatically to loss of warranty.
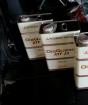
The output can be only one, try to perform, the so-called re-equipment to the complete set of an order of magnitude higher than the existing one. Need started kit From AvtoVAZ, which includes:

PTF installation cost

Installation PTF at the dealer is very expensive.
It would be good at the beginning to think about what such a procedure would cost, because on Vest, this kind is quite complex and time-consuming occupation.
The cost of pleasure at the time of writing the material is approximately 50,000 rubles. If there is from where to add 15-20 thousand, you can safely go to the dealer and install on the spot. In which case, you can always fix any breakdown for warranty. Wish to save up the top? We do everything with your own hands.
Preparation for installation equipment
The main difficulty is that the scheme electrical system This car is seriously different from previous versions.

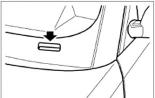
Under the power button fog lights You have to cut a hole.
Lighting control will be performed using a switch installed under a steering wheel, but not having suitable positions for fixing the light flux. The electrical signal comes from the lever through an additional unit available in stock only in the luxury configuration. So the most acceptable solution is to install a kit with a separate connection and output of a special button.
List of tools that will be needed:
- pliers;
- screwdriver with crusades;
- self-tapping screw;
- crown by 76 mm for drilling holes;
- stationery knife;
- set of keys for removing the bumper and mounting optics.
Start setting a lighting kit
So we will perform work, simple and reliable way, while using a separate electrical circuit.
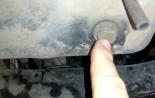
We remove the bumper in front, in the location of the plugs, cut out the neat opening with a diameter of 76 millimeters.

Need cutter by 76 mm
A sharp knife with a blade is rarely either a metal crown of the appropriate size. The headlights insert into the holes, fixing on the right and left brackets with the help of self-tapping screws with a length of 15-20 millimeters.
In the car, we will install the switching button, you can use standard VAZ from LADA 2114 by attaching it next to the wheel vertical optics adjustment. It can be concluded to a regular switch from Vesta, which will be without a fixation, which is slightly lower than the audio system.

Installation of wiring PTF lamps.
Wiring from headlights We carry on the metal corrugated box to the hole located in the area of \u200b\u200bthe pedals. From there we make an output to the button.
Wiring Connection Scheme

Gently cut out the place under the power button.
We use the same principle as when installing equipment equipment and grants.
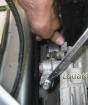
Power load for the relay in 12V you need to take from rechargeable battery Using the M6 \u200b\u200bbolt, directly through the fuse.
Plus, it will be possible to take where the fuse of the dimensions in the mounting block is located, from the cigarette lighter.
Intim the relay where the most convenientness: in motor compartment either inside the cabin. So we were separated by a "easy fright" - intervened in the electrical part minimally, retaining weta warranty.
Installation Scheme on Suite

Luxury scheme
conclusions

Select the lamp is needed correctly.
This article covered the easiest, but expensive method of installing fog equipment.
In practice, especially if your Lada Vesta is no longer warranty, everything can be done with far less Using plastic corrugation, simpler wiring, 16 amp fuse, relay for 4 contacts. In general, the sequence of installation will not differ.
By choosing the most suitable method, you can equip your car with light sufficient for a comfortable ride in the dark season, when visibility is strongly limited.
Fog on the road - a phenomenon is frequent, so the modern car is difficult to imagine without foglighting headlights (PTF) that increase the safety of driving with poor visibility.
Lada Vesta. - Modern sedan, and the need to equip it with this optics is also obvious, but the fog lights are installed by the manufacturer only on the top versions of the model, in the basic configuration in the front bumper, only removable plugs with design places for independent equipment of the PTF car are provided.
The coma of that full-time running lights (DRL) Lada Vesta, the use of which in Russia is required, not better performance, and you can make their tuning, replacing regular lamps with yellow light on the LED with white. The result of such low-cost optimization will delight any car owner.

Consider the nuances of the installation of fog headlights and tuning DRL Read more.
First of all, you should decide how fog lights will be installed on Lada Vesta - the official dealer or independently.
Installation of PTF dealer - the condition of preserving the right to warranty service is performed in the amount of work provided for in the release of the top versions of Lada Vesta, and, accordingly, comprising the entire list-approved list of components. Even without taking into account the cost of performance, the amount is impressive.

The high cost in this case is due to the complexity of the installation of PTF Lada Vesta, since the electronics scheme of this car is significantly different from the electronics of previous models of the Lada line (Granta, Priora, Kalina) - control of fog lights on Vesta is performed from the steering wheel switch to turn the tip sleeve, which functions regardless of the position of the lever.

The reason for the high cost of the operation pTF installations The dealer is the additional electronics unit installed only on the luxury versions of Lada Vesta. This unit is an intermediate link on the signal path from the switch to the pharmaces, which displays information about their inclusion to the dashboard. And the installation of this device entails and expensive changes in the electrical wiring.
If the limit of warranty service of the car is an expired, then the equipment of the sedan with fog lights is possible by a much simpler diagram, including the fastener, the possibility of simplified turning on-off PTF with a button on the front panel.
Choosing fog lights
Statery PTF Luxeva lada configuration Vesta equipped with 19 watt H16 lamps that cannot be called optimal option. Listed in the table below fog lights have more high characteristics And good, especially Valeo, have proven themselves when installing instead of full-time.

In addition to headlights, you need to purchase the following materials:
- 4-pin relay - 1;
- button on-shutting down the headlight - 1;
- protective corrugated case (tubing) for wire - 5 m;
- wire - 5 m;
- fuse at 16 A - 1.
Disassembly of the front bumper
Given the massiveness and aesthetic component of this element in the exterior, the dismantling of the front bumper should be done carefully and strictly according to the instructions.
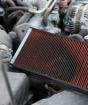
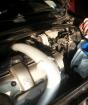
First of all, you need to disconnect and remove the battery from under the hood. Then the head "on 10" is unscrewed 2 bolts of the block mounting air filterHolding also the top of the bumper.

Registration numbers are removed, under which there are 2 bumper fastening screws to the central beam. The M-shaped TORX key "On 20" is unscrewed by these 2 screws and 2 of the same screws that bumper is attached to the wings, in wheeled arches.
Then, the M-shaped Torx "On 30" are unscrewed by 4 screw fastening screws of the bottom of the bumper, and TORX-20 - another 2 mounting screws to the shields on the sides on each side.

After this, the bumper is alternately on each side from the wheel of the wheel arches towards forward to the exit of his latches from landing nest.
The bumper remains hanging on the upper four TORX-30 bolts, of which the central (opposite the bracket of the capped lock) is unscrewed, while holding the bumper from falling, after which the accessory is completely disconnected from the car.
This situation is advisable to use for the passing cleaning of the radiator from insects and garbage.
Preparation of landing places for the installation of PTF
Setting the bumper on the soft canvas by the face, get access to the mounts of the niche plugs in which fog lights are installed.

Front bumper Lada Vesta optima configuration It is completed with plugs that are not designed to fasten the PTF, and has no additional fastener on the back side.
In this case, you must purchase brackets for the installation of fog lights (in the kit 2 pcs. - right and left).

If the fastener is present, then it is to get to the plugs, it is necessary to remove it.
After dismantling the brackets of the PTF mounting, the plugs held in the grooves and screws-screws are removed in the grooves.

In the removed plastic plugs, the drill with a corted drill is cut by the holes with a diameter corresponding to the existing contour or the selected pharmaces, after which the edge of the cut is treated with shallow emery paper and install parts to regular places.
Connecting fog lights
The PTF switching button is conveniently located on the central part of the console or to the left of the steering column in the existing recess. The hole under the button, depending on its configuration, is dried or cut with the subsequent neat, without damaging the edge processing.
The wiring from both headlights should be headed into the salon in the area of \u200b\u200bthe pedal node, for this, the wire of the right headlight is conveniently carried out along the transverse box between the spars.
To connect headlamps, it is advisable to use the classic scheme used in the previous models of Lada line (Priora, Kalina, Granta), simplified - meal to take from the clamp bolt plus Terminem Rechargeable battery.

This method will minimize interference in the car's electric hemp and the cost of buying components.
Tuning daytime running lights
On Lada Vesta, two-dimensional lamps are applied by the manufacturer in the overall and daytime running lights. If instead of them to install the LEDs refined in a certain way, then a little efficient day yellow These lights will change to a brighter white with blue.

Before performing this operation, it is necessary to get acquainted with the pinout cartridges of the daytime lights Lada Vesta, as it is nexcassical on this sedan:
- on the one hand, the cartridge must be "-" in the form of two contacts or one common;
- on the opposite side - "+" for overall lights And "+" for daytime running.
When buying LEDs, you need to make sure that the polarity of the base of the lamp and the ward cartridge. If such LEDs could not be found, output from the position, not always harmless, it can be the bending of the contact pins of the elements according to the specified scheme.

This procedure may entail not only the failure of the fuse, but also damage the elements of the electronics of the car, which are fraught with a complete loss of the right to warranty service.
The desire to make your car is better acquainted and understandable to any motorist. However, deciding to the production of tuning on their own or even with the help of professionals, but before the expiration of the warranty service, it is necessary to carefully weighed the feasibility of performing these works and the consequences, often inevitable with unqualified intervention.
As you know, the purpose of PTF is to ensure better visibility when moving by car in fog. Accordingly, many motorists have the need to establish fog lights on the Lada Vesta car or any other auto model. Read more about choosing optics, as well as its installation, you can learn from this material.
Choice of PTF.

It's one thing, if you decide to put the LED daytime running lights on Vesta - here with the choice there will be significantly fewer troubles. Nevertheless, putting DHO Lada Vesta, it is necessary to take into account certain standards, for the non-compliance of which the driver faces a fine. More details about all the nuances of the choice of DRL, we told in this article.
But when buying PTF also needs to be taken into account certain nuances, including:
- Exterior optics. Everyone knows that in our market today it is very easy to get into the fake, the efficiency of exploitation of which will be significantly lower than the original headlights. Before buying, carefully inspect the fog lanterns - their body in any case should be the most sealed and tightly fixed. Also pay attention to the material itself - it should be durable because it will work in different conditions operation.
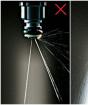
- Lenses. If we talk about lenses, they must be glass. Do not think to stop your choice on PTF with plastic lenses, because if at least minimal pebbles fall on them, the lens can crack.
- Filter color. As for the light filter, it is desirable that it be yellow. As practice shows, the yellow fog will be better to cope with the cut-off of the long light stream, which appears on the fog. But it should be borne in mind that the yellow shade can spoil the appearance of the vehicle, therefore, as an option, special lamps in PTF can be used.
- Collapse of the headlight. Another point to which you want to pay attention is the possibility of independent palary parsing. Sooner or later, any car owner will have to face the need to replace the lamps, so if it proceeds, it will be enough for you to replace it. If the headlight is not collapsible, then it will have to be changed completely (author of the video on the development of domestic designers from Barnaul LED headlights - channel to lead Altai).
Installing and connecting PTF
If everything is clear with the choice of tumanok, we will move to their installation. Note that the Optic Installation implies its connection to the block, so if you do not have experience in this, then better contact the electrician.
So, how to install fog lights Lada Vesta:
- First of all, the acb is turned off and dismantling the front bumper, and then it is necessary to pull out the plugs installed at the PTF installation site. After removing the plugs, the holes are cut, an ordinary stationery knife can be used for this purpose. Just do everything carefully, in order to prevent the appearance of scratches on the bumper.
- Further, optics are fixed to plugs, for this you can use simple self-tapping screws.
- Now you should install the button to activate the optics in the central cabin console. You choose any convenient place for us, as an option, the button can be put on the steering column, on the left, near the trunk control button.
- After the installation actions are performed, the optics must be connected correctly. The wiring from the right lamp must be laid in the steel box, after which all cables should be passed through a special process hole located next to the pedal node. If you speak directly about the connection scheme, you can use the universal version below. With a battery through a bolt, you must take the load power supplying on the relay through the safety element.
- The withdrawal "+" is taken from the fuse of the overall lights right in the block, for the same you can use and plus from the cigarette lighter. As for the relay installation directly, it is made either in the engine compartment or in the cabin.
Headlight Tuning: Options
Now briefly tell about tuning optics. As a rule, car owners face the need to tuning in the event that they want to improve the appearance of the vehicle.
So, the options for tuning PTF may be such:
- Installation of linase lanterns with xenon. Installation of xenon implies the installation of an additional block. This version of tuning will improve the visibility of fog lamps. But it should be borne in mind that the installation of xenon is better to produce if the head lighting in your car is xenon.
- Installing LED light bulbs in lights. Cheaper, but no less effective option compared to xenon.
- Installation of cilia on lights. This option is one of the most budget and simple.
Video "Dismantling of the front bumper on Vesta"
Read more about how to dismantle the front bumper on the Lada Vesta car for the installation of fog lamps, find out below (the author of the roller is MIG79RUS channel).
Special optics from fog is not a luxury, but the necessary element of a modern car that helps to avoid road vehicles in conditions of limited visibility. We are not only about the fog, the definition hits the definition, snowfall, a blizzard, shower.
Why don't you have foglights?
On modern domestic cars, such an additional equipment is established exclusively in the luxury configuration or as an additional option. If there was no visa on our vest when buying fog, it will be needed to do install yourself.
It is important to remember one immutable truth - even installing such trifles as a pair of headlights leads automatically to loss of warranty.
The output can be only one, try to perform, the so-called re-equipment to the complete set of an order of magnitude higher than the existing one. It will take a regular kit from AvtoVAZ, which includes:
- Two front headlights ( 261500097R);
- Front wiring kit in harness ( 8450006983 );
- Fastener left ( 8450006277 );
- Right fastener element ( 8450006276 );
- Set of switches ( 8450006924 );
- Block electronics body ( 231A08052R);
- Wiring set dashboard harness ( 8450030715 ).
PTF installation cost
It would be good at the beginning to think about what such a procedure would cost, because on Vest, this kind is quite complex and time-consuming occupation.
The cost of pleasure at the time of writing the material is approximately 50,000 rubles. If there is from where to add 15-20 thousand, you can safely go to the dealer and install on the spot. In which case, you can always fix any breakdown for warranty. Wish to save up the top? We do everything with your own hands.
Preparation for installation equipment
The main difficulty is that the scheme of the electrical system of this machine is seriously different from previous versions.
Lighting control will be performed using a switch installed under a steering wheel, but not having suitable positions for fixing the light flux. The electrical signal comes from the lever through an additional unit available in stock only in the luxury configuration. So the most acceptable solution is to install a kit with a separate connection and output of a special button.
List of tools that will be needed:
- pliers;
- screwdriver with crusades;
- self-tapping screw;
- crown by 76 mm for drilling holes;
- stationery knife;
- set of keys for removing the bumper and mounting optics.
Start setting a lighting kit
So we will perform work, simple and reliable way, while using a separate electrical circuit.
We remove the bumper in front, in the location of the plugs, cut out the neat opening with a diameter of 76 millimeters.
A sharp knife with a blade is rarely either a metal crown of the appropriate size. The headlights insert into the holes, fixing on the right and left brackets with the help of self-tapping screws with a length of 15-20 millimeters.
In the car, we will install the switching button, you can use standard VAZ from LADA 2114 by attaching it next to the wheel vertical optics adjustment. It can be concluded to a regular switch from Vesta, which will be without a fixation, which is slightly lower than the audio system.
Wiring from headlights We carry on the metal corrugated box to the hole located in the area of \u200b\u200bthe pedals. From there we make an output to the button.
Wiring Connection Scheme
We use the same principle as when installing equipment equipment and grants.
The power supply for the 12V relay must be taken from the battery using the M6 \u200b\u200bbolt, directly through the fuse.
Plus, it will be possible to take where the fuse of the dimensions in the mounting block is located, from the cigarette lighter.
Mount the relay where the most convenientness: in the engine compartment or inside the cabin. So we were separated by a "easy fright" - intervened in the electrical part minimally, retaining weta warranty.
Installation Scheme on Suite
conclusions
This article covered the easiest, but expensive method of installing fog equipment.
In practice, especially if your Lada Vesta is no longer warranty, everything can be done with far less Using plastic corrugation, simpler wiring, 16 amp fuse, relay for 4 contacts. In general, the sequence of installation will not differ.
By choosing the most suitable method, you can equip your car with light sufficient for a comfortable ride in the dark season, when visibility is strongly limited.
In popular russian model Lada Vesta Fog lights has only luxury variation. In the remaining modifications and equipment in the bumper there are special plugs that close the niches to install PTF. You can carry out the installation procedure at the dealer, but it is not suiced. Not every owner will be born at such a step, so the optimal option is the independent purchase and installation pTF set. However, we will tell you how to install headlights.

How need fog optics?
Lighting equipment of this purpose allows you to improve the conditions for a safe movement. Especially acute this moment is felt in bad weather when the visibility of the road is significantly reduced. It is important not only to establish effective fog lights, but also to adjust them correctly. Enhance visibility contributes to the dispersion angle and a powerful light beam. Other drivers will easier notice the car with the fog lights included.
Also at night, fog lights have proven their effectiveness, since they allow the driver to see the situation not only in the immediate vicinity of the bumper, but also by roadbrains.
We affect aesthetics. In this regard, Lada Vesta, equipped with additional lighting, looks more harmonious in comparison with the car, in whose bumper is sadly "sit" plugs.
The cost of mounting PTF at the dealer?
Official representative offices of AvtoVAZ consider the installation of lighting equipment as the improvement of the equipment of the car Lada Vesta to the level of maximum configuration. The cost of the procedure reaches 60 thousand rubles.
The transcendant price is due to the complexity of the process of a dealer method, which also involves the use of parts of the original production. Only some cables will cost the owner of about 20 thousand rubles. Therefore, many car owners are interested in how to install headlights personally.
The intrinsic installation allows you to accrue a significant cost savings. The only unpleasant moment here may appear possible cancellation of warranty support.
How to choose the right headlights and materials to them?
The highest quality indicator has the original set of headlights produced by the "Valeo" brand (code: "FCR220029"). These devices have the cost of 3 thousand rubles. For a couple.
If this price scares the buyer, you can choose products from "DLAA", and it is almost twice as cheaper. If you wish to establish xenon options for PTF, you should study in detail the experience of the owners and material on this issue.
Important! It should not be inclined to buy cheap options, since the quality of them is far from ideal, and the cases of melting are not so rare.
Next important elements Set are brackets for fasteners. For two products will have to lay out about 700 rubles.
Now consider other products present in the kit:
- button to turn on or off headlights;
- relay;
- cables with plastic corrugated shell and switching connectors;
- fuse (current - 16 A).
For the designated set of sellers "ask" about 600 rubles.
Also additionally should be purchased for PTF. For 2 pcs. The owner will have to part with 800 rubles.
In general, the purchase of the PTF set will require a budget in the amount of at least 5 thousand rubles. All specified products are available in the warehouses of most online stores, which makes the purchase of an operational event.
How to install fog optics for Vesta?
Installation with your own hands implies the implementation of several stages:
- dismantling of the bumper;
- preparatory manipulations with landing places;
- installation of headlights;
- installation and subsequent connection.
We dismantle the bumper in Lada West

The product is sufficiently massive, so when removing there is a risk of damage to the LCP. Here we use all available precautionary measures.
- Turn off the battery and remove it.
- The place where the removed bumper from Lada Vesta is stacked, prepare in advance, spreading soft tissue.
- The lower edge of the bumper is attached to the lingers by means of 4 self-tale. They are subject to unscrewing.
- Also unscrew the two screws with which the product is connected to lockers.
- The upper perimeter of the bumper is held by six bolts, which also dismantle.
- Unscrew a couple of bolts under a number sign.
- I pull the body element on yourself, gradually giving him the opportunity to get out of the engagement with the side brackets.
Preparing landing niches and fasteners
- As already mentioned, at the places of future PTF there are plugs. Crown with a diameter of 76 mm cut into these products holes. If the owner of Lada Vesta acquired facing panels of the headlights, this stage is skipped.
- Go to the brackets. They are fixed on the bumper with ordinary self-draws.
- Construct a hole for the button. To do this, we investigate the front panel in the cabin and are determined with the optimal place for the switch. Alternatively, the button can be located on the central console nearby from the button responsible for unscrewing luggage compartment.
Connect PTF by car Lada Vesta
- From right lighting device Wiring laying inside the box.
- IN salon Lada Vesta Cables are fed through a hole present near the pedal node.
- Connection We perform on a simple and universal scheme. The meal is borrowing from the battery, we switch first with the fuse, and then with the contact relay.
- Plus contact comes out mounting block, or rather the fuse of the overall light. Alternatively, "Plus" can be taken from the cigarette lighter.
- The relay should be installed in the sub-compartment of Lada Vesta (can be in the cabin).
The installation is completed with your own hands. The considered method of switching is not only simple, but also allows you to achieve minimizing interference in the on-board network of the car.
Let's summarize
Installation with your own hands of such an element in a car, as PTF in Lada Vesta allows you to save a lot of money (not one tet of thousand). Auxiliary materials and adaptations to establish fog lights will require the owner to part with 5-6 thousand rubles. On the implementation of the procedure will take several hours, but now the car will not only look profitable, but also provide improved visibility in bad weather and at night.
Not all drivers understand what the benefits of foglights are used. Even with daylight with the onset of fog, the rain is ordinary lights, significantly reduce the level of illumination. Fog lights in the Lada Vesta car is only on the most expensive luxury equipment. The rest of the options instead of the front PTF leave the plastic plugs of the Bumper Lada Vesta, which are replaced with the lamps of foglights in auto Salon official dealer. In order not to lose the warranty obligations of the manufacturer of cars Lada Vesta, it is required to carry out partial refinement. The work is complex and expensive. Purchase the necessary details to connect the PTF (fog lights) on Lada Vesta in stores that supply equipment for Lada Vesta, much cheaper.

About the regular set of fog headlights
The manufacturer sets the VALEO PTF in Lada Vesta. They are made in Romania and are suitable for all vehicle modifications: wagon, sedan, SV Cross. The quality of the details can be estimated as high. They are well covered by the road in bad weather, have aesthetic appearance. Glass is dense, does not break away from the slightest contact with it. It is long to work for a long time, subject to its proper operation.
If it is necessary to install PTF on Lada Vesta, it is best to navigate the original parts, although they are more expensive than analogues. Chinese substitutes often do not withstand the load, melted, cease to work. Given that the lanterns are leaving a significant amount of time, money should not be missed here.

Instruction - Installation of PTF on Lada Vesta
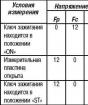
Installation of fog lights on Lada Vesta is characterized by complexity. This is due to the design of the electronic equipment model Lada. The control of the fog in Lada Vesve is made with stealless switches, and they do not have a fixed position with the misty lanterns. In addition to this, the problem creates the absence in all, except for top, LADA grades 2180 special electronic block Fuses like EMM. The signal about the beginning of the work of PTF in the original design comes here. The owners of cheap modifications of Lada Vesta have to look for other connection schemes.
Despite difficulty, the installation of PTF is independently possible. To do this, you will need to purchase the headlights itself, the brackets for their mount, the power button, contact, the set of wires with corrugations, connectors and adapters, a 16 am fuse.
First remove the bumper
Connecting PTF Vesti begins to disconnect the battery and removal of the bumper, which is attached simultaneously to the body, lingers and lockers with a large number of bolts and screws. Move turns away:
- 4 bolts at the bottom of the body;
- 4 self-pressing from the subsidence;
- 2 self-press from each Locker;
- 6 bolts on top of the body and 2 more - under license plates.
At this time, it is necessary to hold the bumper for the beam to avoid damage to fall. A massive bumper is installed on the Lade Vesta, so the help of the second person does not hurt. The detail detail needs to be pulled over and removed from the side brackets.
Preparing seats and fixing headlights
We have already spoken earlier, the manufacturer of the LADO, instead of fog, sets plastic plugs that require cut holes. You can do this with a bimetallic crown, or an ordinary stationery knife. The second way will take a few more time and will require additional accuracy. If it seems that cut will not succeed, you can buy a new cladding for PTF.
At the same stage, the inclusion button is set. It can be placed there, where it will be convenient to the driver, but it is usually selected on the center console, next to the button with which the luggage compartment is opened. The hole for the button can be drilled or cut.
The most important point is the connection of fog
The output to the button is deployed through the corrugated box between the spars, starting with the right headlight. Inside the salon itself it is more convenient to start the wires next to the passage of the pedal node.
The connection of the light bulb occurs as well as the Lada priors, viburnum or grants. Electricity is taken from the battery and commutes with a contact relay through the fuse. Installation of the relay can be carried out in the engine compartment or inside the cabin 2180. Contact for plus stretch from the fuse of dimensions or from the cigarette lighter.
Brief checklist installation of fog lamps
- Remove the front bumper.
- I pull out the factory PTF plugs and the stationery knife carefully make holes.
- Find the fog lights with self-draws.
- Install the PTF feed / stop button in a convenient location.
- Carefully deposit wiring from the installed PTF into the salon, we put the bumper back.
After installing PTF, the quality of light will rise, but does not compare with the lighting of the road from the modified major headlights.
Do you need fog lights for Vesta
To answer the question of whether the fog lights are needed on the Lada Vesta car, we will break what functions this part of the lighting is performed. The Luminous Flow PTF allows you to send the light below the surface of the road than ordinary headlights. Since the feature of any fog: not contact with the surface of the earth.
The light with ease avoids meetings with fog and continues to brightly illuminate the road, while the running and far lights rest directly into the natural phenomenon. In addition to the road, the fog lights the side of the road and the left marking of the road, which avoids the congress to the oncoming lane during bad weather.
If in the area where the car is operated, fog is rare, it is not a reason for solving not to put PTF. The roads are mostly winding, at times similar to mountain serpentine, combining the included PTF and neighbors allowed to continue to drive even at night. The decision to put fog lanterns on Lada Vesta in this case depends on the conditions of using the car.
Selection of fog lights for Vesta
The choice of fog will be based on external species PTF. High-quality spare parts have a hermetic dense body capable of withstanding a serious impact. It is better if PTF has glass, not plastic lenses, since they are less durable and durable. The last selection criterion is a simple detail analysis if you need to replace the lamp.
All these requirements correspond to the original headlamp of Valeo, installed on lada Vesta.. Its price is approximately 4,000 rubles per set of two PTF, the set includes OSRAM light bulbs. You can purchase a set without light bulbs. Then the cost will decrease significantly.
Not bad fog for Lada Vesta offer other manufacturers. For example, Francecar and AutoStol63. Their price is rates from 1500 to 2500 rubles, and the kit includes regular lamps. Chinese sellers also offer their own goods for owners. domestic cars Lada, but their quality is significantly inferior in all indicators.
How much installation work
When lacking time on independent installation Fog headlights, you can seek help from specialists. Official dealer Lada conducts such work in the amount of approximately 60-70 thousand rubles. Of these, at least 10 thousand rubles for the installation will have to give the electrician. Price folds from the cost original spare partsrequired for mounting PTF and complex workwhich will completely copy the luxury version.
Independent installation of fog will reduce the required budget. In addition to the heads themselves, it will be necessary to purchase other equipment, a total cost of not less than 5,000 rubles. Summarizing, say, install PTF in Lada 2180 without assistance you can approximately 5 times cheaper than the official dealer.
How to install fog lights Lada Vesta? Fog lights - an indispensable element of the car. They give the car style and provide security. When creating Lada Vesta, AvtoVAZ designers decided not to equip all serial versions of the new sedan. The presence of this option is available to customers of new items only in the configuration "LUXE".
In the rest of the wizest, the front bumper is empty, and the installation site of PTF is equipped with plugs. On many other cars, Lada is also missing additional lighting on bumper. Therefore, the installation of the lower lamps on its own is an urgent question for Vesta buyers.
Benefit from fog lamps
These headlights received their name due to the fact that they are able to provide visibility in fog conditions. This natural phenomenon minimizes visibility and can easily lead to an accident. The driver is also difficult to do without fog in rain conditions, snowfall or blizzards.
The device of such light instruments as dimensions, near and far light Does not whether to level the fog effect. This fact remains evident even when installing the most powerful types of lamps (LED, xenon). The action of the above lights does not help due to the fact that rays face microscopic drops of H2O as a pair or snowflakes, and from this are reflected or dissipated. As a result, translucent paddle is formed and significantly worsens visibility. In addition, a dazzling effect is created.
Fog lamps have trumps and advantages over the main lighting. After all, PTF is located almost at the ground level. And the foggy condensate does not reach this level. Therefore, we get such an effect that the headlights direct the light under the fog veil. In addition, the upper ray, obtained from the Light PTF, has a clear boundary horizontal level and absolutely does not allow to reflect from droplets of fog, which falls in the driver's field.
Another plus fog: they have a spectrum of high width lighting. Due to this, the roadside remains highlighted even during the fog, which greatly facilitates driving on the roads with steep turns. Also these light instruments enable drivers of counter vehicle See the dimensions of the car during bad weather. The color of the lantern does not affect the quality of the dispersion, because during the fog, all colors from the spectrum are dissipated similarly. Because of this, the fog has white or grey colour With the sun light.
Due to the above advantages, it can be concluded that the presence of fog headlamps is practically necessary to each car. Two main advantages of installing this lighting equipment:
- improving ride safety;
- exterior decoration.
The driver rises calmer and more confident, knowing that in case of bad weather, visibility will not be limited. Also PTF help with night ride. They can be used as an additional light instrument. And the fact that the fog is decorated with an externally, especially relevant in the case of Lada Vesta. After all, the sedan design with them is solid and completed.
Most Vesti consumers when buying a version is not in top equipment They seek to equip the car by fogs.
Non-easy situation with installation
It should be sorted out how to mount PTF for Vesta. If the driver decides to put the fog in Vesta from an official representative of AvtoVAZ, the price of the question will be very high. In other words, the dealer has additional lanterns, the only possible way is carried out: a partial refinement of the vehicle configuration to the top one.
This procedure will cost the customer more than 60 thousand rubles. Such a transcendant price is due to the fact that it is necessary to purchase original factory parts, of which the PTF system consists.
 If you add the price of all components, it is already a round sum. We should not forget about the cost of mounting this equipment. In the amount we get those the same 60 thousand. Equipment of light instruments on Lada Vesta from an official representative of the VAZ is carried out only in this way.
The complexity of equipment by counter-lines at the dealer is the complexity of the scheme, which was designed by VAZ electronics specialists. The inclusion scheme of this light in Lada Vesta differs from previous models and is more complex. In Vest, fog lights are controlled by a switch located under the steering wheel. This switch does not have a fixed position on / off.
In addition, as mentioned above, Vesta has an auxiliary body electronics unit, which is first given a signal from a stealing lever. The unit transmits a signal to the headlights. Most drivers who acquired Lada Vesta are not in the highest configuration, are unlikely to have additional 60 thousand rubles. On the installation of foglights.
Exit from position: to equip the car with headlights yourself and bypass difficulties, collecting a separate inclusion scheme for headlights. To do this, use a separate button to turn on / off.
Install PTF yourself
Consider the installation process. From the list of factory elements, you should purchase: fog, the inclusion button, insert to attach the lamps to the bumper, the relay of 4 contacts, 16-ampere fuse, wire, plastic corrugation (not less than 5 m long).
First you need to dismantle the bumper and cut the plugs on the installation places. Cutouts are made either with a crown of the 76th diameter or a knife. Screws attach the bracket of fog lights. In the lower left side, under the wheel of Lada Vesta (near the buttons opening the trunk), we set the button on the fog headlights. It can also be located directly on the instrument panel. Pre-cut the fusing hole for the button.

PTF installation scheme
Wires leading to the right spotlight should be hidden in a metal box. From the engine compartment to the cabin lay the wire through a special hole in the pedal node. In this case, a simplified scheme is used according to the analogue of Lada Kalina, prior, grant.
Power on the relay is supplied from the battery (necessarily through the fuse). Plus contact for controlling the button is supplied from the mounting unit. The plus coming from the dimensions or cigarette lighter is taken. The device for closing a chain can be placed both inside the cabin and under the hood. We connect all the chain elements according to this scheme and check the PTF using the button.
As you can see, the confonstruum set, installed on its own, is much cheaper.