What needs to be changed by replacing the alternator belt. Detailed instructions on how to properly change the alternator belt
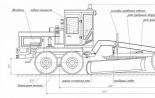
To supply electrical systems car with energy in each car there are two power sources - a DC battery and a three-phase alternator equipped with a powerful rectifier bridge. But in order for the latter to start producing current, it must be made to spin. This is done with the engine running using crankshaft and a belt. Often the latter requires replacement.
Belt drive: advantages and disadvantages
The belt drive of the generator belongs to the transmissions, which are called flexible coupling. The drive includes two pulleys - the leading one is attached to the end of the crankshaft, the driven one is mounted on the generator shaft, as well as the belt thrown over them. The transmission of torque is carried out by means of frictional forces.

Alternator belt types
Because various brands passenger cars have engines of different types, then three types of generator belts are used in them:
- wedge-shaped (in cross-section they have the shape of a trapezoid, are capable of transmitting significant forces, withstand large overloads);
- poly-wedge (wide, with longitudinal grooves, have inverse flexibility and are used to transmit rotation to several devices);
- toothed (on the inside they have transverse grooves and are endowed with the ability to accurately observe the gear ratio).
Separate belt drive of a powerful 3-phase generator of modern passenger car are polyclips new belt, consisting of a plurality of longitudinal wedge-shaped teeth located on the inner side of a flat endless base. The main condition for the stable operation of the generator belt is the mandatory presence of a tensioner. The tension roller or the generator itself acts as it.
The V-ribbed belt drive has both advantages and disadvantages.
Advantages
- low weight and small thickness allow the belt to be used in drives of motors with high speed;
- increased inverse flexibility allows you to simultaneously transfer rotation to the hydraulic booster, water pump, generator, air conditioning compressor;
- has increased resistance to cracking;
- protects the generator from shock and peak loads during starting and stopping the engine;
- protects the generator from overload, due to the slipping of the belt in the pulleys;
- stable transmission of torque with a significant distance between the crankshaft and generator pulleys;
- simplicity of design;
- smooth and quiet operation;
- no lubrication required;
- low cost combined with a long service life.
disadvantages
- shaft ends with pulleys and thrust bearings are under the influence of decent forces arising from strong tension;
- when heavy loads occur, there is strong wear on the side surfaces due to slippage;
- service life depends on correct tension;
- the mechanism cannot work normally when oil gets on it, therefore protection from any kind of lubrication is required.
Alternator belt design and material

V-belt consists of 5 layers
The product must have the following characteristics:
- great strength with significant load fluctuations;
- good wear resistance;
- the maximum coefficient of adhesion to the working surfaces of the pulleys;
- be flexible but tough.

V-ribbed belt consists of the following layers
The generator drive is made in the form of an endless flat belt, on the inner surface of which there are longitudinal wedge-shaped ribs. This design allows the elasticity of the flat and the increased traction of the V-belt to be combined. The basis is a cord reinforced layer of synthetic cords covered with a rubberized high-strength rubber fabric. This design is practically unaffected by stretching.
When to change the alternator belt
Modern technologies make it possible to manufacture a generator belt so strong that it can operate reliably for a long time - several tens of thousands of mileage. Many manufacturers set the standard for the obligatory replacement of the alternator belt at 80-100 thousand kilometers. But control over the state of this important element the generator drive must be. Common practice is visual inspection for cracks and edge breakage when a sustained whistling sound occurs. Burrs and misalignments on the pulleys and improper tension will cause premature damage. The break will be signaled by two control lamps. The first is about the lack of battery charging. The second is about a sharp increase in the temperature of the coolant (for example, on a classic, a water pump and a generator work from one consumable).
What to do if it breaks

Torn alternator belt
If the belt breaks on the road, and there is no spare, the situation will be quite serious. Especially difficult at night. You can only move in tow with the engine turned off, which is very dangerous. If during the day, then a short distance can be traveled on a battery, turning off all unnecessary sources of current consumption: light, radio tape recorder, stove, navigator and other devices. In a desperate situation, you can try to use the means at hand:
- cut the torn one in half lengthwise, fold the halves together and make a circle of the desired length, wrap both halves with strong twine;
- waist belt, the ends of which are fastened with wire;
- women's tights, tie the ends with a tight knot;
- strong rope, wrap the ends with strong twine;
- harness from car camera, wrap the ends with twine or wire.
How to choose the right one
If the belt begins to deteriorate from prolonged use or heavy wear- it must be changed immediately. The main criterion- length, which can be found from the catalog, knowing the catalog number of the part of this car brand and its configuration. For example, the length for the brand VAZ 2110-2112 y different models different:
- for 8 and 16 valve engines, including those of Priora, with a minimum configuration - the length is 742 mm;
- for 16 valve engine with hydraulic booster - 1115 mm;
- for models equipped with air conditioning - 1125 mm.

Marking is applied to the outside of the belt
You can find out about the length from the markings that are applied to the outer surface. It is recommended to buy an original product from the manufacturer whose products are used to complete the vehicle on the assembly line.
Alternator poly V-belt manufacturers

V-ribbed belt for generator GATES
American GATES Firm and its products are the most famous among all the manufacturers of multi-ribbed belts. GATES spare parts are supplied to assembly lines cars and trucks Italy, France, Germany, Sweden, Japan, Korea, USA and other countries. Her belts are of high quality, durable, but quite expensive. This brand is most often counterfeited by unscrupulous manufacturers of low-quality consumables.
German Continenta l is also well known for the quality of its products.
German Bosch has an excellent reputation in the world for many products, including multi-ribbed belts.
American DAYCO company takes 2nd place in the belt market and supplies its products to assembly lines automobile concerns Italy, France, Germany and other countries. Original DAYCO products are trusted by consumers not only among motorists in European countries, but also in the USA, Asia, and Africa.
PJSC "BalakovoResinoTechnika"- Russian manufacturer of original rubber products for conveyors of VAZ, GAZ and KamAZ. Its products for generators are eagerly bought by owners of LADA, Volga, Gazelle and other domestic brands.
Do-it-yourself alternator belt replacement
An experienced driver always carries a spare part of the correct size and type. It is not difficult to change it if available necessary tool and minimal locksmith skills.
Video: Replacing the belt and roller on Renault Megan 2
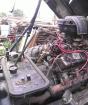
The procedure (replacement is carried out with the engine off and the battery terminal removed) is as follows:
- provide access to the belt, which may require removal front wheel, engine mudguard, and for some brands - crankcase protection; injection engine it is imperative to remove the crankshaft position sensor;
- loosen the belt tension, for which loosen the bolt (or nut) of the tension roller or the generator itself;
- fix the belt layout in memory if it brings several devices into operation at the same time;
- you need to remove the old belt from the uppermost pulley, then compare it with the new one - they must be identical (there should be no discrepancy in the profile and length);
- find out the cause of the belt damage and eliminate it;
- to put a new belt in place, you need to start with the crankshaft pulley, then throw it on the generator and, last of all, on the water pump; then you need to adjust the degree of tension (when pressing with a finger with a force of 10 kg, the sag should not exceed 10 mm);
- put the battery terminal back in place, start the engine and turn on the headlights, stove, air conditioner and other powerful current consumers (there should be no whistling, knocking, noises; the headlights should shine exactly at any speed);
- replace the parts that were removed at the beginning.
Signs of incorrect replacement
If the belt is overtightened, then the load on the bearings of the generator shaft will increase, and it will begin to brake the shaft. The force for rotating the generator will increase, the load on crankshaft becomes more, fuel consumption will increase.
If it is not fully tensioned, it will begin to slip and the generator will rotate at a lower speed. Under heavy load, the slip part starts to whistle. To get rid of the whistle is simple - you just need to tighten the belt.
If it rotates on misaligned or bent pulleys, then vibration occurs due to the beating of the pulley. It can also be caused by faulty bearings in the idler pulley or generator. A low-quality cheap belt can also vibrate when it starts to stick to the pulley surface. If vibration is not eliminated, the consumable will tear very quickly.
Video: Cold noise and belt vibration
Replacing the alternator belt yourself is not difficult, even a novice car enthusiast can do. If you do everything in a timely manner, without haste, carefully, there should be no harmful consequences for the car.
Of all the service work that each driver has to carry out with his own car, such an operation as replacing the alternator belt is often encountered.
The problem is that a vehicle needs more than just fuel in the form of gasoline, diesel fuel or gas. Many systems and devices need electricity.
Without electricity, it is impossible to ignite the fuel in the engine, the light will stop burning, the turns, the glass cleaner will not turn on.
The rechargeable battery has a small supply of electricity required for starting power unit, and all the remaining energy needs are provided by the generator.
In turn, like all auxiliary equipment, the generator uses the mechanical energy of rotation of the shaft, converting it into electricity. The shafts are interconnected by a special ring-shaped drive.
Like all parts of the car, the drive has a limited resource, which, of course, comes to an end. And in front of the owner vehicle the problem arises of how to replace the alternator belt. The replacement itself is quite simple, and any motorist should be able to carry it out on his own, since a drive breakage can occur far from the city. It's also better because you can save a lot of money.
[Hide]
Alternator Belt Wear Signs
Before answering the question of how to change the alternator belt, you need to know when it is best to do it. The electric generator is a hinged unit and has its own body, which is attached to the engine with a special bracket, while it can move in the desired direction.
This is done so that you can adjust the degree of tension of the drive. To transfer rotation to the generator on the crankshaft, a pulley is provided.
Similar in appearance, but of a different diameter, there is a pulley on the generator shaft. The drive firmly connects these pulleys, transferring rotation from the power unit to the generator. For proper operation, the drive must be tensioned with a specific force, adjusted by a special bolt or plate.
The fact that replacement of the alternator drive belt is required is indicated by the following factors, upon detection of which it is better not to pull with replacement:
- specific whistle when starting the engine or at increased speeds;
- sensor readings that the generator performance has decreased;
- breakage of the drive.
Factors indicating that alternator belt replacement is required:
- the pulley has shifted;
- malfunctions with the tensioning device and, as a result, loosening of the tension;
- the drive resource is close to depletion;
- a low-quality belt is installed.
Visually, you can also determine that the alternator belt needs to be replaced, this is indicated by the following factors:
- cracks;
- scuffs;
- tousled edges;
- threads are visible;
- oil stains on the surface.
If you find at least one of the signs, it is better to carry out an immediate replacement. This video shows how a generator on VAZ cars. On foreign cars, the change takes place according to the same principle.
Replacement instructions
The prudent car owner always carries a spare drive in the trunk of his vehicle. This is what we advise you too.
Replacing the alternator belt is a simple procedure. Even a novice car enthusiast, with a detailed study of the instructions we offer and watching a video, will be able to cope with it in a matter of minutes.
Preparation and inspection
Before inspecting the drive, be sure to stop the engine and remove the ignition key. Next, you need to remove the negative terminal battery... Inspect the condition of the strap. Whether there are any breaks or cracks, whether it has lost its elasticity.
If nothing like this is found, then you need to check the tension. A fairly common cause is belt loosening.
Before removing the old belt, remember its location. The new one must be dressed in the same way. It will not be superfluous to sketch a diagram or even take a photo, so as not to forget how the belt is located correctly.
Required set of tools
- a set of keys;
- set of heads.
Stages
Now let's move on directly to the question of how to change the alternator belt.
- First of all, using a wrench, unscrew the tension bolt.
- The drive to be replaced can then be removed from the pulleys.
- Compare the new one in size with the old one.
- If everything is in order, pull it over the pulleys.
- When the belt is tensioned, we adjust the tension using the tensioning bolt.
The documentation that comes with your car usually indicates the correct tension. Be aware that over-tensioning the belt is just as dangerous as under-tensioning.
Attention! When the drive is installed, make sure you haven't accidentally left the key in the car.
Now you can put the negative terminal of the battery back. Start the engine and turn it on as much as possible electrical appliances... If a whistling sound is heard, the belt must be tightened.
Sorry, there are currently no polls available.
Video "Correct and fast tension"
This video shows you how to tighten the belt better and faster.
Why is it necessary to replace the alternator belt:
The main factor is wear and tear;
If not replaced, the belt may break and damage other car systems;
Weak belt - poor-quality operation of the generator;
If you ignore it, you can get stuck somewhere in nature.
Before performing this procedure:
Be sure to wait until the engine has cooled down. This will help you avoid burns and act prudently. 20-30 minutes are not worth blisters and screams;
Take the ignition key from the car keyhole. This will save you from accidentally starting the engine, because a car is still a technique;
Remove the negative terminal from the battery - this must always be done if work involves a generator, battery, etc.
Here is a step-by-step guide to replacing the alternator belt:
1) Buy a new alternator belt - a full-fledged analogue of the old one.
2) Remove the used belt. To do this, using a wrench, it is necessary to loosen the tensioner bolt. There is no need to completely remove the bolt. Examine the nature of the tensioning system, it can be in the form of a semicircle, or in the form of a rail.
3) Before removing the belt, remember how it is located. If necessary, make a note of how the belt is worn. So you will be 100% sure. Do not neglect this point, just imagine that the belt goes through the alternator pulley, pump pulley, air conditioning compressor pulley, crankshaft pulley, idler pulley, and again the alternator pulley. In practice, it is very easy to get confused, especially if you are making a replacement for the first time.
4) Loosen the alternator belt and remove it.
5) Compare the new belt with the old one - they must be the same length and width. Install the new car accessory in its original place. At the same time, make sure that it is located exactly the same as the old one.
6) Tighten the tension bolt. The optimal tensile force can be found in the instructions that are usually included with the purchase. Do not overtighten the belt, as it may simply break during operation. In addition, high tension will lead to premature wear of the alternator bearings.
The correct belt tension can be determined as follows:
When you click on tensioned belt- it should bend no more than 0.5 cm;
For a new belt, the deflection is 0.2 cm;
You can also turn the belt out at 90 ° and when standing on the edge, a stretch should be felt.
7) Collect any tools you may have put on the engine or elsewhere under the hood. Connect the negative terminal to the battery and start the car. If an air whistle is heard during engine operation, tighten the tension bolt more.
The described procedure for replacing the alternator belt is general and may differ from specific vehicle make.
If there is too much belt left, you have made a mistake in the installation.
After replacing the alternator belt, it is worth turning on the existing electronics: headlights, stove, music and a ride. This is the most the right way check that everything was done correctly.
Why is it better with your own hands
It is worth noting that replacing the alternator belt with your own hands is more preferable than in a car service. Since you can replace the old belt with a new one on your own, even while in a remote area, where there are no services and workshops. Of course, this will be possible if you stock up on a new belt in advance.
Improving your repair skills - you save your financial resources. Almost any car enthusiast strives for this. There is nothing difficult in replacing the alternator belt, but if you crawl under the hood without basic repair skills, you can break the car and make people laugh.
On car engine installed attachments (generator, air conditioning compressor), driven in rotation by a poly V-belt. Over time, the product wears out and cracks, which can lead to rupture. The need to change the alternator belt on your own may arise if the trouble happened on the road and away from the service.
[Hide]
When do you need to change the alternator belt?
The frequency of replacing the generator drive belt is indicated in the vehicle's service manual. Please be aware that the period for one machine supplied to different markets may differ. This is due to different climatic conditions and dustiness of the air, which additionally destroy the material of the product.
For example, Volvo recommends producing primary replacement after 80 thousand km of run, and each subsequent shifts are performed after 60 thousand km. At the same time, on a car from the European market, the belt changes every 180 thousand km. On VAZ cars, the product rarely serves more than 30 thousand km of run.
A typical sign of a stretched belt is the whistle that occurs when the engine is started or after driving through a puddle. The sound is sourced from the strap material that slips over the surface of the pulley. Usually, the whistle quickly disappears and appears again when the engine is started or after another puddle. In this case, the owner needs to check the belt tension and try to bring it to standard.
Worn belt (right)
What affects wear?
Factors affecting drive belt life:
- Product operating conditions. Dust, abrasives or chemicals will significantly reduce the life of the strap. Long-term operation at low temperatures air.
- The condition of the pulleys. The occurrence of beating or deformation leads to the destruction of the tracks and edges of the belt.
- Tension. With reduced or excessive tension, the belt wears out at an accelerated rate.
- Belt production date. Rubber is prone to aging, so the strap can deteriorate while in the packaging in the warehouse. An additional negative impact is provided by violations of storage rules.
- Belt manufacturer. There are products made by small companies from low-quality materials. Such straps can collapse after several thousand kilometers.
Signs of belt wear and product replacement are shown in a video filmed by Vladimir Bazekin.
How to check the belt?
The condition of the belt should be checked not only when a whistle appears, but also periodically. Most car manufacturers recommend a visual check of the condition of the strap and tension every 6 months or 25 thousand kilometers. It doesn't matter if the car is in use or parked.
Approximate test sequence:
- Open the hood of the vehicle. located on the side of the crankshaft pulley. It is necessary to check the condition and tension carefully, without bringing your hands close to the fans of the cooling system. This is due to the fact that the fan can start at any time, even on a cold engine.
- The visual condition is checked by turning the inside of the belt towards the light. Cracks, abrasions and delamination of the product are unacceptable. If damage occurs in a small area, the belt is considered unsuitable for further use. The element is pulled by scrolling the crankshaft by the central nut.
- The tension is checked by measuring the deflection under a load of 10 kg. With a distance between the axes of the pulleys up to 300 mm, the deflection boom should be 6 mm. With a distance between the axes within 300-450 mm, a deflection of 12 mm is allowed.
It is possible to check the tension of the alternator belt by applying the maximum load, that is, by turning on all energy consumers, except for the starter. If the whistle does not occur, then the tension is sufficient.
How to tighten the belt
If there are no cracks or tears on the belt surface, then you can try to tighten it. A similar procedure is relevant for cars Russian production and foreign cars equipped with a mechanical manual tensioner, which is often the generator itself. The belt is tightened until the moment of stopping slipping on the pulleys. At the same time, the motorist must remember that excessive interference loads and destroys them.
If the strap tension does not allow for normal operation, then the part must be replaced. It is forbidden to install spacers under the tension rollers, which will allow you to select an excessive belt length.
Drive Belt Replacement Instructions
Replacing the alternator drive belt does not cause problems for most motorists. After removing the worn strap, it is recommended to inspect the wear pattern. If it has damage to the edges and the contact part, then this may indicate a misalignment of the pulleys. In this case, you need to find the damaged element and replace it. Installing a new belt on a damaged pulley is pointless, as the rubber will quickly wear out on the sharp edges. When changing the strap, follow the sequence of steps recommended by the vehicle manufacturer.
When replacing the alternator drive belt, it may be necessary to install a new idler pulley and associated fasteners. For a list of parts to be replaced, refer to the vehicle repair and maintenance manual.
What do you need to replace?
Before changing the alternator belt, you will need to prepare a set of tools and materials (the maximum list is given):
- wrenches and heads;
- new belt and tensioner pulley;
- rod for fixing the roller;
- mounting paddle for belt removal;
- protective gloves;
- a sheet of paper and a pencil for drawing the installation diagram.
New unoriginal drive belt may be several millimeters longer than the standard product. The difference in length will be compensated by the tensioner.
Scheme
Installing a belt on engines with two or three pulleys is straightforward. The situation changes when the belt is installed on a motor equipped with a large number of pulleys. In this case, it is recommended to draw a diagram of the installation of the product. Such an event will speed up the installation process and avoid errors.
 An example of a belt pad on a Chevrolet Cobalt
 Scheme designations:
- 1 - crankshaft pulley;
- 2 - alternator pulley;
- 3 - guide roller;
- 4 - air conditioner compressor clutch;
- 5 - a pump pulley and an additional booster pump drive pulley;
- 6 - belt;
- 7 - tension roller.
Algorithm of actions
The procedure differs depending on engine design and quantity attachments... Below are step-by-step instructions for replacing belts on common vehicles. On other vehicles, the operation takes place using a similar technology.
By car VAZ Grant
You can change the belt on a VAZ Grant car without a tensioner using the algorithm:
- Cut the old strap with a knife.
- Turn the generator mounting bolt from below by 3-4 turns.
- Unscrew the upper fixing bolt completely and remove it from the hole.
- Push the alternator forward until the retaining ear is inserted into the bracket.
- Secure the mechanism with wire or otherwise.
- Slide the belt over the alternator pulley and the top of the crankshaft pulley. Some car owners use an accessory that holds the strap on the device during donning.
- Turn the engine shaft with a wrench to fully fit the belt.
- Fix the generator in its original place. Check the operation of the units with a full load of the generator and different speeds of the crankshaft.
On Kia Sid
You can change the alternator belt as follows:
- Unscrew the fixing bolt located on the top of the generator.
- Lift the retainer upward by removing the bolt from the guide slot.
- Turn the device relative to the lower bolt. If the mount is "stuck", then the generator is turned by light hammer blows applied through a wooden block.
- Remove the worn belt and pressure roller.
- After that, you need to mount a new roller and only then you can put on the belt.
- Tighten the strap in accordance with the recommendations of the instruction manual. Check the operation of the unit, when a whistle appears, slightly increase the tension.
Volkswagen Polo Sedan
An example of replacing a belt on a Volkswagen Polo Sedan engine equipped with an automatic tensioner:
- Loosen the belt tension by loosening the tension roller fixing bolt. Nut size 16 mm.
- Turn the roller mounting bracket counterclockwise. The turning is forceful because the tension spring is compressed.
- Carefully remove the belt from the crankshaft pulleys and drive assemblies.
- Dismantle the roller with a 16 mm head inserted into the recess under the generator. If the tension roller does not change, then it is fixed in the wringing position using a metal rod inserted into the hole in the housing.
- Put the belt on the pulleys, then gently release the tension roller. The tensioner automatically adjusts the tension level of the product.
Video "Maintenance and replacement of the alternator belt"
Maintenance and replacement of the alternator belt is shown in the video tutorial filmed by the avto-blogger channel. ru.
Designed to ensure the rotation of the rotor, as a result of which this unit is able to generate the energy necessary to power the on-board network. Therefore, the strap must always be in working order, otherwise the driver simply will not be able to fully use the car. About types and typical malfunctions we will talk about the strap in this article.
[Hide]
Alternator Belt Description
Views
Regardless of the length of the alternator belt, two types of belts can be used to ensure the operation of the drive of the device:
- Wedge-shaped. Traditional RG, mainly used in earlier vehicles. Operation of this type is relevant in vehicles in which the drive from the crankshaft is made only to the device itself. A significant disadvantage of such a WG is that during its operation there is a high probability of slippage. A more improved version of the wedge-shaped version is the toothed one, characterized by a wedge-shaped profile, as well as teeth on the inside.
- V-ribbed. Another type of RG, which has recently been used much more often, is multi-ribbed or multi-strand (multi-strand). Regardless of what the number of the alternator belt is, the width of the alternator belt will be larger, but at the same time thinner. This, in turn, allows for better flexibility. Such a RG was named multi-channel as a result of the fact that several rows of furrows are located on its inner side. Due to the fact that given type RG is more flexible, usually it is used not only to drive a generator, but also other units - power steering, compressor, air conditioner, etc.
Regardless of what type of alternator drive belt belongs to, they are all manufactured according to the same principle. It is based on specialized rubber. Also, the design of such RGs includes several layers of strong reinforcing thread.
Typical malfunctions
Possible problems that can happen with RG:
- Replacing the alternator belt sometimes occurs due to a break, although this does not happen so often, because a lot of effort is needed to break strong threads. Such a problem may appear as a result of jamming of one of the components with which the RG is connected. For example, this can happen as a result of the destruction of a device bearing.
- Wear is another reason for replacing the alternator belt. As a result of long-term use of the strap, its profile begins to decrease due to constant friction, as a result, the RG slips more often. This leads to the fact that the transmission force decreases and over time the generator becomes unable to generate the required energy.
- Delamination 0 This fault usually occurs as a result of damage to the shafts. When the geometry of this component is violated, on one side the strap wears out a lot and a reinforced thread begins to protrude beyond the edges of its rubber. Delamination can also be caused by exploitation. poor quality material in production.
- No less frequent problem, as a result of which it is necessary to replace the alternator belt, is subsidence, which is due to wear. Wear leads to an increase in the diameter of the RG, weakening, as well as slippage of the component. Also, subsidence can occur as a result of the use of low-quality material in production. In addition, the physical characteristics of the rubber can be altered by the contact of grease on the strap, and this can also cause sagging.
Many owners are interested in the question - why is the alternator belt whistling? If the whistle of the alternator belt appears only when the engine is started and disappears after a few seconds, there is nothing to worry about. This usually occurs in wet weather and is a sign of moisture. But if the screeching and whistling, as well as squeaks do not disappear over time, then this indicates slippage. Accordingly, the reason may be subsidence or wear.
If in your case a generator belt roller is used for tensioning, a strong squeal may be due to wear on the roller bearing. It should be noted that a short whistle is sometimes the result of the use of low-quality material in production. In this case, with the onset of cold weather, the strap begins to lose elasticity, which contributes to its wear before it warms up (video author - BuTaLik).
Checking the condition of the alternator belt
The service life of a drive belt is on average about 50 thousand kilometers, but this indicator is significantly influenced by the conditions of use. To check the strap on the generator, the first step is to diagnose the tension. In working condition, the WG should only sag a short distance, which is regulated by the manufacturer of the machine. If you do not know how to tighten the alternator belt, check out. The installation diagram is detailed here, so you can learn how to change the alternator belt if necessary.
It is also necessary to assess the condition of the RG for wear or mechanical damage. If you see that the RG begins to delaminate, there are traces of fuel and lubricants on it, then it is necessary to remove the alternator belt and replace it with a new one. The selection of a new strap is carried out in accordance with the vehicle model, as well as its type.
Replacement instructions
How to replace a generator belt with your own hands?
Consider the process using the example of a VAZ 2108:
- First, the strap is dismantled. To remove the RG, you will need to loosen the fixing nuts from the bottom and on the tensioner itself. During the loosening, the generator itself should be moved towards the motor, after which the weakened strap is simply dismantled from the shafts.
- How to install the alternator belt? In this case, there is nothing complicated - the process of installing the belt is carried out according to the same scheme. The strap is installed on the pulleys, after which the generator is simply moved away from the power unit, for this a mount is used.
- Use a crowbar to hold the tension while tightening the nut on the tensioner. Next, you need to tighten the nut and check the installation process. If, after replacing when starting the engine, there are no extraneous sound, then the procedure was carried out correctly. If there is a whistling sound, tighten the strap.
Video "Step-by-step instructions for replacement"
You can learn more about how the element is replaced from the video below (video by Kalinin).