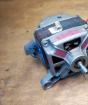
Timing belt on 3S engine. Personal experience
Removal and installation of the timing belt (3S-Fe, 4S-FE). 1 - timing belt, 2 - Gasket, 3 - cover number 2 timing belt, 4 - cover number 1 timing belt, 5 - right engine support, 6 - shock absorber of the right engine support, 7 - steering hydraulic drivebreaker drive belt, 8 - pulley crankshaft, 9 - generator drive belt, 10 - timing guide timing belt, 11 is the right portion of the engine protection.
Removing the timing belt 3s-Fe, 4S-Fe
1. Disconnect the negative terminal from the battery.
2. Remove the right side of the engine protection.
3. Remove the generator drive belt.
4. Remove the steering hydraulic drive pump drive belt.
5. Remove the right engine support, unscrew 4 bolts and 2 nuts, remove the support shock absorber.
6. Remove the timing belt cover number 2.
7. Install the cylinder piston No. 1 in the compression tact.
A) Turn the crankshaft pulley to combine the installation gauge on the pulley distribution Vala., It was combined with the mounting label of the bearing cover. If not, turn the crankshaft one turnover (360 °).

B) Remove the crankshaft pulley, a) using a special propeller, loosen the pulley bolt.

C) Remove the pulley with the help of a special device.
After removing the crankshaft pulley, check that the labels on the camshaft pulley and the bearing cover are still combined.
9. Remove the limit of the timing belt cover number 1.

10. Remove the timing belt. Note: If a removable belt is assumed to be reused, apply an arrow of the direction of the belt movement towards the rotation of the crankshaft, as well as tags on the pulleys and the belt.
A) Loosen the tension roller mounting bolt and trying not to damage the belt, press the roller to the left, as far as possible, and temporarily tighten the bolt.
B) Remove the timing belt from the camshaft gear pulley.

C) Remove the timing belt guide belt.
D) Remove the timing belt with the crankshaft gear pulley.

11. If necessary, remove the switchgeal pulley of the camshaft, turning the fastening bolt.
12. Remove the tension roller and the spring of the tensioning roller, turning the bolt.

13. If necessary, remove the intermediate pulley, turning the bolt.
14. If necessary, remove the crankshaft gear pulley. If the pulley is hard to remove manually, use two screwdrivers.

Note: Place the rag, as shown in the figure to prevent damage.
15. If necessary, remove the oil pump pulley, unscrew the nut.
Installing the timing belt 3S-FE, 4S-Fe
1. Install the oil pump pulley. (If removed).
(A) Align the pulley and shaft profiles, and install the pulley.
B) Tighten the oil pump pulley fastening nut.
Tightening torque ........................ 28 N-M
2. Install the cogged pulley of the crankshaft. (If removed).
A) align the mounting key on crankshaft shaft with a sponge groove in the pulley.
B) Install the gear pulley of the crankshaft, the belt guide inside.
3. Install the intermediate pulley. (If removed).
A) Install the pulley and tighten the bolt.
Tightening torque ........................ 42 N-M
Note: Use a 35 mm bolt.
B) Check that the pulley rotates freely.
4. Temporarily install the tension roller and its spring.
A) Align the hole with the guide pin.
B) Install the tension roller and bolt. Do not tighten the bolt. Note: Use a bolt
42 mm long.
C) Install the spring roller spring.

d) Press the roller to the left, as far as. It will be possible and tighten the bolt.
E) Check that the tension roller rotates freely.
5. Install the switch pulley of the camshaft.
A) Align the mounting pin of the camshaft with a hole under the pin, and install the switchgeal pulley of the camshaft.
B) Tighten the pulley bolt.
Tightening torque ........................ 55 N-M
6. Install the timing belt.
(A) Align the mounting labels of the crankshaft gear pulley with labels on the oil pump housing and the camshaft pulley mounting hole with a label on the bearing lid.
B) Remove, if there is, butter or water from all pulleys.
C) Install the timing belt on all the pulleys.
Note: When you re-use the timing belt, combine the tags installed when removing, and install the belt in accordance with the arrow indicating the direction of rotation of the engine crankshaft
7. Install the timing belt guide to the front side of the outside.
8. Check the gas distribution phases,

A) Loosen the tension roller by turning the bolt for 1/2 turn
B) Slowly rotate the crankshaft pulley by two turns from the NTT to the VMT.
Note: Always turn the crankshaft pulley clockwise, otherwise the roller "will play", the belt will get the slack and slip into the tooth.
C) Check that each pulley is combined with installation marks. If the installation labels are not combined, remove the timing belt and reinstall it.
D) Tighten the tension roller mounting bolt.
Tightening torque ....................... 43 nm
9. Install the timing belt cover No. 1.
A) Install or glue the gasket on the timing belt cover.
Note: If the gasket due to the leaks of bulk oil or changed the size, trim the excess material.
B) Install the timing belt cover and tighten the mounting bolts.
10. Install the crankshaft pulley.
A) align the pulley with a groove on the pulley and install the pulley.
B) Tighten the pulley bolt.
Tightening torque ..................... 110 nm
11. Install the timing lid 2 of the timing belt using a new gasket.
Note: It is better to glue the gasket, whatever she jumped into inside.
12. Install the right engine support.
A) Install the bracket of the right engine support.
Tightening torque ............. 53 nm
B) Install the support shock absorber.
Tightening torque ....................... 74 N M
C) Install the shock absorber bracket.
Torque:
Bolt ..................................... 36 N-M
Nut ........................................ 53 N-M
13. Install the steering hydraulic power supply pump belt.
14. Install the generator drive belt.
15. Install the right side of the engine protection.
16. Connect the negative terminal to the battery.
As you know, change the timing belt every 55-60 thousand kilometers. This optimal mileage is installed experienced way And meets in numerous instructions for use. The excess of this mileage without replacing the timing belt does not necessarily lead to an emergency, but the likelihood of the engine outlet due to the destruction of the belt (gap, pulling over the norm, cutting off the teeth) at the same time increases sharply. Naturally, this recommendation refers to belts of well-known manufacturers, such as Gates, Bosch, Lemforder and even our Balakovo RTI factory, but not relevant for timing belts of little-known manufacturers (Mitsuboshi, San), for which sellers do not guarantee more than 10- 20 thousand km, even if they are installed in the same service recommended.
It is such a timing belt, as it was installed, stood on the engine 3s-Fe my toyota car Vista 1991 release. The belt demanded a replacement for the following reasons: Mileage more than 40,000 km, unpleasant noises when operating the engine (periodic deaf stuffs, sharp knocked knobs on valve drives, general noises in the arrangement of the timing belt), a very noisy engine operation when 3000 revolutions are exceeded per minute. The question arose only one: to replace the service or own forces in the garage. I didn't really want to go to the service, because it is expensive (in the area of \u200b\u200b1000 rubles), and there are cases of "halur". Earlier, for example, when changing the hub bearing, I gave me the hub to me in one service, in the other, the outer clip of the bearing was pressed by pressure on the inner clip (through the balls), the seal was deeper than the usual, because of which the seal was disturbed, and did not launch in Lubricant. In addition, the service, it happens, it was delayed - as they explained to me on the phone, the operation time strongly depends on how the pulley bolt turns away from the state of the tension and irrigation rollers, from the crankshaft salinity state, etc. As a result, I decided to replace the timing belt in the garage without repair pit on its own forces. Moreover, such an operation previously performed on his previous car VAZ-21083.
For a start, I purchased the timing belt Gates size 5202 xs of Belgian production and carefully studied the procedure for performing this operation on books " Toyota Camry. & Vista. Device, maintenance and repair "and" Repair japanese cars"S.V. Cornienko. This information is enough for independent work.
So, the car put in the garage so that free access to its right front wheel is provided. Remove the mass terminal from the battery, the machine selector put in the "P" position, tighten hand brake and on both sides by anti-collective stops block the left rear wheel. After this preparation, we slightly weaken the nut fastening the right front wheel, raise the car to the jack and remove the wheel. Jack must be put as close as possible to the wheel removed. To fix the car in the raised position next to the jack under the threshold, we put the stop with a soft lining (so as not to remember the bottom edge of the threshold), and lower the car on it. We release the jack. In the depths of the wheel niche, plastic protection (splashes) is installed on the right, which is attached to two bolts and two plastic locks. Remove it, if necessary, pulling out plastic clamps. They, as a rule, break, but instead they are well suited to fasten the fastening of the interior cover from "Samar". After removal of protection, access to the crankshaft pulley opens.
Turn the central bolt to 19 counterclockwise to 19, which the pulley is fixed on the crankshaft. To capture the bolt, it is convenient to take the head to 19 and two standard extension cords to go beyond the wheel niche. The gorott should be without a stringent, so that it can be hit by a hammer. Since it is nothing to fix the pulley (due to the lack of a special device and any large holes for encouraging a screwdriver or mount), I turned a bolt with a shock way: just started turning the knob counterclockwise and hit the hammer on it for an increase in the torque. The bolt turned away, while pulley almost did not move. We remove the two drive belts from the pulley, smaller from which leads the hydraulicel in rotation, and the other is the generator and the air conditioner pump. To remove a large belt, we release a bolt tensioner on the generator, relaxing the belt to required level. To remove the hydraulic belt weaken the nut of its tensioning device. This can be made with a head to 14 using two standard extension cords and twist. The nut can be seen through the opening, which passes the drive shaft. It is on the right and in the depths of the pulley of the hydraulic agent. At the pencil belts, we put the arrows in the direction of rotation (when assembling the direction of the belt movement should be preserved).
After removal drive belts You can remove the pulley itself. Before this, turn the spark plugs and exhibit the first cylinder to the top dead point (NTC). To do this, the label on the pulley, which is a slot on its neighbor to the engine, we combine with a number 0 on the scale on the bottom plastic cover, covering the timing belt. Rotation of pulleys We produce clockwise manually or the key through the temporarily screwed central bolt. Pulley remove with hands, or with a three-wane puller, depending on the strength of the landing. On my engine, the first time the pulley was removed by the puller, and later after lubrication landing Litol was easy to wear and starred with his hands.
Now remove the right engine support. For this, on the side of the radiator (in order not to occupy a wheel niche), we bring a jack under the car carter and stuff it a little, putting a small one. It must be done in order to remove the load from the support and that the engine does not shift after it dismantle. We turn out four nuts and three bolts:
- two nuts on a 14 head with an extension from the bottom side of the support (from the drive shaft side, lying on the back), which the engine is attached to the support;
- Two nuts on 17 and bolt that fasten the base of the support to the right side member (from above);
- one short bolt for 14, which, through the spacer curve, fits the upper part of the support to the engine in the area of \u200b\u200bthe generator location;
- Long bolt for 14, which connects the middle part of the spacer curve, support and engine bracket (located in three centimeters from the short above-mentioned bolt, access from above).
The support is easily removed, and access to the upper and lower plastic lids covering the timing belt. The upper cover is fastened with five bolts on 10, the most difficult to reach the bottom left (in the area of \u200b\u200bthe engine bracket to the support). It is convenient to turn away a small head on 10 s G-shaped lever. When turning out these bolts, it is necessary to show ingenuity and outstanding patience. The lower cover is attached to four bolts on 10, the most uncomfortable of which will be screwed into the center of the lid in the recess. Need to remember or record, which bolt is in what hole, because They are different lengths.
After removing both covers, you can directly start working with timing belt. On my engine I was waiting for an unpleasant surprise. It turned out that Mitsuboshi's belt stretched out so that the stretch spring was completely complicated and did not stretch anything, while the upper branch of the belt looked freely between the pulleys. We had to be wondering how the belt belt did not happen at the same time, and how he did not cut the teeth. The reason for the unbalance of engine operation, which caused the unpleasant consequences listed at the beginning of the article was established. In addition, it turned out that the tensioner bearing was very worn, had a backlash and noisy, and the bearing owland roller (which closer to the pump) also noisy, having a slight backlash. There were no flows through the glands.
Attempting to lubricate the bearing of the bypass roller failed, because Its metal-plastic covers are well and deeply pressed in the manufacture. In the process of extraction, they are irreversibly deformed and upon subsequent installation no longer ensure the retention of lubricant in the bearing. Therefore, it was decided to replace both rollers to new ones. To buy rollers in Avtograd, I had to spend 1515 rubles.
To remove the timing belt weakened the bolt, fixing the tension roller and, pressing on the roller with his fingers, lower it to the lowest position. Carefully, without moving the camshaft pulleys and crankshaft, remove the timing belt. Immediately on the pulley camshaft with a simple pencil or marker, we apply a label from above and next to it a response mark on the engine housing. This label we record the correct position of the camshaft pulley. The fact is that in all allowances for repairing the camshaft pulley, it is recommended to install in the desired position of the combination of the hole in it with a label on the engine housing (the label should be seen through the hole). But in a real situation, due to the installation of the engine, it is not possible to look at the tilt to this hole, as the front rack niches interferes. Check the combination of tags to the touch also fails.
Before installing a new timeline belt, we fix new rollers to your places, while the fixer of the thread of the middle strength is applied to the bolt of the irrigation roller (traces of its use on the threads were clearly visible. Stretching roller re-fix in the lower position, and start installing the belt. First, we put it on the crankshaft pulley, then we supply the left branch around the pulley of the Maslonasos, we bring the tensioner on the roller and hold the left hand to the left hand, and the right branch we supply around the bypass roller, the pump pulley and send it to the camshaft pulley from above. From the bottom to the camshaft pulley, we bring the left branch of the timing belt. Gently, trying to keep the coincidence of temporary labels, put on the strap on the camshaft pulley. In order for the belt's teeth into the Pump Phava, it was necessary to trust him a little clockwise (about 1/3 of the tooth).
Now check the coincidence of tags on the pulleys. To do this, let go of a tension roller and a long wide chisel, the crying of it on the left through the engine bracket, davit on the tensioning roller, choosing all the belt sagging (help the stretch spring). We set the lower protective cover with the labels (you can two bolts) and crankshaft pulley (without a bolt). After that, we check the coincidence of the labels: temporary on the camshaft pulley and the factory on the crankshaft pulley (the slot with the zero mark). In my case, the crankshaft pulley label did not coincide with the number 0, and the end of the pulley clockwise. I had to press the tension roller again, removing the timing belt from the camshaft pulley, crankshaft pulley up to 0 and put on and stretch the belt again. After that, the tags on the pulleys coincided in the desired position.
To stretch the timing belt, wrap the crankshaft pulley bolt and tighten it clockwise (fixing the pulley or shock mode). With the help of the head and extension, we turn the crankshaft pulley for two turns and again check the matching tags. Rotation occurs easily, because Spark plugs are unscrewed. At this time, the spring roller spring itself pulls the belt with the desired force. After that, we drag the tensioning roller bolt to the torque of 42 n * m. Replacing the timing belt can be considered complete.
We install the upper protective cover in place, we screw the bolts of both covers in their places (taking into account length). We return the engine support in place, twist four nuts and three bolts. It is more convenient to start the operation with the screwing of the long upper bolt, because In this case, the engine is attracted to the support, and the support to the spar. On the nuts and bolts when fascinating the thread retainer. We put on the pulley of the crankshaft the belt of the steering wheel, we bring it from the bottom to the pulley of the hydraulic pot pump. Fully belt refill in place by turning the crankshaft pulley clockwise about half turn. Stretching the belt produce a large screwdriver, which is inserted into the slot of the tensioner of the hydraulic power supply device to the left of the fixing nut. The belt will be stretched correctly, if under the load of 10 kg its deflection will be 10-13 mm. In the conditions of the garage, it is difficult to make such a measure toolfully difficult, so the deflection is tested, strongly pressed the finger on the belt (the effort will be approximately as required). The magnitude of the deflection is controlled by the labels applied with a pencil to the bottom cover of the timing belt. Properly stretched belt should not whistle (slipped) with a short turn of the vehicle wheels (for 1-2 seconds) until it is left or left. Next, we wear the generator and air conditioner belt if the latter is installed on the car. Strap stretch and fix the tensioner existing on the generator. The belt is deflection on the site between the generator and the air conditioner compressor with a load of 10 kg should be 9-11 mm.
Put the spark plug place high voltage wires, let go of the jack and take it out from under the car, put the mass terminal on the battery and make a test engine trial. If everything is in order, install plastic protection (splashing) in the wheel niche and the wheel. Repair completed.
After replacing the timing belt, the nature of the engine of my car has changed significantly. The deaf stuffs disappeared, almost ceased to the valves, the vibration decreased. Engine on idling He began to work softer, quieter and more pleasant for his ear. When driving, the low-frequency roe, arising in the range from 3 to 4 thousand revolutions per minute of tachometer decreased. It even seemed that the car became more premium, although no instrumental measurements were made about this. In general, the replacement of the timing belt clearly went to the car for the benefit.
No special tools for performing work required. And once again she wanted to celebrate the work of Toyota specialists who made such a reliable and maintainable car. In general, this repair is no longer the first. And it strikes each time the bolts and nuts after a breakdown with a click turn away from the hand that the detachable spline connections are disconnected after a light tapping that the timing belt itself is stretched with the desired power of the stretch spring, the bearings rotate without jail and backlash, etc. Everything is simple, reliable, convenient and, unfortunately, is still unattainable for our car industry.
You will need about six hours. The first thing you need to do is remove the wheel and the motorcycling of the engine at first, it is attached to two bolts and two plastic latches.
How to get to the timing belt
And then let us begin to say to the most responsible and complex procedure, you will need to unscrew the crankshaft pulley bolt. In the pulley, there are four small holes, they are designed for a special tool, their diameter is very small, so it is not enough to adapt to use enough and at first glance it is impossible. You can hold it with vice, and using scrap to lock it. Now unscrew the bolt. Everything, hard work ended now you need to remove the air conditioner and the generator belt to do this, you need to weaken the locking and axial bolts of the generator.

To remove the gur belt, the tensioning bolt will need to be unscrewed, but it will not be possible to get to the "axial", so you will need to loosen the tension of scrap and remove the belt.

All, now disconnect the black wire that comes from the motor to the support. Do not forget to deliver a jack under the right side of the engine, you can continue. We begin to dismantle the right support that interferes with the shooting of protective housings.

The top bracket will be pulled to the motor with two nuts, now raise a little engine and pull out support.

Everything, nothing will no longer hurt to remove the covers, first of all unscrew the upper casing, there are only five bolts there, in some places it is very difficult to get to the bolt. Then the lower, when you remove problems, it should not arise.

Installation of TRM labels
Before you put the pulley and combine the staggers of the asterisk, you need to unscrew the candles to disappear compression, now the pulley is satisfied with the crankshaft and you can combine tags.

In order to make sure in the coincidence of the stars of camshaft, you can take the mirror and look through it in the hole of the asterisk, if everything is correct, you can see the label on the block.

Now it is necessary to remove the bolt, which fixes the tensioning roller, after removing the spring. It is calmly not twitching, and in no case is not twisting the belt, we are painting it from stars and rollers.
Before putting new beltIt must be compared with the old on the coincidence of the number of teeth, serial numbers and of course length.
As soon as the belt was put, the tensioner spring was thrown, the crankshaft must be scrolled on 2 turns, so that the roller tensioner makes his work, that is, pulled the belt. Before assembly, check the coincidence of the labels, we will weaken and drag the belt in the opposite direction.
Replacing the timing belt. Toyota Ipsum 3S-Fe. Updated version after the second replacement.
Introduction: Yes, although there were a lot about the maintainability of Toyota, but I will tell you that on the Passat to change the timing belt was easier, although not much, but maybe it makes itself felt a more dense layout on the minivans. Knowledge of course force! And if I knew the correct sequence of operations, I would have done everything twice as fast. I did on the book, and there the sequence is such that I forgot to write the first line: remove the engine and conveniently position it on the workbench :-). We also have to do this operation in a narrow space between the engine and the body. Well, the lyrics are now just a sequence:
1. Remove the right front wheel. And remove the boot aka Carter's protection :) (right half) - by revealing pieces of 6 bolts and screws and pulling one piston.
You will open a gorgeous view of the crankshaft bolt.
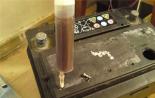
2. Revealing this bolt separate song. The main problem lock the pulley. I did it like this: weakened the generator's belt as possible, firmly plugged the rope belt just below the generator pulley (see photo), pulled the generator belt again, the rope turned out. This can be done with the gur of the pump of the pump, but they do not stretch so tightly. We unscrew the bolt ... Do not think that it will be simple. I managed to make the hammer strikes on the gate. In the end, you have not yet reached cars and there is a chance to collect everything back and go to search for shooters or in the car service :-)
3. Remove the pump belt GUR, tapped with the weakening of the tension of the on-tree belt :-), I let go of the bolts 3 and 4.
4. Disconnect the Accord terminals !!! Remove the generator, the generator belt
5. Run a tank of Goura (by pulling up, pushing the latch between the body and the tank). We unscrew the highway Gur (2 bolts 1 and 2 cm. Photo).
6. We substitute the jack under the engine

and we start to remove the support, even I would say to disassemble it. First unscrew the first nut from below (in photo number 10), 1 nut and bolt from above (in photo 8 and 9). We unscrew 3 bolts with which the support is attached to the body. We take out the support ... At the same time, the highway of the gur damn prevents.
7. We climb under the car. Lower the jack on which the engine is worth. We unscrew the 3 bolts of the support bracket (in photo 5, 6 and 7).
8. Remove the top cover of the timing cover. To do this, you need a jack again to raise the engine to the topmost position. The lid is removed by a rather cunning movement, because The main brake cylinder and highway of the gur and brakes is very prevented.
9. Sunday the engine again. And remove the crankshaft pulley and the lower protective cover of the timing. Pulley knees of the shaft may not be so easy. But there are holes with a chopped thread (like M6). In the photo below shows my handicraft. those. The plates were screwed and the pulley bolt squeezed all this design.

10. We mark the paint exact location of the belt on the crankshaft and camshaft. I also installed on every case as written in the book 1st cylinder in the NMT, tags for zero, etc.
11. Weaken the roller of the belt tensioner, press it and screw it again. This operation alone requires some dexterity :-) We remove the timing belt.
12. Transfer tags to a new belt. We put the belt back. Watch the exact coincidence set by tags.
One of the complex moments during the assembly, it is to bring the lower part of the support to the engine (5,6,7 bolts) ... twice changed twice soaked.

Truck fixation of pulley :-)

bolts Support and belt adjustment GUR

tags for crankshalla
Conclusion:
Of course, I was a bit wrong. By purchasing not the original timing belt and without changing the video .... well, oh well. Those. In fact, I replaced only the timing belt and belts of the GUR and the generator.
1. Two jack and tripod for auto insurance.
2. Keys on 10 and 14 of all possible forms (horn, cape bent and the like.
3. Head at 14 long (when the support is unscrewed, the protruding stud is interfered).
4. Head at 12, 19 and extension cords.
5. Little rounds (disconnect wire mounting latches)
6. Puller or adaptation for pulley removal.
1. Remove the right front wheel. And remove the boot aka Carter's protection :) (right half) - by revealing pieces of 6 bolts and screws and pulling one piston.You will open a gorgeous view of the crankshaft bolt.
2. Revealing this bolt separate song. The main problem lock the pulley. I did it like this: weakened the generator's belt as possible, firmly plugged the rope belt just below the generator pulley (see photo), pulled the generator belt again, the rope turned out. This can be done with the gur of the pump of the pump, but they do not stretch so tightly. We unscrew the bolt ... Do not think that it will be easy. I managed to make the hammer strikes on the gate. In the end, you have not yet reached cars and there is a chance to collect everything back and go to search for shooters or in the car service :-)
3. Remove the pump belt GUR, tapped with the weakening of the tension of the on-tree belt :-), I let go of the bolts 3 and 4.
4. Disconnect the Accord terminals !!! Remove the generator, the generator belt
5. Run a tank of Goura (by pulling up, pushing the latch between the body and the tank). We unscrew the highway Gur (2 bolts 1 and 2 cm. Photo).
6. We substitute the jack under the engine 
And we start to remove the support, even I would say to disassemble it. First unscrew the first nut from below (in photo number 10), 1 nut and bolt from above (in photo 8 and 9). We unscrew 3 bolts with which the support is attached to the body. We take out the support ... At the same time, the highway of the gur damn prevents.
7. We climb under the car. Lower the jack on which the engine is worth. We unscrew the 3 bolts of the support bracket (in photo 5, 6 and 7).
8. Remove the top cover of the timing cover. To do this, you need a jack again to raise the engine to the topmost position. The lid is removed by a rather cunning movement, because The main brake cylinder and highway of the gur and brakes is very prevented.
9. Sunday the engine again. And remove the crankshaft pulley and the lower protective cover of the timing. Pulley knees of the shaft may not be so easy. But there are holes with a chopped thread (like M6). In the photo below shows my handicraft. those. The plates were screwed and the pulley bolt squeezed all this design. 
10. We mark the paint exact location of the belt on the crankshaft and camshaft. I also installed on every case as written in the book 1st cylinder in the NMT, tags for zero, etc.
11. Weaken the roller of the belt tensioner, press it and screw it again. This operation alone requires some dexterity :-) We remove the timing belt.
12. Transfer tags to a new belt. We put the belt back. Watch the exact coincidence set by tags.
Next, we collect everything in the reverse order, without forgetting by the book to pull the timing belt.
One of the complex moments during the assembly, it is to bring the lower part of the support to the engine (5,6,7 bolts) ... twice changed twice soaked.