Where are the threads of the heating of the rear window. What is needed to connect the heating of the rear window? Troubleshooting the heater with a conductive adhesive
The heating system of the rear window TC is a common equipment for almost every modern machine. The purpose of this functional supplement is to eliminate ice crust or sprousing from glass in winter. If the heating of the rear window does not work, the visibility is deteriorating, and the driver is deprived of the ability to rationally assess the circumstances on the roadway behind its own car. Restore safe driving will allow the speedy repairs.

Device of heating system
To understand how to restore the heating of the rear window, it is worth pre-examining the principle of operation of this system. Its goal is to eliminate fogging and preventing air cutting in the cabin. In winter, this function is indispensable because icing evenly leaves glass and at the moment when you already need to go, the review is 100% free.
The principle of operation of such a system in the case of the windshield is the effectiveness of directional air flow.
If we are talking about the rear window, compact heating elements come into operation, the source of which is the electrical network. Metal tracks are fixed on the surface of the glass from the cabin. These are numerous thinnest ribbons through which electricity passes, activating the heat release process. As a result - due to the heating of the glass, the water evaporates and the surface becomes transparent in a couple of minutes.
Scheme of work
To know how to restore the heating of the rear window of the car and with a high level of professionalism to come up to the repair, learn the principle of operation and the electrical circuit of connecting wires. From the terminal + battery power goes to the ignition lock, then on the fuses and last on the controller. After such a path, it follows the power contact relay. TC Body is associated with minus battery output. The activation of the heater supplies the voltage to the relay winding, then the power contacts are closed, there is also a connection of relay conclusions. The current flows by parallel to the connected tapes of the heater, then it falls on a minus output through the body of the machine.

Remember, the activation of the heater is possible only with the activated ignition key.
In some cases, a launched motor appears in the role of factor activation. Such a feature is due to the fact that the battery should not be prematurely discharged, and given the features of each brand of the car, the amount of consumption of this system can be 10-25 A.
Sources problems
Since to restore the heating of the rear window with their own hands prefer many drivers, you need to know about the options for repair, taking into account the source of the problem. In an independent check of the functional components of the machine there will be no obstacles if you have minimal automotive repair skills.
The safety element is the first thing that should attract your attention when the breakage is detected, since the system will not work if it overwhelms. The localization of this element varies depending on the machine model, so at this stage you will have to seek help from the TC service book. Next, remove the fuse and make sure it is working. Rear window heating repair will be limited to the replacement element.
The breakdown of the system relay can also lead to the opening of the heating. In this situation, the installation of the fresh item will also be enough.

Wiring
If the fuse replacement has not corrected the situation, proceed to the diagnostics of the feeding electrical conductors. Burning, fastening breakdown or fracture contribute to stopping current flow to heating poles. To detect this circumstance, turn on the heating button and measure the terminal tester voltage. You can detect the terminals at the bottom of the glass or on its sides. The lack of voltage on the wires should alert you.
Examine the entire path of wiring for integrity, clean the contacts of the terminals and connections. Oxidation in these zones often lead to voltage supply lock. If it was not possible to cope with this task, it will help you autoelectric.
In case of damage to the heating tapes, it may also be necessary to restore the heating of the rear window. To know how to do this, it is necessary to pre-explore the peculiarities of the workflow in this area. The heating element receives the voltage and the energy follows the threads. In relation to the base, they are connected in parallel and perform the role of current conductors. Their heating is due to a certain fraction of resistance, despite the insignificant heating temperature, it is enough for its purpose. If one or more threads are damaged, there is no current on them, therefore, these sites are not heated. Features of repair work in such a situation are described slightly lower.

Controls
If all the items that you checked earlier are good, you should pay attention to the power button. It is possible to determine the operation of the system along the lighting light indicator, which makes it necessary to know after pressing the button. If everything is activated and the corresponding indicators made itself felt, but the glass does not heat, it is likely to wear or burn the working contacts of the toggler, so the energy is not served. Repair of the heating of the rear window of the car requires only replacement of the button.
Import cars
In the case of imported machines, the repair of rear window heating does not limit itself to the diagnosis of the standard heating system, since the rear view mirrors are also equipped with heating. The activation of the heating of the glass of the feed leads to a parallel activation of the mirror warming up. If the system does not work on both zones, the most likely probability is that you are dealing with the cause discussed in the first point - a fuse or relay.
It is important to determine which fuses are connected with glass, because there are several of them. It will not be superfluous to diagnose the electronic board, which due to the disappearance of contacts and the rupture of the tracks is often wearing.
Phased repair
It is paramount to diagnose and purchase a repair kit. Repair kit options can be somewhat and below the repair technology in each case.
In addition to visual diagnostics of the state of the threads, there are several more methods, more reliable and effective:
- Visual diagnostics requires the activation of the heater when the rear window swam. Where the threads are torn, the surface almost instantly will move, whereas in the rest of the zones will be problematic.
- Using a voltmeter requires ignition activation and further turn on the heating system. One dipstick should lie on the mass of the vehicle, and the second near the center of the heating ribbon. Pre-second probe wrap foil. The opening will be localized in the zone where the voltage will rise to 12 V or fall to zero. Ideally, this parameter should not exceed 5 V.
- The second method of using a voltmeter implies fixation of one probe to the positive terminal of the heater, and the second must be moved along the tape of the negative terminal. The problem point will be where the voltage is zero.
- The use of an ohmmeter requires activation of the Kilo regime. The device must be analog, with an arrow. Probes should be located near the system conclusions that are in opposite sides of each other. Use distilled water to wet your wool, which you need to smoothly spend on the tape. As soon as the appliance arrow fade, you can detect the cliff area.

Repair conductive glue
Repairing the rear window heating yarns can be carried out using conductive glue. It is designed for temperature range from -60 to +100 degrees. Do not choose sets with glue, the cost of which is 150-200 rubles. Often they are enough for a while or they can be ineffective at all. The cost of 300-400 rubles will be optimal for such a set.
Procedure for performing work:
- Explore the instructions attached to the set. You must have a clear idea of \u200b\u200bthe embodiments of the composition and the speed of its full drying.
- Prepare a problem surface. Moisten the rag in the alcohol solution and wipe the area.
- Slightly clean the edges in the cliff zone with zero emery paper. It is enough to simply remove the flare and the tag with two movements.
- Take advantage of the scotch even to wake strips through the thickness of the sides. It should not overlap the thread, but also avoid the departure from the tape for a long distance. Focusing specifically on the width of the thread.
- Start applying a conductive adhesive on the prepared zone with a tassel or a syringe. From the instructions you will learn how many layers need to be applied. Fall on the working zones of the tape should be 1 cm left and right.
- Liquid your tape and wait for the composition to dry. Previously, this will not happen.
- Check the performance of the system after drying.
Among the demanded and reliable manufacturers of the repair kit, which includes threads, it is worth highlighting Quick and Permatex. Such options are suitable for repairing even extensive plots, even ate we are talking about 10 cm. The package assumes the presence of heating tapes, a polymer resin in the form of a spray and stencils.
The repair of the heater is reduced to the following actions:
- determine the rupture zone and prepare the filament of the appropriate size;
- eliminate the protective film and use the resin to fix the threads in the required zone;
- after complete drying, repeat the manipulation and check the result after 2 days.

Alternative method
Folk methods will also rise to restore the threads. The difference between them is only in the material used:
- Chips in combination with paint. The first material will be able to get copper and brass from the bar, which must be treated with files. Pick up the paint so that it is combined with a shade of heating tapes. Mix the components in the same proportions until you reach the mild dough consistency. Use an insulating tape or scotch to create a stencil. Stick stencil and activate heating. It is possible to determine the contact by characteristic hiss. Apply a mixture on a stencil. This method allows you to get rid of the need to wait for a day. You can operate the car immediately after the manipulations performed.
- The breakdown of the breakfast is carried out using zinc chloride. Prefer the act with the minimum content of tin - POSS-4-6 or POS-18. He lived from copper or silver is suitable for repairing an extensive ribbon section.
Many drivers are interested in what to do if the heating is not working on the rear window? This is not just a whim, but a vital necessity, allowing to always see what is happening from behind.
If, when looking into the rearview mirror, the driver does not see anything other than fog, it means that the risk of an accident increases many times. That is why, as soon as you noticed that heating the electrical yarns of the rear window does not work, it is necessary to immediately take it to the repair.
This is not a particularly difficult procedure, but that everything goes as needed, it is necessary to approach it as much as possible. It is very important to carry out everything exactly with the instructions.
Features of the heating system for rear window
Design heating
Before moving to the repair of heating of the rear window elements, which you make your own hands, you need to understand the design of this device. In fact, it does not constitute anything complicated.
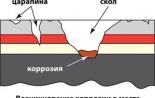
On the sides of the rear window of the vehicle go two conductive tires. Between them are located heating lines. Usually, high-purity material is used to create them. The fact is that for efficient work, each thread must have resistance around 10 Ohm. Only so you can protect the glass from fogging.
The number of threads in the heating of glass, which is in the back, is different for each car. In most cases, it depends on the length of the surface. When repair, it affects the complexity of the discovery of the cliff.
Important! All heating lines are connected in parallel. As a result, the opening of one of them does not affect the work of the rest.
Connecting to the on-board network

To fix the heating of the rear window filaments, you will need to study the scheme for connecting this device to the automotive electrical network.The main role is played by the ignition castle. It is through it that the tension is supplied to the heating system.
Attention! For stable operation of the device, one conclusion closes on a mass of the machine.
Once you turn on the heater, the current comes on the relay. After that, contacts are closed, and the conclusions are connected. As a result, electricity without obstacles is supplied to the heater.
As soon as the current falls into the heater electrical circuit for glass, it begins to feed the threads that are parallel to the common system. But that's not all. The fact is that the negative contact of the battery is also brought to the mass of the car. Due to this, constant sharing is carried out.

As you already understood from the above material, the heating of each rear seat thread works due to the ignition key. As soon as he gets to the ON position, the entire system is activated.
Attention! In some cars, the heater for the rear window is activated solely when the engine is running.
Many drivers are outraged by such a solution to the designers, but in reality he has its own logic. The fact is that the rear window heater consumes very much of electricity.Typically, this indicator varies in the range from 10 to 25 A.
So that you understand better how much it is 25 A - do a visual comparison. In order for one car headlight to shine, at least 5 A. is actually one heater is 5 headlights.
What malfunctions be other than the cliff of threads
To fix anything, you first need to diagnose the breakdown. For a number of signs, you can first find out what exactly the reason for the failure of the threads. So the non-working rear window heater indicator when the button is pressed to the defective fuse.
A luminous indicator and non-penetrating heating threads located on the rear window indicate problems in the relay. In turn, poor contact in the electrical circuit leads to too slow down the glass.
We carry out repair of heating
Search for a breakdown

It is from this that you need to start the procedure for restoring the normal health care of all rear window yarns. First, look at all lines visually. If nothing is not unbearable, you can use the search techniques that have been developed by other drivers who collided with the same problem:
- If at first glance when inspecting the rear window, the cliff of the heating lines you did not find, you should not immediately move to more complex techniques. To begin with, simply disconnect the heating. In a place where the glass is not heated - a characteristic band appears.
- Take a voltmeter, activate the heating of the rear seats. Set one probe to the mass of the machine, the second wrap foil. At the same time, slowly move on each line until it comes to the middle. Standard voltage is 5 V. If it falls below, it means that you found the place of the cliff. The jump to 12 V also denotes a break.
- There is another option to use a voltmeter. To do this, be connected plus to the terminal to the appropriate heating contact. The second probe must be slowly moved along the line. Moreover, it is necessary to do this from the other side where the negative terminal is located. The voltage drop means what you found a break.
- Ommeter. The best arrow device will be the best. When you turn on the device, you must select mega mode. Properties Connect to the outputs of heating on the rear window. As a connecting element, the usual wool moistened in distilled water. Spend on line. The arrows reaction will mean that you found the place of the cliff.
As soon as the location of the cliff in the heating threads of the glass, which is found, found, can begin to be fully repaired.
We repair heating

There are many methods of repairing threads responsible for heating the car's glass located behind. TO example, you can take the usual repair kit for the corresponding part. Plus, this option is that you will not have to look for additional parts and tools. Everything will be in one package.
Attention! Before you begin to solder - clean, and degrease the wire of the heating system.
Some of the best sets to restore heating damaged thermal rear window lines make Permatex and Quick Grid. All of them have similar components.
Remetomlect allows you to restore about 10 centimeters of damaged thread. Usually in the set already there are ready-made lines. All you need is to install them correctly.
The algorithm for the repair of thermal lines of the rear window with the help of Remkomplekt is very simple. You need to replace the damaged thread and apply the compound where there was damage.
Important! The procedure must be repeated two or three times so that it has the effect.
At the end of the work, remove the template.Heating cannot be turned on at least the day after you do everything. Otherwise, all work will be useless and will have to redo it.
The second method of repairing heating of thermal lines of the rear window with their own hands is to use conductive paste. Just apply it to the place where the threads were torn off. Wait 24 hours. After that, all the functions of thermal lines will be restored.
Tip! If time is pressed and you need to go urgently, use the usual hairdryer to accelerate the process.
Folk Methods Repair

Of course, the use of Remkomplekt and thermal paste has its advantages. They are easy to use, and the result of repair by these means of heating threads from a special material for rear window is always at a high level. Nevertheless, they still need to buy. And for this you need money and time. In some cases, and with the first and second possible, some difficulties are possible.
It is not surprising that the domestic and foreign motorists were invented a whole set of diverse techniques that can help in the shortest possible time with the help of existing means to restore the torn lines.
In order to realize the first folk method for repairing the rear window threads - you will need paint and chips. To get it chips need a copper-brass bar and a file. Paint color does not matter much. Nevertheless, it is preferable to match the threads.
The chips and paint are mixed in the proportion of one to one. As a result, you should have some kind of dough from these two elements. In order to make the stencil, ordinary tape will fit.
After the stencil is applied to the surface, turn on the heating of the threads with the resistance of 10 ohms for the rear window. Only then apply the regenerating mixture. As soon as the dough falls on the damaged area - a specific hissing will be heard.
The main plus techniques with paint and chips when repairing heating on the rear window is that you do not need to wait. As soon as you break easily recognizable hiss you can immediately go to the track, not afraid that the rear window is notice.
The second folk method of repairing heating installed on the rear window has some differences from the first. In the mixture, the chips are also used, but the paint is replaced with glue. Ideally suitable BF-2. Its restoration qualities will be more than enough to restore damaged threads.
Important! To ensure more reliable contact, you can use fine wiring.

The third folk method of repairing the heating threads attached to the rear glass is the usual soldering. To do this, you need a flux and zinc chloride. Without solder, of course, it will not be possible to do. The vein that you will use while working should be silver. Alternatively, you can apply copper.

As you can see, the folk methods allow you to restore even the most serious breakfasts of heating lines on the rear window of the car with minimal cost. Unfortunately, unlike the finished paste, the composition you will have to do it yourself. And it takes time and strength.
RESULTS
Heating of high-resistant rear window yarns can be repaired with their own hands. For this, it is not even necessary to buy Repair Kit or pasta. Enough primary means in the form of bar and paint.
When creating a passenger car, designers pay great attention to glazing machines. In the design of the glass vehicle play an important role. They protect the driver and passengers from wind, dust and dirt. Serve with a sound insulation obstacle that allows people who are in the cabin to talk without tension.
The visibility from the salon and the opportunity to control the road situation depends on their shape. For this, various improvements are made on the glasses, including the heating of the rear window.
A system that helps purify the rear window from the nondes, snow or fogging, is not very difficult constructively. The electrical circuit in general terms can be portrayed as follows:

- C - generator.
- E230 - Switch of the OGS system.
- J519 - onboard electrical network control unit.
- Z1 is the heating element of the OGSC system.
Although on different models of cars and there may be some differences, however, if we consider it in a detailed plan, it is fundamentally it includes the following main elements.

- Mounting block.
- Ignition switch.
- Switch heating ZS.
- Control lamp signaling the inclusion of the OGSC.
- Heating element of the OGSC system.
K6 - Relay Additional.
K7 - OBSC inclusion relay.
A - Connecting to power systems.
In addition, the system has fuses, terminals and wires connecting all elements into a single integer.
When the OGSC ignition key is turned on by pressing the button, to which the power is supplied through the additional relay K6. At the same time, the heating element of the rear window of the rear window is triggered, the heating element is connected and the control light lights up at the same time.
The device of the heating element on the rear window can also be different. In the standard version, it is a mesh of thin metal nickel threads, which are connected by two conductive tires located on opposite sides. On the one hand, a 12V voltage current is supplied to the tire, on the other, the bus closes to the ground. Such devices are attached to the glass with a special glue.

On some models of cars, the heating element is applied to the glass by spraying, for example, aluminum. On top of such spraying with the help of glue, which conducts the current, the thin film is fastened with good traffic.
Detection of malfunctions in the OGS system
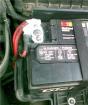
Having found signs that the heating of the rear window does not work, it is necessary to carefully check the entire electrical circuit of the system of the car.
The first thing you want to check is the cost of fuses. For example, on VAZ-2110, these are fuses for heating the rear window F4 and F7, which are located in the mounting unit. Their malfunction may occur due to the factory defect, short circuit or voltage jump in the onboard network. Need to replace the faulty fuse, for which it needs to be removed from the mounting unit.
Next, you need to check terminal compounds in the OGSC system. When operating a car on all equipment, strong vibrations are affected. As a result, damage to contacts or some terminal can disconnect or loosen.
You also need to check the rear window heating relay. The breakdown of the relay is possible when the wire breaks in the working coil of this part or due to the burning of the contacts, due to the factory defect or short circuit. To check it, the relay must be removed and controlled by the tester. In the event of a malfunction of this part, you need a replacement for a working spare part.

 It is necessary to check also the contact of the heating of the rear window. On the rear window, a conductive element is attached with glue, which is the contact to which the electrical current transmitted through this contact to the heating threads is supplied.
In this place it is possible to open the wiring or due to the fact that the glue was low-quality, detect the contact element from the glass.
It is often quite common to the failure of heating ZS, it leads to a break or damage to the threads in the heating element on the rear window. This is detected by visual inspection or instrumental analysis. We can visually detect only explicit damage to the thread by installing the gap between the damaged ends.

It is possible that with some repair work on the car, a mechanical damage to the glass surface was applied, on which the heating element is attached using adhesive.
However, the main tool in the diagnosis of this malfunction is a voltmeter or an ohmmeter.

They allow you to reveal a plot with faulty threads with high accuracy, even if visually detect this breakdown.

The order of repair of a faulty system of the OGS
Having determined the reason why the rear glass heating does not work, you can start repairing this system.
- If the fuses or the OSS system relays are faulty, then you need to remove faulty parts. Replacing them for new, workable labor is not. The main thing is that they are set as indicating the circuit of the electrical on-board system.
- In the case when the culprit of damage in the OGSC system is a terminal connection, the restoration of the heating of the rear window also does not cause difficulties. It is enough to clean the contacts in the terminals. It is possible to replace the terminal box, but it will not take much time.
- If the glue, which was attached to the contact on the rear window turned out to be poor and there was a detachment, then in this case it is necessary to buy a new high-quality conductive glue. Remove with a proportioned contact with a layer of old glue using a napkin with an alcohol solution. Then apply a layer of a new connecting substance and glue the contact to the place.

- If the wires are detected on one of the tires, this wire is necessary to attack the old place using the connection scheme. The procedure for the following:
- remove the remains of the old solder from the wire, cleaning the end, in addition, you need to clean the connection on the tire;
- with the help of a tassel on the sheepskin surfaces of the tire and wires the rosin paste as a flux;
- on the peeled and infanipalized living wire, the wires are solder, containing three percent of silver in its composition;
- swipe the wire to the bus, while overheating surfaces should be avoided.

- Most of all accuracy in repairing the rear window heating is required if the discontinuity of the heating element of the OGSC is detected in the conductive threads. To facilitate this work, there are special sets for the repair of this system. To correct damage, the actions are performed in the following order:
- in the rupture area, clear a plot with a length of six millimeters in each direction from the place of damage;
- purified section wipe with a napkin or a cloth moistened with alcohol or alcohol solution;
- on both sides of the damaged thread, paste thin strips by repair sticky tape or ordinary building tape, if the repair kit is not. Prevent sticking of adhesive tape at nearby threads, in order to avoid damage;

- if there is a repair kit, then mix the hardener with the composition of the silver color, which after applying will perform the role of the thread of the conductive current. After mixing, apply a stick or tassel on a damaged area by closed the circuit.

- if the repair kit is not, the role of a special mixture will perform glue, which is well conducted by electric current, it can be applied with a brush, observing the accuracy;
- after removing the damage, it is necessary to give the time so that the glue or special mixture must be applied to speeds up this process;

- after drying the strip of the conductive current, it is necessary to carefully remove the self-adhesive tape, for this it is best to cut it with a knife at the place of adjustment to the repaired threads so as not to damage it when the tape is removed;

- after the work performed, it is necessary to check the capability of the OGSC, for which it is necessary to start the car engine and press the inclusion button of the OGSC.
See also video
The current in the car is served from the plus through the ignition lock, as well as through fuses. Then the voltage passes to the heater switch and the minus battery connects to the car body. One of the wires of glass heating system is also connected to the body.
When the driver presses the power on the system, the voltage comes on the relay. It is triggered, force contacts are closed. The current falls on the heaters, passes through the heating threads and then through the body goes to the battery.
Device of heating element
The heating element has the following device. Bocames on the rear window are conductive tires. They are attached special threads from high resistance materials. Resistance to each thread is 10 ohms.
Their number depends on the size of the glass. So, each thread is a separate element that works separately from others. All items are connected to each other in parallel. This scheme allows you to provide a high reliability system. So, if there is a break of one thread, everyone else will work.
Typical malfunctions
Before repairing the rear window heating threads with their own hands, you need to find out the fault. Depending on what kind of malfunction is manifested by externally, you can diagnose the operation of the system even without a multimeter.

It should be noted that it is possible to start glass heating only if the ignition code is enabled. On some models, the auto turn on the heating of the glass can only with the motor running. This is done in order to reduce the burden on the battery. The system for full-fledged work is necessary from 10 to 25 A current.
Heating does not turn on
So, if the system does not turn on with the corresponding button, the corresponding fuse failed. A button can also be broken. If the performance indicators are glow, but the glass does not turn off, repair the rear window heating threads are starting with checking the connectors and relays. In this case, the electrical schemes find where parts are installed and change them.
Slow spontaneity
Sometimes you can observe cases when a considerable amount of time passes between pressing the button and on the button and turning on the heating system. If over the board the low air temperature or frost, then the reason for this problem can be in bad contacts on one of the connectors. Contact resistance grows, current becomes lower, power drops.

To check this malfunction, you must use the multimeter. Change the voltage at the terminals of the heating system and battery. These voltages should not be different.
Stripes remain on the glass
This is the most popular malfunction. The problem is associated with the breakdown of the threads that are applied to the glass. This malfunction can be diagnosed by bands on the glass after the system is turned on.
The threads installed on the rear window differ in low strength. And if they have a little effect on them, it will take the repair of the rear window heating yarns.
We define the place of the cliff
It is not difficult to find a break. Near the threads, foaming or a permanent disappear. That is why it is to quickly find a damaged element, threads consider and then find a damaged place. But sometimes the cliffs are so insignificant that they are very difficult to notice. Then the voltmeter should be used.
Due to the fact that one of the tires is connected to the body machine, the minus the multimeter wire is connected to the body. Next, a positive wire with a diploma concern the first and second tires. On the first voltage is +12 B, and on the second - 0 V. If for some reason there is no access to the bus access, then the measurements can be performed where the threads come out from under the seal.

If the heating is enabled, there are 12 V in the system, but the threads do not heal, then this says that the entire wiring is before the first tire in working condition. If there is no voltage, it says about bad contact. Requires repair of threads and rear window heating contacts. Can also fail the relay.
If the voltage is not only on the first, but also on the second bus, they are looking for bad contacts in the wire connection circuit of the heat heating system.
How to find a break
Thread is a tape with a resistance of 10 ohms. In different places, the voltage will be different. In the first point, the voltage will be 12 V, in the third - 6 V, in the fifth - 0 V.. If you do not know which threads are damaged, it is easy to find it. For this measure the voltage in the middle of each strip. If the thread is trimmed, then the voltage will be either 12 V or 0. Therefore, the break from the left or right.
Repairs
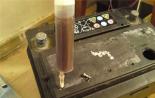
There are several ways to repaired this system. The most efficient and fast is to use a set for repairing rear window heating threads.

There are many of them, they are designed to restore the integrity of the ribbons. This set is all. It is a syringe with special paste. Reviews are well characterized by the Permatex tool. Repair the rear window heating threads with it is very easy and simple. You do not need any additional tools. Everything is in the set.
So how to repair? Everything is very simple:
- With the help of alcohol or solvent we clean the glass area at the point of breaking the thread.
- We take into my hands tape and stick it on both sides of the heating element. At the same time, the distance between the ribbon should not differ from the thickness of the heating thread.
- With the help of a tassel or a syringe, we apply conductive glue or paste (depending on which set will be used). How to apply it? The glue should be overlapped by a third of the thread of 10 millimeters on each side.
- We remove the tape and wait until the glue dries. According to the instructions, the composition dries out in 24 hours.
- A day later, we remove the excess glue. This can be done with a sharp knife - kitchen or stationery. Be careful - the knife can easily damage the surface of the heating element.
- We wipe the glass soft and slightly moisturized by the rag.
- Check the performance of the element.
You can also use another means for repairing rear window heating yarns. This is "ELEKONT" of domestic production. Mass are applied to the place where the thread is torn. Apply adhesive so that it overlaps the whole part of the thread from each of the parties. After hardening, the electrical heating system will earn again.

It is believed that glue can be made self (made of metal chips). But it is not worth doing this. The finished product is much more efficient. In addition, the reliability of the technology of self-making adhesive is not confirmed.
Conclusion
So, we found out how the heating threads are arranged and how to repair them. The complexity of repair is to find a non-working tape. After all, the system will work even when half of all existing threads occurred. True, glass in this case will move half.
If you are reading this article, then the heating of the rear window is definitely it is an indispensable function of your car. Nevertheless, for many decades, drivers were forced to ride without heating the rear windows. From the thermal functions of the brake of the car was only the very warm air that blends from the ventilation holes at the base of the windshield, but this, of course, it was not enough so that such air could dry and warm the rear window in the rear end of the cabin. However, if you had children, you could give them a little cloth and give orders to make the rear window to be clean, but agree, this is not a very welcome perspective!
Then this curious grid of wiring threads on the rear window appeared. The button on the dashboard includes the system, and right in front of the fog (condensate) will disappear on it. Soon such a defroster became standard for the rear windows of most cars, and today almost all the cars are equipped with the heating of the rear window.
But, unfortunately, like everything else in your car, heating is also susceptible to breakdowns. And if it happened, then the first step that should always be done in troubleshooting is a clarification, why the rear window heating does not work before proceeding to one or another more specific and thorough diagnostic or repair method.
Repair the rear window heating thread
So, the repair of the rear window heating should be started with the search for a good kit for repairing heating, which, in general, is very primitive and consists of directly conductive means (glue, varnish, etc.) and brushes for its application (sometimes included Cancellation or tape can go for the border of glue. This set is sold in almost any auto shop, and when buying should pay attention to its color - it should be yellow-red, mustard or red - most often it is precisely such means for repair are the most qualitative and Reliable. In any case, you better choose glue from those that the same color that also applied to your rear window.
The second - the price of a set of means for repairing rear window yarns should be at least 300-400 rubles - here is exactly the case when quality depends on the cost.