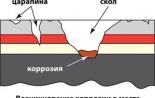
The rear window heater is made. Restoration of rear window heating threads
At any time of the year, the driver needs a regularly working machine. And sometimes some details are considered not as important, but according to the law of meanness, they will be in a difficult moment. One of the troubles that can happen to the driver on the road is damage to the heating system of the rear window. Both in the winter during the period of cold weather, and in the summer in rainy weather, this feature of the car must be performed in full. Otherwise, moisture will fall into the salon, and visibility is reduced to the limit, as a result, the driver is forced to repair the vehicle rear window heater.

Heating system and function
The functioning of the heater is carried out at the expense of electricity. It is known that warm air flows are influenced on the windshield, special heating elements are needed for the rear. It's no secret that the inner side of the rear window is equipped with metal tracks having a large electrical current resistance. When the current proceeds along the ribbons, heat isolation and, accordingly, heating. The result is obvious: transparent, dry, heated glass.
The main function of this structural element is the fight against icing, humidity and fogs. As soon as the system begins to work, after a slight period of time, the glass is clean and transparent. In addition, this feature allows not to overcover the air in the car.
Damage to the heating system
As a rule, the driver notices damage in this part of the car, only when ice rear windows are constantly sweating and does not get rid of ice. After turning on the heater, in an ideal in a couple of minutes, it should be transparent and clean, but if this did not happen, it means there was damage or function in defective. Among the damage to the system should be allocated:
- Slow glass focus. If visibility does not improve after a few minutes of operation of heating, it means that the functioning is broken. The reason may hide in the fragile contact of the circuit connector.
- Lack of heat performance when it is turned on. In this case, after pressing the indicator does not shine. This can be associated with a faulty key or burnt fuse.
- Having a glass of horizontal poverty bands. As a rule, such a malfunction can occur due to the cliff of the heating threads, which are applied to the glass surface.

Slow glass focus
Whatever happens, the main thing is to produce the right repair of the heating of the rear window with their own hands or with the help of a specialist.
Definition of malfunction and repair
It is believed that it is quite simple to determine damage in the heating system, and each driver will cope with the specified task. Before starting work, it is recommended to calculate the threads deposited on the glass so that it was then easier to remember which the account is damaged. There are cases when the gap is impossible: it is so small that one of the devices should be used. It may be a voltmeter or multimeter. In any case, to repair the rear window heating yarns, you need to carefully study the surface and identify damage.
There are several effective troubleshooting methods:
- The method of visual diagnostics - in damaged places with the heated glass is not heated and remains missing.
- With the use of a voltmeter - with the heater turned on, one probe should be put on the "mass" of the machine, and the second, wrapping the foil, put in the center of the thread. It is necessary to monitor the voltage, its indicator should not exceed 5 V. If the device shows 0 or 12 V, then the gap is in this place.
- With the use of an ohmmeter - the device is included in the "Kilooma" mode and is connected to the opposite leads of the heater. Mix the mob and spend on the thread. In the place where the arrow will twitch, and is a break.

Determination of rear window heating malfunction
It is possible to repair the heater with a variety of methods, for example, to acquire a special set for repairing the rear window heating threads.
You can repair the system using a repair kit, conductive paste and folk methods. The main difference of all options are the materials that are used during operation.
Materials for repair
By purchasing the repair kit, the driver has the ability to fix the heating thread to 10 cm. Materials used in such sets:
- pattern with threads;
- thermally active polymer resin in the cylinder.

Rear window heating repair materials
Works are carried out strictly when the heating system is turned off. Having determined the place of damage, it is necessary to remove the protective film from the template and attach to the place found. The application of the polymer material is made with a brush, and after drying it is repeated several times. After performing work, the stencil is removed and preferably not to include the heater during the day.
In the case of using a conductive paste, only a construction hairdryer may need, which speeds up the drying of the material.
The materials that are used in the "folk" methods of repair of the heater are paint (glue) and chips, metal for soldering a damaged place. As a rule, the paint is selected according to the color of the threads and connect with the chips, sticking to the ratio of 1: 1. To work, you will need a stencil for which the mixture is applied (when the device is turned on). The advantage of this method of repair is the absence of the need to expect drying during the day. The driver can immediately go after the work. For soldering, zinc chloride is suitable.
How to restore heat with glue
Quite often, drivers use conductive adhesive for rear window heating repair. The material is mixed with chips, which is extracted with a file or copper-brass bar. The proportion of 1: 1 is observed. As a result, the consistency of the soft test is obtained. With the help of tape or tape, stencil is made, and the prepared mixture is applied to the place of damage. After the procedure, it is not necessary to wait for the drying of the materials and you can immediately move on the road.

Glue for rear window heating repair
What to do with contacts, and other methods
If the contacts were damaged in the heating system of this element, it is best to use the soldering method. This method is the most reliable and for a long time will help you forget about this problem. Zinc chloride is perfect for work. It is recommended to take a solder with a minimum tin content. After the end of the work, the glass must be well rinsed with water to remove the remains of the chemical.
The price of heat recovery
In fact, repair the heater is quite simple and inexpensive. Taking advantage of the "paint + chips" method, the driver will incur minimum costs, acquiring the paint of the desired color (or using the material) and prepare the sawdust. If you acquire a strapar, it will be much more expensive. The cost also depends on the conductive adhesive manufacturer. It can be a well-known and expensive Keller firm or a cheaper producer - Loctite. Alternative option will be the glue of the Russian company.
When creating a passenger car, designers pay great attention to glazing machines. In the design of the glass vehicle play an important role. They protect the driver and passengers from wind, dust and dirt. Serve with a sound insulation obstacle that allows people who are in the cabin to talk without tension.
The visibility from the salon and the opportunity to control the road situation depends on their shape. For this, various improvements are made on the glasses, including the heating of the rear window.
A system that helps purify the rear window from the nondes, snow or fogging, is not very difficult constructively. The electrical circuit in general terms can be portrayed as follows:

- C - generator.
- E230 - Switch of the OGS system.
- J519 - onboard electrical network control unit.
- Z1 is the heating element of the OGSC system.
Although on different models of cars and there may be some differences, however, if we consider it in a detailed plan, it is fundamentally it includes the following main elements.

- Mounting block.
- Ignition switch.
- Switch heating ZS.
- Control lamp signaling the inclusion of the OGSC.
- Heating element of the OGS system.
K6 - Relay Additional.
K7 - OBSC inclusion relay.
A - Connecting to power systems.
In addition, the system has fuses, terminals and wires connecting all elements into a single integer.
When the OGSC ignition key is turned on by pressing the button, to which the power is supplied through the additional relay K6. At the same time, the heating element of the rear window of the rear window is triggered, the heating element is connected and the control light lights up at the same time.
The device of the heating element on the rear window can also be different. In the standard version, it is a mesh of thin metal nickel threads, which are connected by two conductive tires located on opposite sides. On the one hand, a 12V voltage current is supplied to the tire, on the other, the bus closes to the ground. Such devices are attached to the glass with a special glue.

On some models of cars, the heating element is applied to the glass by spraying, for example, aluminum. On top of such spraying with the help of glue, which conducts the current, the thin film is fastened with good traffic.
Detection of malfunctions in the OGS system
Having found signs that the heating of the rear window does not work, it is necessary to carefully check the entire electrical circuit of the system of the car.
The first thing you want to check is the cost of fuses. For example, on VAZ-2110, these are fuses for heating the rear window F4 and F7, which are located in the mounting unit. Their malfunction may occur due to the factory defect, short circuit or voltage jump in the onboard network. Need to replace the faulty fuse, for which it needs to be removed from the mounting unit.
Next, you need to check terminal compounds in the OGSC system. When operating a car on all equipment, strong vibrations are affected. As a result, damage to contacts or some terminal can disconnect or loosen.
You also need to check the rear window heating relay. The breakdown of the relay is possible when the wire breaks in the working coil of this part or due to the burning of the contacts, due to the factory defect or short circuit. To check it, the relay must be removed and controlled by the tester. In the event of a malfunction of this part, you need a replacement for a working spare part.

 It is necessary to check also the contact of the heating of the rear window. On the rear window, a conductive element is attached with glue, which is the contact to which the electrical current transmitted through this contact to the heating threads is supplied.
In this place it is possible to open the wiring or due to the fact that the glue was low-quality, detect the contact element from the glass.
It is often quite common to the failure of heating ZS, it leads to a break or damage to the threads in the heating element on the rear window. This is detected by visual inspection or instrumental analysis. We can visually detect only explicit damage to the thread by installing the gap between the damaged ends.

It is possible that with some repair work on the car, a mechanical damage to the glass surface was applied, on which the heating element is attached using adhesive.
However, the main tool in the diagnosis of this malfunction is a voltmeter or an ohmmeter.

They allow you to reveal a plot with faulty threads with high accuracy, even if visually detect this breakdown.

The order of repair of a faulty system of the OGS
Having determined the reason why the rear glass heating does not work, you can start repairing this system.
- If the fuses or the OSS system relays are faulty, then you need to remove faulty parts. Replacing them for new, workable labor is not. The main thing is that they are set as indicating the circuit of the electrical on-board system.
- In the case when the culprit of damage in the OGSC system is a terminal connection, the restoration of the heating of the rear window also does not cause difficulties. It is enough to clean the contacts in the terminals. It is possible to replace the terminal box, but it will not take much time.
- If the glue, which was attached to the contact on the rear window turned out to be poor and there was a detachment, then in this case it is necessary to buy a new high-quality conductive glue. Remove with a proportioned contact with a layer of old glue using a napkin with an alcohol solution. Then apply a layer of a new connecting substance and glue the contact to the place.

- If the wires are detected on one of the tires, this wire is necessary to attack the old place using the connection scheme. The procedure for the following:
- remove the remains of the old solder from the wire, cleaning the end, in addition, you need to clean the connection on the tire;
- with the help of a tassel on the sheepskin surfaces of the tire and wires the rosin paste as a flux;
- on the peeled and infanipalized living wire, the wires are solder, containing three percent of silver in its composition;
- swipe the wire to the bus, while overheating surfaces should be avoided.

- Most of all accuracy in repairing the rear window heating is required if the discontinuity of the heating element of the OGSC is detected in the conductive threads. To facilitate this work, there are special sets for the repair of this system. To correct damage, the actions are performed in the following order:
- in the rupture area, clear a plot with a length of six millimeters in each direction from the place of damage;
- purified section wipe with a napkin or a cloth moistened with alcohol or alcohol solution;
- on both sides of the damaged thread, paste thin strips by repair sticky tape or ordinary building tape, if the repair kit is not. Prevent sticking of adhesive tape at nearby threads, in order to avoid damage;

- if there is a repair kit, then mix the hardener with the composition of the silver color, which after applying will perform the role of the thread of the conductive current. After mixing, apply a stick or tassel on a damaged area by closed the circuit.

- if the repair kit is not, the role of a special mixture will perform glue, which is well conducted by electric current, it can be applied with a brush, observing the accuracy;
- after removing the damage, it is necessary to give the time so that the glue or special mixture must be applied to speeds up this process;

- after drying the strip of the conductive current, it is necessary to carefully remove the self-adhesive tape, for this it is best to cut it with a knife at the place of adjustment to the repaired threads so as not to damage it when the tape is removed;

- after the work performed, it is necessary to check the capability of the OGSC, for which it is necessary to start the car engine and press the inclusion button of the OGSC.
See also video
The heating system (CO) rear window is equipped with all cars. Thanks to its proper operation, the driver is easier to perform maneuvers, as he will know how the situation is behind the car. What malfunctions can occur in work and how to repair the heating of the rear window with their own hands? Answers to these and other questions are looking below.
[Hide]
Description of the rear window heater
So, what device heating windshield (wind) or rear window and what is the purpose of this system? The device is used to thaw ice at negative temperatures, as well as the removal of fogging into wet and dry weather in the car. Special threads are applied to the rear window that allow you to remove ice residues while warming up auto in winter. By the way, it is the heater that is considered one of the most effective ways to combat fogging.
The rear window establishes a certain number of special conducting filaments of incandescent on a special film. This film is fixed with glue, and the threads themselves function from electricity. Through the thread passes electricity, allowing to highlight heat and, accordingly, warm the glass itself.
Principle of operation and function
The principle of operation of the car glass heater is to press the driver of the button located in the cabin of the vehicle, and the further heat heating. Food itself comes with a positive output of a car battery - voltage in this case enters through safety elements and ignition lock. Ultimately, energy is fed to the device controller, as well as the contact of the relay. Negative contact of the system is connected with a mass of the car, that is, its body.
When the system is turned on, the voltage enters the relay winding. When this element triggers, the contacts are closed, while the two outputs are simultaneously connected, which are marked in the number 30 and 87 numbers. Then the energy is transmitted to the heating system and fed to the threads that are fixed on a heated glass with glue. Further, the current arrives again through the grounding of the machine and enters a negative video output - Sergey Kotov).
Possible malfunctions and their signs
As practice shows, it is often if the heating system does not work, then the owners of the car learns about it as a result of his fogging or the appearance of the plaque. A person involves heating, while the result will not be at all, or the surface warms up, but minimally and unevenly. The system power circuit can be different - in some cars it is activated without switching on the ignition, in other key in the lock you need to turn.
Before checking and repairing the system repair, we recommend you to familiarize yourself with the list of faults:
- The device is not activated. As a rule, there is an indicator on the activation button - if when it is turned on, the bulb does not light up, then the problem must be searched or in the button itself, or in a safety device. In the event that the indicator is on, but the device does not function, you can also check the relay.
- In the event that CO works, but the glass itself warms too slowly, which is particularly relevant for the period of frost, it is possible that the reason should be sought in the connectors. If the contact is bad, its resistance can be higher, and the voltage value, respectively, will become smaller. As practice shows, often the cause of the malfunction lies in poor contact with the onboard network of the vehicle, so that contacts should be checked.
- Another problem - on the surface of the autoglass after activation, horizontal traces remain on the surface after activation. In this case, the reason is likely to damage the threads in certain places. The malfunction of this kind can be determined without testers - just on the eye. It should be borne in mind that the threads can be destroyed even with minor stress, quite often this occurs as a result of using a scraper for rubbing.
Photo gallery "Damaged areas of tracks"
Diagnosis and repair
Now details on how to diagnose and restore the damaged area. Let's start with the check.
How to find a damaged thread?
To search for a malfunction, you can use one of several methods:
- To begin with, visual diagnostics should be made. If the auto glass is fought, then activate CO. On the damaged area of \u200b\u200bthe surface, the fogging will remain after all other threads warm up and the auto glass will post. Such options for self-check is considered one of the most simple.
- Also, the diagnosis of performance can be carried out using a voltmeter tester. To do this, you will need to first turn on the ignition and click on the activation button CO. Then one tester probe will need to ground, that is, to connect to the car body, and the other is wrapped with a conventional food foil, and then bring to the heating path.
When conducting diagnostics, the voltage value should appear on the voltmeter display, which will be no more than five volts (this is ideal). In the event that the voltage value is around zero or increases to twelve volts, it will indicate that there was a breakdown on this track. Thus, you will need to diagnose all tracks. - There is another way to check with the same voltmeter. In this case, you will need to connect one tester contact to the positive conclusion of CO, and the other will need to move along the track, only from the negative output side. In the place where the track is damaged, the voltage value will fall sharply to the zero mark.
- If you do not have a voltmeter, but there is an Ometer, then with such a device can also be checked the system. In this case, the probe tester will need to be connected to a negative, as well as a positive contact of CO. Then you need cotton - a small piece must be mixed in distillate, and then spend it along the incandescent path. At that moment, when the arrow on the tester starts to move, you will find a break (author of the video - Over 9000).
How to repair your own hands?
If you are faced with the problem of the inoperability of CO, then its repair is not necessarily trusted to specialists - everything can be done with their own hands. To restore CO there are several methods.
So, how to repair the system:
- For repair, you can purchase Repair Kit. As a rule, repair kits for performing this task have identical parameters and characteristics - with their help you can restore no more than 10 cm of a damaged section of the track. Remkomplekt includes directly threads and a balloon with a polymer resin. In this case, you will need to first determine the damaged area, for this you can resort to one of the methods described above.
When the repair point will be determined, you need to turn off the CO and remove the film from the autoglass. The surface is neatly cleaned and degreased, after which a new track is applied to the damaged place. Using a special brush, which should also go bundled, you must apply to the surface of the polymer resin, and when it dries, repeat this step again. After completing these actions, it will be necessary to wait at least 24 hours, only after that CO can be included. - Alternatively, to restore the performance of CO, you can also purchase a special conductive paste. How to restore with pasta - one layer is applied to the damaged section of the track, but note that it will be necessary to capture and intact thread on both sides by about 2-3 cm. In this case, it will also be necessary to wait at least 24 hours before further operation CO. For a faster drying, the paste autogle can be blown in a hairdryer.
Terminals from the heating system are connected to the mass. A wire leaving from a positive one is connected to a tissue of a metal rod. The resulting electrode moistened in the solution, the driver must diligently rub the sectors in which the appearance of the conductive element is noted. Plots with minor damage to the threads after such a procedure are fully delayed with copper. The ends of large gaps will have to be pre-treated with a soldering iron. With its help, an additional jumper is attached from a very thin wire.

Troubleshooting the heater with a conductive adhesive
Progress:
- Preliminary cleaning of damaged areas. To do this, you can use the usual. At the end, wipe damaged places dry and degrease their alcohol.
- Use adhesive tape to fencing the location of the conductive glue.
- Conducting glue consisting of two components is mixed in a separate dish, accurately adhering to the instructions specified on the package.
- The layer of applying the adhesive fluid should not exceed 2 mm. The time of pouring the conductive layer is 30 minutes.
- Working with a cotton waller or tassel.
- Removing Scotch at the end of the work done.
To facilitate repair work in special repair kits, which include stencil and conductive glue. Their price varies within 300 rubles. Instead, you can also use DD6590 glue. It has a view of a syringe with an activator, a wooden applicator and a napkin moistened in alcohol.
Knowing how to fix the heating system of the rear window and what to use the tools, the motorist will never ride with icing stalks, and therefore.
Maybe you will be surprised by the theme of today's article, because in the yard summer, and the weather is replete with sunny hot days. But this feature is relevant at any time of the year. We will talk about the heating of the rear window. For those who think that in the summer it is absolutely no need, say that you probably move little by car during the rain.
But here is not enough, Mr. Merphy is entering the game with his notorious "laws of meanness." On the street rain, and the heating of the glass stopped working, and the humidity in the cabin is increasing, and visibility is reduced. Urgently requires repair of the heating of the rear window of the car. The reasons for such unexpected troubles can be a variety of actions, starting with non-professionalism of the workers of the tinting studio, ending with the cuffs of the kids on the passenger seat.
Rear window heater: How does it work?

The heating of the rear automotive glass remarkably copes with the problem of fogging and does not overpow the air in the cabin. Regarding glasses of glass in winter, there are advantages here. Automotive glass is evenly getting rid of icing by the time when it is already necessary to extend. The air from the heater just started to warm, and the rear window is already clean, dry and transparent.
Rear window heater: what is it and what is it needed for?
The most effective fighter with the fogging of automotive braids is heating. How does the heating of the rear window work? Heated windshield is carried out due to directed warm air flows. The rear glass is heated using small heating elements operating from electrical energy. On the glass itself from the inside (from the cabin) attached tracks from metal with a large resistance in the form of multiple thin ribbons. When electrical energy passes through them, heat is highlighted. As a result, the glass heats up, and the water evaporates. After a few minutes, the glass becomes transparent again.
To successfully diagnose malfunctions and repair the heating of the rear window of the machine as much as possible, it is necessary to study the electrical circuit of connecting heating elements and understand its working principle.
 The image shows a typical circuit of the heating in the wiring of the car. Let's look together how it works. Power comes from the "+" battery terminal, passes through the ignition lock, fuses and is fed to the heater controller and the power contact relay. The withdrawal of the battery with the "-" sign is connected to the car body, as is one of the findings of the heating device.
When the heater is turned on, the voltage goes onto the relay winding, which is triggered by the power contacts and the mutual connection of the relay conclusions 30 and 87. The current goes to the heater, passing through parallel to the connected threads, and then through the car case again goes to the minus battery.
What could be fault
Basically, car owners do not bother over what and in this heating rear window device, until it does notice or does not cover with an icy crust. Here the heating power button is pressed with the usual movement, it takes five minutes, ten, fifteen, and there is no result: the glass did not become more transparent, well, or the review appeared only in some part. Here and the measuring devices are no need to understand that the repair of the vehicle rear window is required.
 Note that the heater is activated only when the ignition key is turned into the "ON" position. In other cars, the heater is activated only when the motor is running. This is done in order to avoid premature discharge of the battery. Depending on the car model, the rear window heater can consume from 10 a to 25 A electric current. So that you understand, two car headlights consume 10 A.
Rear window heater does not turn on
If the light on the heating button in the active state does not shine, most likely the button itself or the fuse burned down. If the light is on, but the threads are not heated, then the reason lies either in the relay, or in the connectivity connectors to the onboard wiring. If there is a place to be this case, then by car documentation, you should define a place where these parts are located, and replace the non-working element. Quickly find the place of installation of the relay does not always work, but there is one way to check its performance indirectly. We will tell about it a little later.
Rear window slowly plays
 Sometimes it happens that after the heater is shown in the state of activity, the glass begins to move, but very slowly. If the weather is frosty, then the reason may be burned in the insufficient contact of one of the electrical circuits. As a result, the contact resistance increases, the current comes with a smaller force, the power decreases, and the threads warm up slower.
To check this malfunction, you need to take the multimeter and measure the voltage value on the terminals of the heater input and the battery. The difference in the results should not exceed one volt.
On the rear window remain horizontal stripes of fusion
And perhaps the most common malfunction of the heating system of the rear window of the machine - breaking the threads attached to the glass itself. This malfunction is visible to the unarmed gas, since in the place of a faulty element glass or duned, or not deflated (depending on the time of year).
Tracks conductive current, easily destroyed even with a minor mechanical effect. Therefore, it is impossible to clean the glass with a scraper, only a rag of soft tissue. Also, if you are currently transporting long or large loads, they should not rest in the rear window.
Diagnosis and repair
 Determine the damaged thread of the heater is not difficult, as you already understood. Therefore, before fixing the heating of the rear window, you need to count all the threads from top to bottom and remember what are faulty on the score. So on, with visual inspection it will be easier to find the right thread. But the breaks are sometimes just microscopic. A voltmeter or multimeter will help here. To quickly find a problem thread, you need to explore the device of the rear window heater.
Methods for finding a problem thread
If the visual signs of the cliff are not observed, for example, if the cluster happened on the terminals, then you can resort to old good folk methods. It is remarkable that every motorist at the slightest effort and costs are able to find the place of cliff of the heater.
Visual diagnosis. If the rear window is filled, turn on the heater. At the point of breaking the threads, it begins to come off almost immediately when the rest of the damaged element is not heated.
With the help of a voltmeter - the first method. Turn on the ignition, and then heated the rear window. One appliance probe put on a car's mass, the second wrap foil and move the heating thread center. Voltage should be no more than 5 V. where it will fall to zero or jums up to twelve, there is a break.
With the help of a voltmeter - the second method.One probe attach to the positive terminal of the heating element, and the second move along the thread from the pass of the minus terminal. In a place where the stress drops to zero, the repair of rear window heating is required.
 With the help of an ohmmeter. It is better to take an analog device with an arrow. Turn it into the keel mode. Properties attach to the opposite conclusions of the system. Moch your wool in distilled water and slowly spend it on the thread. In the place where the appliance arrow will be twisted, and there is a break.
All, diagnostics was carried out. Now, inspired by its success, you can take on the repair of the heating of the rear window with your own hands.
We carry out repairs
There are many options for repairing the rear window heater. The same can be said about the materials used and the techniques used. In any case, you are free to choose a way to carry out repair work. It is necessary to remember only one thing, in any case, the connecting places of the heating system should always be cleaned and degreased if soldering is required.
1. How to fix the rear window heating with the help of the drive? Many repair sets of the rear window of the vehicle have similar characteristics. With their help, you can restore up to ten centimeters of the heating thread, which is damaged. The repair kit includes: patterns with threads and a cylinder with a thermally active polymer resin.
 Determine the break point of the thread and turn off the heating device. Remove the protective film from the template and attach a thread to the torn place. Tassel apply the polymer material to the repaired place. When driving, repeat several times. Remove the stencil from the glass and do not start the heating within 24 hours.
2. How to repair the rear window heater with a conductive paste? It is applied to the place of cliff threads. In this case, capture the torn ends on both sides of 2 cm per each. Pasta must dry day. You can use the construction hairdryer and speed up the drying process.
3. Restoration of the heating path of the rear window folk methods. In principle, they themselves do not differ from each other, only there is a difference in the materials used.
Paint and chips. Chips is mined with a file and a copper-brass bar. The paint is better to take the color of the heating threads. Mix the components in the proportion of 1: 1 to the state of the soft test. Make a scotch stencil or tape. Turn on the heating and on the stencil, apply the mixture. You will hear about the presence of contact in the place of repair according to the characteristic easy mixture. All is ready. You can immediately go and do not wait for a day.
Glue and chips. Here, instead of paint, glue BF-2 is used as an option.
Spanning place soldering. Here you need to use zinc chloride. Solder should be taken with a low content of tin, type Pos-18, POSS-4-6. If the long section of the heating thread is damaged, you can use silver or copper core.
Now you should have enough options for recovering the car's rear window heater. As you already understood, it will not be delivered to the difficulty, and it is not necessary to spend the materials.