Side trunk on the motorcycle with his own hands. Motorcycle Coffer Making (40 photos)
We have the main object for customizing (alterations "at home") and the most walking transport under the "Choppers" are "Urals", "Dnipro", "Casiki". They are basic cargo transport in the village.
Often after the "cosmetic repair", many bikers cling back bags for different luggage and just for the "effect". On the new "Urals" can already establish something like trunk types. This applies to the type "tourist", "retro" (there is a little shelf instead of the saddle).
But there are such that they use them in a complete measure. However, you will not take a lot in them, and those who use the "solo" are not for the rested, but for the matter, sometimes there is a need to transport some cargo. You can, of course, wear a motorcycle in three very volumetric strong coffee machines, but it is not necessary for everyone and not everyone affordable.
In this case, the economy is the trunk. Of course, if you did not redo the motorcycle dramatically. I want to imagine one of the homemade options for the "tuning". It was made in a garage and tested in several long journeys.
The design of this trunk is different from the one that everyone got used to see on "Izhi" and "Java", because the "Urals" frame has a different design of the back and the silencers are cut up.
As it should be the tourist trunk, the proposed has three cargo sites: one above behind the seat (Fig. 1) and two - from the silencers from the silencers (Fig. 2 and 3). All of them are made of 10 millimeter steel pipe. An unusual pentagonal form of sidewalls chose to not disturb the main composite lines of the "feed" of the motorcycle: the lower tube and the shelf are lying in parallel to the silencer, and the upper one is parallel to the seat. Along and across the sidewalls are welded traction from a 6 mm rod - for additional stiffness.
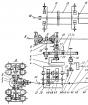
The sidewalls are attached to the frame at five points, and the upper shelf - in four (Fig. 4). Moreover, nothing is required to weld to the frame or drill additional holes in it. The elements of the trunk fastening are shown in Fig. five.


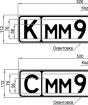
And now let's look at what everyone is intended. Element A is just a flattened end of a pipe with a hole drilled in it with a diameter of 9 mm. Here the sidewall is screwed by a silencer fastening bolt. Alternatively, a plate-welded plate with a hole will be consolidated.
At point b, the sidewall is attached to the upper bolt of the shock absorber by means of a steel corner welded to it.
The upper shelf is attached to the frame at the point in the plate of suitable length. At the bottom it connects to the point of fastening the turning pointers.
Spacer with which the sidewall is mounted at the point r, gives the trunk transverse rigidity. It is inserted into the opening of the wing mount, and the other side of the bolt is connected to the sidewall.
The thrust is the main burden on the trunk. On a motorcycle, it is mounted at the point of attachment of the wing and the seat using a triangular bracket E with a welded bolt.
A few words about the lower side shelves. They are small to not spoil appearance Motorcycle, but their size is quite enough to secure a 20-liter canister. Some sequestness of the shelf forward along the motorcycle is explained by the design and repeats the location of the muffler.
Complete load capacity of the trunk is about 50 kg. But if you can try well and a little smelting, you can come up with a more prominent (if it is very necessary).
I think such a trunk can be used with a carriage.
Bags for a motorcycle are made of various materials: metal, plastic, leather or plywood. The choice depends on personal preferences and skills. If you decide to make cofments for a motorcycle with your own hands, you can be confident in their exclusivity. And if with properly diligence and fantasy to approach their decoration, they will become not only convenient triggers for the carriage of various items, but also a uniquely decoration of the bike.
Homemade Metal Kanistra
Easy way to make side Cofters For the motorcycle do it yourself - it is to use two metal canisters. The manufacturing process is quite simple:
- We purchase two identical metal canisters with a capacity of 20 liters (the average price of 1300 ÷ 1500 rubles per piece).
- On the canisters with a marker we apply the cut line (the lower part will serve as a container for things, the upper - lid).
- Bulgarian with a disc on metal gently cut both canisters in accordance with the applied markup.
- The edges of the cut is cleaned with sandpaper and cover anti-corrosion paint.
- On both parts install the seal (for example, the seal is suitable from the lid of the VAZ 2101 ÷ 2107, which can be purchased at any auto parts store for 250 ÷ 300 rubles).

- Tightly press both parts to each other and place the holes for fastening the loops (conventional furniture loops) and latches.
- Drills the holes on the applied markup, secure loop and latch with rivets or bolts.

Durable metal homemade cofrs are ready. Now you need to make fasteners. It depends on the individual features of the motorcycle. For this purpose, you can use clamps or other suitable hardware.

Decoration depends on the individual preferences of the biker:
- If you choose bright color canisters, then they themselves will decorate your bike.
- If you wish, you can paint the canisters in the color of the motorcycle.

- If you carefully cut the handles, then you can cover the canisters by self-adhesive film or enclose artificial skin.
On a note! For the manufacture of side wrappings on the moped, canisters with a capacity of 5 or 10 liters are suitable.
Metal boxes from fishermen boxes
The boxes are very easy to make from two fishing boxes. Fixer work is minimal, as the loops and the latch are already installed on the lid of the box. It is only necessary to make suitable fastenings and decorate (for example, plane a thin foam rubber, after which it is covered with dermal). So, a winter aluminum box with dimensions of 31 x 20 x 30 cm (with a volume of 18 liters, weighing 1.4 kg) costs only 980 ÷ 1100 rubles. You can not doubt the strength of this design due to the fact that the box is designed to sit on it an adult man in full winter equipment.

Plastic Kanistra
The process of manufacturing wrappings from plastic canisters is largely similar to the manufacture of lateral trudgers from metal containers. The difference lies only that plastic boxes have insufficient rigidity, therefore, additional metal elements (strips and sheets) will have to be installed for their manufacturer, reinforcement. The main disadvantages of this method include large labor costs and the amount of time that will be needed for the manufacture of plastic trunk for a motorcycle (compared to metal analogs). And although plastic canisters are much cheaper than metal, additional costs for metal and hardware can reduce cash savings "No".

Homemade leather cofgrounds
The skin was and remains the most favorite material for various biker accessories. Tailoring of the boxes from this material can be carried out independently.
Required tools and materials:
- roulette, metal ruler, marker, narrow construction knife, needle with thick ear, canvas;
- a piece of leather (shore-saddled, thickness of 3 ÷ 4 mm), thick synthetic threads, fittings (buckles, fasteners, rivets and so on).
How to make leather boxes:
- From dense cardboard, we cut the patterns of all parts of the future coffer (side, bottom, closing valve, and so on) taking into account the allowance for the seams (0.7 ÷ 0.9 mm).
- We decompose the finished patterns on the back of the skin and supply the marker.
- Cut the blank using a building knife.
- With the help of canvas and wooden inquiries, we make holes in places of fastening individual parts.

- We sew all parts with a thick needle and kapron thread.
- Corners strengthen special rivets (holnitenes).
- Breeping all the necessary accessories (buckles, frames - holders and decor elements). Result: We sewed durable and durable boxes.

For the manufacture of motorcycles on the thigh, quite a skin with a thickness of 1.0 ÷ 1.5 mm.
The advantages of such a material as moisture-resistant plywood, (in the manufacture of curves) belong:
- simplicity of treatment with the use of electric jigsaw or circular saw;
- availability and low price;
- easy to connect separate parts to each other using glue, self-tapping screws, wooden bars and metal corners.
The disadvantage of such a material is the impossibility of making from plywood of motorcycle side trunk with complex curved geometric shapes. The same box is attached similarly to metal or plastic products.

In custody
We described only some types of hardware for motorcycle, which can be made independently. In addition, make the CFR for a motorcycle can be made of fiberglass, impregnated with epoxy resin. Having a welding machine, it is not difficult to make metal boxes of the most diverse shape and capacity. The final choice of material depends on your skills, and the shape and dimensions are from personal preferences.
In general, motorflaps are made different ways from a different material. My customer wanted them to be from clean skin without an inner skeleton. Therefore, a black shore was selected 3.2 mm. In the process, the thought flashed that it was not bad to make a shore chaprak - he was tougher. But I decided to highlight the boxes in advance, so I didn't absorb moisture, because I took Shore. After the fiction, the rigidity will be at the proper level.
This is how my sketch looks like. This, of course, takes place, but it suits me - informatively and do not care about spilled coffee.
Since the idea of \u200b\u200bthe tutorial visited me after the start of work on the skirts - the whole process of patterns, clippings and painting, I safely professional profound. In principle, everything is elementary, everyone knows how to cut and cut fabrics or some more lambood, so it did not bother over this stage. P.S. All patterns made from a prefine or very hard cardboard, so everything was smooth.


So, we have almost all patterns except the valve that will be made from the other skin, because stupidly did not have enough of the desired black shore. On the valves, I put the same Shore, only red-colored, on which there will be a drawing in the form of a crow. To smoothly sew a CAFR, which is essentially a big bag, you need to punch holes in advance under the seam. I strongly recommend getting a canvas and cut them a millimeter groove under the thread - so it never flows in life and looks like a suture much more spectacular and even more. In general, the markup is made by a special handle on the skin and erases later, but I don't have it, because it's hard to be solid, but he is not erased. In short: I place the seam, I cut the groove.

Next on the back of the pattern I put the labels in order not to confuse what to sew it. It's time to pierce holes under the seam. Here chief Principle - holes should be the same amount and symmetrical location on the patterns sewed to each other. If you pierce on Avos - at the end of the seam, the head will come out in the form of unnecessary holes, which do not hide, and the explicit asymmetry of the stitched bag. In the first coffee box, I got a head in mind the excess hole, which I almost broke through inattention. If it struck - the assimmetry would come out in the form of a guy centimeter - the eyes rushed immediately, so be careful. Chinese masters generally glue the surface at the moment and only then sew.


I start sewing the bottom of the box to its front wall. For good it would be worth it to immediately cut the edges and rounded, but I do not have required toolTherefore, I just do a smooth cut and paint it. That is how it is in any way, because it is still to mount the buckles, and in the case of the jacket to redo it easier and faster. All the seams are manual with two needles one towards another. Thread synthetic, wicker + midway, 1mm in diameter. Important: Before the insertion of the front wall, the box must be installed and pierced all the seams and holes, as well as cut all the necessary grooves for bends on a piece of leather, which will be the bottom (and immediately bend in the right places in the right places with a chicken one). Because then it will be hemorrhoids rare. In the end, we have such a fig. Immediately after the firmware, we go to the bathroom, we wat a member (the rear side of the skin) with a water and accrane climb the hammer, as shown in the photo. As a result, we have clear angles of 90 degrees in the seam. And the eye pleases and exclude scuffs and other zaleps, as in the photo of the old box below, whose seams are not bent (torn the thread and blooms seam, everything will be broken.).
Next, I make exactly the same workpiece under the second CAFR. In a good way, it would be necessary to immediately enjoy the outer wall until the rear is sewn, in order not to suffer especially. Probably, I'll do it. Wax in this case is necessary, while the skin does not stop absorbing it. It is for giving gesture and waterproof skin, because the shore is a very soft grade and the form holds badly. The process of fracturing and the composition would be preferred in the secret, do not blame me. Who needs it - he will google. By the way, I will be offered by Mebra, because the face is painted in this case.

While hands with calls are resting from sewing, take the back of the walls of the boxes and with the help of old hoses align and customize the attachments under the motorcycle of the owner, at the same time immediately navel laces for their silica to the frame. Laces take from the same skin as the boxes and in a couple of minutes we cut the cords. Punch holes in the right places for future lacing.


In parallel, two previous items begin to slowly fasten the buckles and cut straps. Nothing difficult. And immediately fixes them on the CFR. Muffd up in this case, the buckles on a riveting called the holnitenen. This little thing is brutally saved time and strength, it looks spectacular, but loves to slip off the anvil and it turns out a deposition as in the photo. Treatment - either to pass out this infection, trying not to break the skin, or to come down with a hammer and forget. Minus - it looks non-style. Leaves Crop the surplus from the bottom and you can sew the back wall. P.S.: Before the sewn of the back wall on it it is necessary to break holes under fastening to the motorcycle frame. I forgot to do it - so I will suffer already with a sewn wall.


She sewed the back wall, slept the hammer of the bend (generously watering the outside the groove and from the inside the box the place of folding with water so that the skin was plastic and stretched) so that everything is smooth and beautiful. While the first coofer dries flashing the second. War of the bottom and the rear wall of the boxes.


Now it's time to carve out and plant the inner valve on the buttons on the riveting, so that the contents through the gaps between the main valve and the walls of the coffer are out of the coffer.


I expect the valves on both boxes, stitching the seams - decorative (I immediately flashing) and for attaching to the cofiver. I nano drawing by the deceit. Crash first drawing, then everything else neatly. It remains to enjoy and sew to the cofiver.

Even before buying your Maxiscover Honda Silver Wing 600cc, my wife and I have already planned future travel. Well, what "dalnyak" without luggage, which is quite problematic sometimes conspicuous on a motorcycle? No ready version of the side frame or curvatures is not able to fit the amount of luggage as homemade.
I confess, until this point I have already tried to make a side frame on my previous Maxiscuter - Honda Forza 250cc. As a result, he was too fun and did not have time to fulfill his destination, since the motorcycle was sold and bought Silver Wing. Based on the previous experience, I began to design a new trunk, which would have a high strength, but did not have too much weight. What came of it, I will describe further.
First of all, it is necessary to think good, where the places of fastening of our trunk will be. Excellent if the motorcycle from the plant has such a design that allows you to easily fasten the trunk on the frame. Sometimes it is worth resorting to the study of the factory options for the trunk, which are presented on the market. For example, GIVI specializes in the release of such motorcycle supplements. What I did: I found a photo of my motorcycle with the installed side frames in the search engine, then adapts them under your trunk, a little frozen them.
After that, you can start making the ears of the attachment. IN top points My future trunk will be attached to the standard places on which the coffer platform is installed by the manufacturer. This greatly simplifies work. As a material from which the mounts will be made are steel strip, the thickness of which is 4 mm.
To make fasteners the correct shape, the band must be placed and exacerbated in the form repeating pad. Having tees and hammer, it is not difficult to do it. That's what I did: 
Now you can do the manufacture of the trunk themselves. As a material, I chose a rod of a square section of 10mm. If you wish, you can search the pipe of the square section, but there will be problems with its bending. Therefore, it is better to stop on the "square" or Prude, which I did. I made a frame with small shelves, whose main task is to support bags. Here's what they looked:


As you can see, the design of the trunk, I enhanced by brakes on the sides and added transverse rods to make the bag not savage and did not fall out.
Next, you can welcome the trunk to the fasteners themselves. It is best to do this at the place to guess as much as possible with the location of the "ears" on the frame. To do this, it is necessary to maximize the motorcycle from the effects of the temperature and voltage of the welding machine. I completely removed the battery, and the plastic looked into the wet rags, cardboard and old linoleum. That's what it looked:

Immediately I clarify: it is enough on the motorcycle only to grab the frame for several points, it is necessary to recruit it only in the removed form.
So that our frames do not touch the plastic of the motorcycle were tough and fixed, they must be fixed at the lower points. I made a jum between them, which, in turn, is fixed on the motorcycle frame: 
To the framework itself, I also welded the brackets of the required length, allowing to fasten the trunk at the bottom:

And, of course, I painted them. This is what happened in the end:


And here is my trunk in the process of long-distance travel:


At the moment, we have already traveled more than 25,000 km with this trunk. In 2015, 11,000 km journey into Altai. In 2016 - 14,000 km on Baikal. He has repeatedly cut off with his strength, when the motorcycle fell on his side, resting on him. Just thanks to him, he remained intangible every time. I attach a video in which the process of operation of my wonder trunk is also visible.
Attached video:
In modern realities, a trunk becomes one of the pretty necessary things for a motorcyclist. In particular, this can be noted among lovers of long trips and travels. It should be noted that novice motorcyclists often arise the question of how to make a boot for a motorcycle.
The trunk themselves can be divided into 2 types, these are structures for fastening the CFR, and individual for direct consolidation of the cargo. In modern times the first option is somewhat practical and more popular.
But we consider both variations.
If you pay attention, the components market elementary elements are quite expensive. An ordinary trunk, which can be done with your own hands, with what is pretty fast, will cost the market in the amount of more than 10 thousand rubles. Think if you need to buy a boot on a motorcycle, or better to do it yourself.
Trunk for fastening the coofers

This design is used in order to transport small cargo. It is quite possible to make it from several metal tubes or twigs. If you want a more designer solution, you can perform from a metal sheet, which will be quite well complemented by the bike style. At the same time, if the manufacturer is carried out from twigs or pipes, then the creation of additional parts will be required, since it is necessary to create a fully flat plane to which the boxes will be hung.
In order not to provide for the most additional components, it is best to fully produce a part of a solid sheet. Or you can perform the upper part to perform solid, and fastening using twigs or tubes.
The DVR is useful not only in cars. How to choose it tell in this article. If you have both a car, in which the location is also not enough, we recommend see how to make expedition trunk - .
This design is designed strictly for fastening the coffer in the top. At the same time, for the manufacture it is not desirable to use a metal with a thickness of less than 3-4 millimeters, this causes sufficient rigidity of the trunk itself, and will also improve the appearance in general. For a larger design solution, you can apply engraving or cut the "windows" on the side parts. It is possible to do it yourself yourself with a drill, or a grinder.

If you want something more original, you can contact specialized workshops, in which there are equipment for laser cutting and engraving. So consider the full production process:
First you need to cut the cardboard layout. The sheet is adjusted to the cofter and in the contour of its bottom, we mark the boundaries of the trunk cover. In some cases, the coffer already has its own platform for fastening, in this situation it is necessary to perform the top of the trunk strictly under the playground itself.
Also, when measuring, we provide protrusions in width, because you need to fix the entire design, for this edge it will be necessary to bend.
Next, after measuring, making the site layout, and its immediate workpiece, it is necessary to prepare fasteners. It is advisable to provide elements for fixing on the frame. At the same time, there is no clear instruction for them, it is necessary to be guided by a strict form of the motorcycle frame itself. But it should be noted that the best variation will be located at the edges of the site flowing to the frame of fasteners.
After that, it remains to be painted, and then fix directly the coofer itself. Further, except the top, also side cofrs are planned, then additional fasteners should be provided. You can also make them from tubes or rods, fixing to the top of the whole structure.
In some cases, the factory assembly of the boxers has connecting belts in themselves, and ultimately the side frames are needed strictly to support, in order to avoid friction about the wheel.
Cargo shipping trunk

The next type is a separate trunk for the carriage of goods. This design appeared in Soviet times. At that time it was made for the most part of steel rods. Consider its features and variations of the manufacture of such a trunk with their own hands.

Of course, we will take a little from old times, and on the example of the manufacture, consider the trunk for more modern motorcycles, because they currently prevail in the world of motorcycles. Such an example will be the production of design only from metal tubes.
First you need pipe bender. In the case of its absence, it is necessary to use steel rods to obtain the desired beautiful bending. Fully bending procedure is carried out using a burner. The metal element is heated, and slowly, carefully bends.
Just think that buying a boot for a motorcycle of this type will cost approximately $ 150-200. But we turn directly to the process itself:
Initially prepare the site. To do this, it is necessary to cut out of the rods, then cut the pieces into the necessary form.
Next, the lateral parts of the trunk are prepared in the same way and welded to the overall design.Metal jumpers are used for attachment. At the same time, their size depends only on the motorcycle model, well, and more accurately from the frame features.
On the frame itself, in the places of the alleged attachment, paint is pretty. Further, measurements and the trunk welding grabbing the jumpers directly to the frame. IN Depending on the ears welded to the frame, it is measured, and the location of the "response" ears is marked.
At the base, all manufacturing is carried out individually depending on the characteristics of the motorcycle itself, therefore it is necessary to consider more details on the example of any of the models.

Also, it should be noted that when planning the transportation of highly heavy loads it is necessary to provide for additional reference frames, taking them to the frame, it is desirable closer to the central part, in this case the weight of the engine will compensate for the weight of the cargo. It can be made of metal rods. Drills holes at the ends, after fixing the bolts on the base of the frame, also for reliability you can additionally grab welding.
After mounting, the last steps will be stripping, degreasing and actually painting or varnishing, depending on personal preferences.
Thus, two variations of the creation of a trunk for a motorcycle were disassembled, with their own hands, which in turn will mostly help beginner fans of motorcycles. And maybe it will be a good crib for experienced driversThat before that could only buy a trunk for a motorcycle, but did not know how to make it himself.