Bardechka on a motorcycle from the pipe. Cofp side for motorcycle: how to make
Motorcycle is an excellent vehicle. Two-wheeled identifies freedom in all its manifestations. Wind in her hair, unlimited possibilities, high speed, openness - it is impossible not to fall in love with a motorcycle. So I want to sometimes take everything and leave. Stop. And what to take? Good question. Any journey does not do without road things. And where to do them, because the motorcycle has no trunk, there are no extra seats where you can throw the bags? It turns out but not everything is so bad, there is a way out. Homemade side skirts for a motorcycle - this is what you need. Data Motorcycle "Bandacles" are simply created for the transport of things on two-wheeled transport.
Why do you need cofrapers
Very often you can hear from the driver of a motorcycle: "I can't take anything with me." It's a shame, because, having transport, I really do not want to go somewhere on foot and carry goods only on your two. Somehow it is impractical. As mentioned earlier, the CFR side for a motorcycle can correct this problem. But there is another question before us, the answer to which you need to get at the very beginning. What are the boxes for?
In them you will not transport, for example, furniture. These travel bags are calculated only on personal belongings: clothes, some products, minor accessories. You need to know the measure and do not overload the boxes, otherwise it may be irreparable on the road.
Varieties "Bardachkov"
Cofqued functions are increasingly less clear. This abstract question is resolved. Now some specifics. Kofra: What are they? Form, color, material, location, design - Each factor should be considered based on personal assumptions and circumstances. One of the important categories is the location. Board, feed, the front part - a lot of options, but what to choose? Most often, bikers acquire a sideways for a motorcycle.

What is his advantages? The main thing is large capacity. "Bardac" on the side is not limited in size. Also nothing bothers him. Practicality and convenience are important properties of such an accessory. Such a location allows without any difficulties to use kofram at any time. Visual beauty is also important. Coftem side for a motorcycle just looks really good.
The rest of the criteria
As for the form: there are no rules and tips. Square, cylinder, rectangle - the bag may be anything. The main thing is practicality and capacity. With the material will not work so unambiguously. There are different gloves: leather, textile (that is, fabric), plastic. Of course, the side cofrs are leather for a motorcycle - this is a classic option that every self-respecting biker. But there are more radical, departing options from the canons. For example, most often for the absence of the desired material, the craftsmen sew bags of fabric.

Side textiles perfectly cope with their responsibilities no worse than their leather fellow. Plastic gloves is a cheap option that is not distinguished by durability, with also external attractive features. The coofer from plastics is usually installed on real bikers alien to this type of travel bag.
What option is better: bought or homemade?
There is a huge number of curves. Color, material, shape, outlines, drawing - All this can be chosen. There are a lot of stores in stores, hundreds of identical units. This is the problem. The commercial option does not transmit the personality of the motor guide, negates its differences.

The homemade CAFR is a particle of the soul. Make a motorhose itself - it means to go through a difficult stage, full of zeal, concentration and hard work. But the result is worth it. This is made by the coofer, painting on the side of the beloved motorcycle.
Cofter side for motorcycle: how to make yourself
Since the way is chosen, it is worth it to start it, because the boxes will not be done by themselves. The first main step is the choice of material. It completely depends on the further development of events, step-by-step actions and, in fact, the result. Homemade cofrs must meet one important requirement, without which work will become impossible, - low cost. I do not want to spend a lot of money and money on what you are doing with your own hands. By the way, this requirement can easily turn into a plus "home" motorcycle. So, under this parameter, side textile boxes are ideal. For a motorcycle and his driver such a product is a gift.
Progress
The sideboards for the motorcycle begin to do from the drawing, in this case - from the cutting. On the material (tarpaulin) it is worth drawing a couple of figures. Total six of them: bottom, top and side parts. It is necessary to strictly ensure that the symmetric parts are one size and shape, otherwise there will be a skew. About sizes: bottom and top will be 20 x 40, Boca - 30 x 40, front and rear end - 40 x 40 cm. After the pattern, the parts must be sewn, adding the ends inside. This procedure will get rid of alignment and further alterations. To the final version, it will also be necessary to attach the strap on which the road bag will hang.
In general, motorflaps are made different ways from a different material. My customer wanted them to be from clean skin without an inner skeleton. Therefore, a black shore was selected 3.2 mm. In the process, the thought flashed that it was not bad to make a shore chaprak - he was tougher. But I decided to highlight the boxes in advance, so I didn't absorb moisture, because I took Shore. After the fiction, the rigidity will be at the proper level.
This is how my sketch looks like. This, of course, takes place, but it suits me - informatively and do not care about spilled coffee.
Since the idea of \u200b\u200bthe tutorial visited me after the start of work on the skirts - the whole process of patterns, clippings and painting, I safely professional profound. In principle, everything is elementary, everyone knows how to cut and cut fabrics or some more lambood, so it did not bother over this stage. P.S. All patterns made from a prefine or very hard cardboard, so everything was smooth.


So, we have almost all patterns except the valve that will be made from the other skin, because stupidly did not have enough of the desired black shore. On the valves, I put the same Shore, only red-colored, on which there will be a drawing in the form of a crow. To smoothly sew a CAFR, which is essentially a big bag, you need to punch holes in advance under the seam. I strongly recommend getting a canvas and cut them a millimeter groove under the thread - so it never flows in life and looks like a suture much more spectacular and even more. In general, the markup is made by a special handle on the skin and erases later, but I don't have it, because it's hard to be solid, but he is not erased. In short: I place the seam, I cut the groove.

Next on the back of the pattern I put the labels in order not to confuse what to sew it. It's time to pierce holes under the seam. Here chief Principle - holes should be the same amount and symmetrical location on the patterns sewed to each other. If you pierce on Avos - at the end of the seam, the head will come out in the form of unnecessary holes, which do not hide, and the explicit asymmetry of the stitched bag. In the first coffee box, I got a head in mind the excess hole, which I almost broke through inattention. If it struck - the assimmetry would come out in the form of a guy centimeter - the eyes rushed immediately, so be careful. Chinese masters generally glue the surface at the moment and only then sew.


I start sewing the bottom of the box to its front wall. For good it would be worth it to immediately cut the edges and rounded, but I do not have required toolTherefore, I just do a smooth cut and paint it. That is how it is in any way, because it is still to mount the buckles, and in the case of the jacket to redo it easier and faster. All the seams are manual with two needles one towards another. Thread synthetic, wicker + midway, 1mm in diameter. Important: Before the insertion of the front wall, the box must be installed and pierced all the seams and holes, as well as cut all the necessary grooves for bends on a piece of leather, which will be the bottom (and immediately bend in the right places in the right places with a chicken one). Because then it will be hemorrhoids rare. In the end, we have such a fig. Immediately after the firmware, we go to the bathroom, we wat a member (the rear side of the skin) with a water and accrane climb the hammer, as shown in the photo. As a result, we have clear angles of 90 degrees in the seam. And the eye pleases and exclude scuffs and other zaleps, as in the photo of the old box below, whose seams are not bent (torn the thread and blooms seam, everything will be broken.).
Next, I make exactly the same workpiece under the second CAFR. In a good way, it would be necessary to immediately enjoy the outer wall until the rear is sewn, in order not to suffer especially. Probably, I'll do it. Wax in this case is necessary, while the skin does not stop absorbing it. It is for giving gesture and waterproof skin, because the shore is a very soft grade and the form holds badly. The process of fracturing and the composition would be preferred in the secret, do not blame me. Who needs it - he will google. By the way, I will be offered by Mebra, because the face is painted in this case.

While hands with calls are resting from sewing, take the back of the walls of the boxes and with the help of old hoses align and customize the attachments under the motorcycle of the owner, at the same time immediately navel laces for their silica to the frame. Laces take from the same skin as the boxes and in a couple of minutes we cut the cords. Punch holes in the right places for future lacing.


In parallel, two previous items begin to slowly fasten the buckles and cut straps. Nothing difficult. And immediately fixes them on the CFR. Muffd up in this case, the buckles on a riveting called the holnitenen. This little thing is brutally saved time and strength, it looks spectacular, but loves to slip off the anvil and it turns out a deposition as in the photo. Treatment - either to pass out this infection, trying not to break the skin, or to come down with a hammer and forget. Minus - it looks non-style. Leaves Crop the surplus from the bottom and you can sew the back wall. P.S.: Before the sewn of the back wall on it it is necessary to break holes under fastening to the motorcycle frame. I forgot to do it - so I will suffer already with a sewn wall.


She sewed the back wall, slept the hammer of the bend (generously watering the outside the groove and from the inside the box the place of folding with water so that the skin was plastic and stretched) so that everything is smooth and beautiful. While the first coofer dries flashing the second. War of the bottom and the rear wall of the boxes.


Now it's time to carve out and plant the inner valve on the buttons on the riveting, so that the contents through the gaps between the main valve and the walls of the coffer are out of the coffer.


I expect the valves on both boxes, stitching the seams - decorative (I immediately flashing) and for attaching to the cofiver. I nano drawing by the deceit. Crash first drawing, then everything else neatly. It remains to enjoy and sew to the cofiver.

Hello dear readers of this article! I want to apologize in advance for not very high-quality photos, but you know, the garage is a garage, so it turned out.
But I think that this work does not represent much difficulty, so it will be enough and what is.
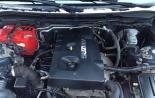
So, let's start with the fact that the glove box of this motorcycle model seems to be big in volume. But with very small sides, which do not give any guarantee that the things put in it will continue to be safely and preserved without falling somewhere in the battery compartment, or worse on the street. And motorcycle Kawasaki ZX9R. 97 years of production still requires the presence of at least a minimum tool, and in stock form to the end of the trip from the tool there will be little.
That's how he looked until the alteration:

And here is the ill-fated hole in which everything falls:

Like do it yourself Make so that this glove box can be used to the maximum. And the answer is very simple, for this, just need to build on the board that I actually did. Taking the remaining after repair, nobody the necessary pieces of laminate, I measured the length of the sides, as well as they involved their height so that backseat calmly slammed, but so that between the seat and the board was the minimum lumen.
That's what I did:


Sidelights are only 3, since for the back wall, it is without necessary, you can simply remove the plastic there, close the clearance of rubber, which I actually did. In the front wall of the glove box (metal), I drilled a hole under the bolt, and in a wooden side I did a tilt, so that the bolt cling to everything. In the side wooden sides, the holes under the bolts were drilled, which holds the metal glove box itself. By the way, the bolts I had to replace the longest, as the relatives lacked to skip through the laminate and turn the nut on top. I also decided to make a soft glove box to the tools do not thunder in it. For this, I took a piece of old skin and cutting it on the size of the glove box, put it into it.

From above, set the walls and screwed them to the metal glove. And voila, the glove box is ready! Now a decent handbag with tools is placed in it, as well as there is still a place for some boosted. For example, two volumes of war and peace can easily fit there. In addition, dust and dirt getting into the glove box decreased several times. Therefore, take a laminate, saw, drill and forward!