Not working heating rear window what to do
Many drivers are interested in what to do if the heating is not working on the rear window? This is not just a whim, but a vital necessity, allowing to always see what is happening from behind.
If, when looking into the rearview mirror, the driver does not see anything other than fog, it means that the risk of an accident increases many times. That is why, as soon as you noticed that heating the electrical yarns of the rear window does not work, it is necessary to immediately take it to the repair.
This is not a particularly difficult procedure, but that everything goes as needed, it is necessary to approach it as much as possible. It is very important to carry out everything exactly with the instructions.
Features of the heating system for rear window
Design heating
Before moving to the repair of heating of the rear window elements, which you make your own hands, you need to understand the design of this device. In fact, it does not constitute anything complicated.
On the sides of the rear window of the vehicle go two conductive tires. Between them are located heating lines. Usually, high-purity material is used to create them. The fact is that for efficient work, each thread must have resistance around 10 Ohm. Only so you can protect the glass from fogging.
The number of threads in the heating of glass, which is in the back, is different for each car. In most cases, it depends on the length of the surface. When repair, it affects the complexity of the discovery of the cliff.
Important! All heating lines are connected in parallel. As a result, the opening of one of them does not affect the work of the rest.
Connecting to the on-board network

To fix the heating of the rear window filaments, you will need to study the scheme for connecting this device to the automotive electrical network.The main role is played by the ignition castle. It is through it that the tension is supplied to the heating system.
Attention! For stable operation of the device, one conclusion closes on a mass of the machine.
Once you turn on the heater, the current comes on the relay. After that, contacts are closed, and the conclusions are connected. As a result, electricity without obstacles is supplied to the heater.
As soon as the current falls into the heater electrical circuit for glass, it begins to feed the threads that are parallel to the common system. But that's not all. The fact is that the negative contact of the battery is also brought to the mass of the car. Due to this, constant sharing is carried out.
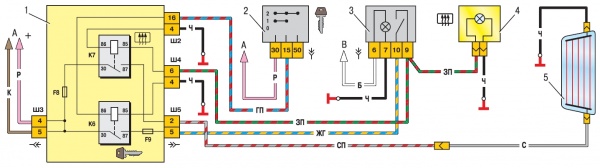
As you already understood from the above material, the heating of each rear seat thread works due to the ignition key. As soon as he gets to the ON position, the entire system is activated.
Attention! In some cars, the heater for the rear window is activated solely when the engine is running.
Many drivers are outraged by such a solution to the designers, but in reality he has its own logic. The fact is that the rear window heater consumes very much of electricity.Typically, this indicator varies in the range from 10 to 25 A.
So that you understand better how much it is 25 A - do a visual comparison. In order for one car headlight to shine, at least 5 A. is actually one heater is 5 headlights.
What malfunctions be other than the cliff of threads
To fix anything, you first need to diagnose the breakdown. For a number of signs, you can first find out what exactly the reason for the failure of the threads. So the non-working rear window heater indicator when the button is pressed to the defective fuse.
A luminous indicator and non-penetrating heating threads located on the rear window indicate problems in the relay. In turn, poor contact in the electrical circuit leads to too slow down the glass.
We carry out repair of heating
Search for a breakdown
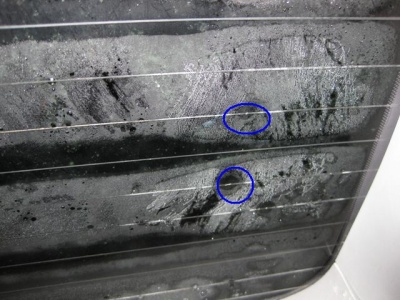
It is from this that you need to start the procedure for restoring the normal health care of all rear window yarns. First, look at all lines visually. If nothing is not unbearable, you can use the search techniques that have been developed by other drivers who collided with the same problem:
- If at first glance when inspecting the rear window, the cliff of the heating lines you did not find, you should not immediately move to more complex techniques. To begin with, simply disconnect the heating. In a place where the glass is not heated - a characteristic band appears.
- Take a voltmeter, activate the heating of the rear seats. Set one probe to the mass of the machine, the second wrap foil. At the same time, slowly move on each line until it comes to the middle. Standard voltage is 5 V. If it falls below, it means that you found the place of the cliff. The jump to 12 V also denotes a break.
- There is another option to use a voltmeter. To do this, be connected plus to the terminal to the appropriate heating contact. The second probe must be slowly moved along the line. Moreover, it is necessary to do this from the other side where the negative terminal is located. The voltage drop means what you found a break.
- Ommeter. The best arrow device will be the best. When you turn on the device, you must select mega mode. Properties Connect to the outputs of heating on the rear window. As a connecting element, the usual wool moistened in distilled water. Spend on line. The arrows reaction will mean that you found the place of the cliff.
As soon as the location of the cliff in the heating threads of the glass, which is found, found, can begin to be fully repaired.
We repair heated
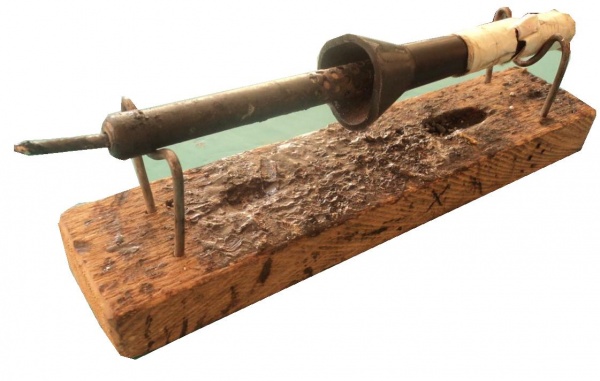
![]()
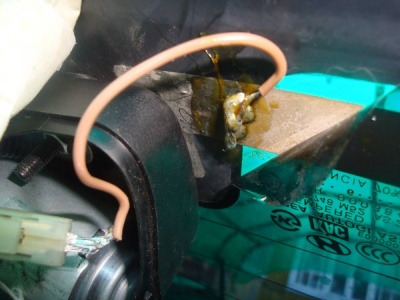
There are many methods of repairing threads responsible for heating the car's glass located behind. TO example, you can take the usual repair kit for the corresponding part. Plus, this option is that you will not have to look for additional parts and tools. Everything will be in one package.
Attention! Before you begin to solder - clean, and degrease the wire of the heating system.
Some of the best sets to restore heating damaged thermal rear window lines make Permatex and Quick Grid. All of them have similar components.
Remetomlect allows you to restore about 10 centimeters of damaged thread. Usually in the set already there are ready-made lines. All you need is to install them correctly.
The algorithm for the repair of thermal lines of the rear window with the help of Remkomplekt is very simple. You need to replace the damaged thread and apply the compound where there was damage.
Important! The procedure must be repeated two or three times so that it has the effect.
At the end of the work, remove the template.Heating cannot be turned on at least the day after you do everything. Otherwise, all work will be useless and will have to redo it.
The second method of repairing heating of thermal lines of the rear window with their own hands is to use conductive paste. Just apply it to the place where the threads were torn off. Wait 24 hours. After that, all the functions of thermal lines will be restored.
Tip! If time is pressed and you need to go urgently, use the usual hairdryer to accelerate the process.
Folk Methods Repair
Of course, the use of Remkomplekt and thermal paste has its advantages. They are easy to use, and the result of repair by these means of heating threads from a special material for rear window is always at a high level. Nevertheless, they still need to buy. And for this you need money and time. In some cases, and with the first and second possible, some difficulties are possible.
It is not surprising that the domestic and foreign motorists were invented a whole set of diverse techniques that can help in the shortest possible time with the help of existing means to restore the torn lines.
In order to realize the first folk method for repairing the rear window threads - you will need paint and chips. To get it chips need a copper-brass bar and a file. Paint color does not matter much. Nevertheless, it is preferable to match the threads.
The chips and paint are mixed in the proportion of one to one. As a result, you should have some kind of dough from these two elements. In order to make the stencil, ordinary tape will fit.
After the stencil is applied to the surface, turn on the heating of the threads with the resistance of 10 ohms for the rear window. Only then apply the regenerating mixture. As soon as the dough falls on the damaged area - a specific hissing will be heard.
The main plus techniques with paint and chips when repairing heating on the rear window is that you do not need to wait. As soon as you break easily recognizable hiss you can immediately go to the track, not afraid that the rear window is notice.
The second folk method of repairing heating installed on the rear window has some differences from the first. In the mixture, the chips are also used, but the paint is replaced with glue. Ideally suitable BF-2. Its restoration qualities will be more than enough to restore damaged threads.
Important! To ensure more reliable contact, you can use fine wiring.
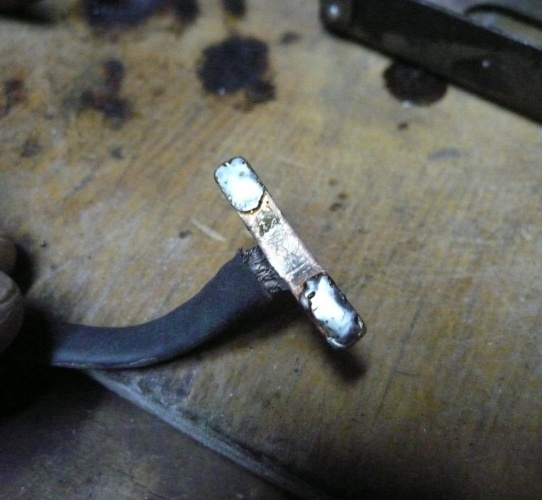
The third folk method of repairing the heating threads attached to the rear glass is the usual soldering. To do this, you need a flux and zinc chloride. Without solder, of course, it will not be possible to do. The vein that you will use while working should be silver. Alternatively, you can apply copper.
As you can see, the folk methods allow you to restore even the most serious breakfasts of heating lines on the rear window of the car with minimal cost. Unfortunately, unlike the finished paste, the composition you will have to do it yourself. And it takes time and strength.
RESULTS
Heating of high-resistant rear window yarns can be repaired with their own hands. For this, it is not even necessary to buy Repair Kit or pasta. Enough primary means in the form of bar and paint.