Repair of gearbox with your own hands on Chevrolet Niva: Step-by-step instructions and video
Problems in the work of a beloved car is always unpleasant, costly and delivers a bunch of inconvenience. Especially when it comes to problems in the work of the CAT. In this article, we will describe in detail about the problem of Niva Chevrolet knock when switching gear and tell me how to repair with your own hands.
Problems with box
Neva Chevrolet Niva, and in particular its gearbox, as they say, is good, but with its "features". Somewhere after the first 50 thousand km of run, the device begins to show the teeth. A hum of or unusual noise may appear. Such features "make it clear that bearings or gears were worn out. If one time is to watch the checkpoint, then you can determine what exactly will have to be replaced. What other problems may arise in the gearbox?
- Noise, grinding or knock when driving a car, and sometimes when warming up.
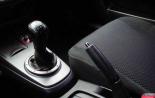
- Strokes at the time of switching gear.
- PPC may refuse to disable one or another.
- Deformation of the lever, which promises complications during the shift process.
- Also, transfers can simply knock out.
For each item listed above, there are causes and ways to solve them. But today we will consider a specific problem - a knock box of the Niva Chevrolet gear and do it with their own hands.
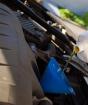
A knock at the movement of the car or at the time of heating, it says that bearings, gears, shaft (primary) or axial were caught in the checkpoint. Actually, determine what exactly was the cause, sometimes it happens very difficult. And if you do not have the ability to fully replace the gearbox, the only option for you will be removed manually, disassemble and carry out a small repair.
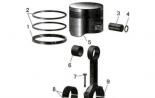
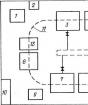
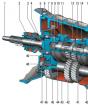
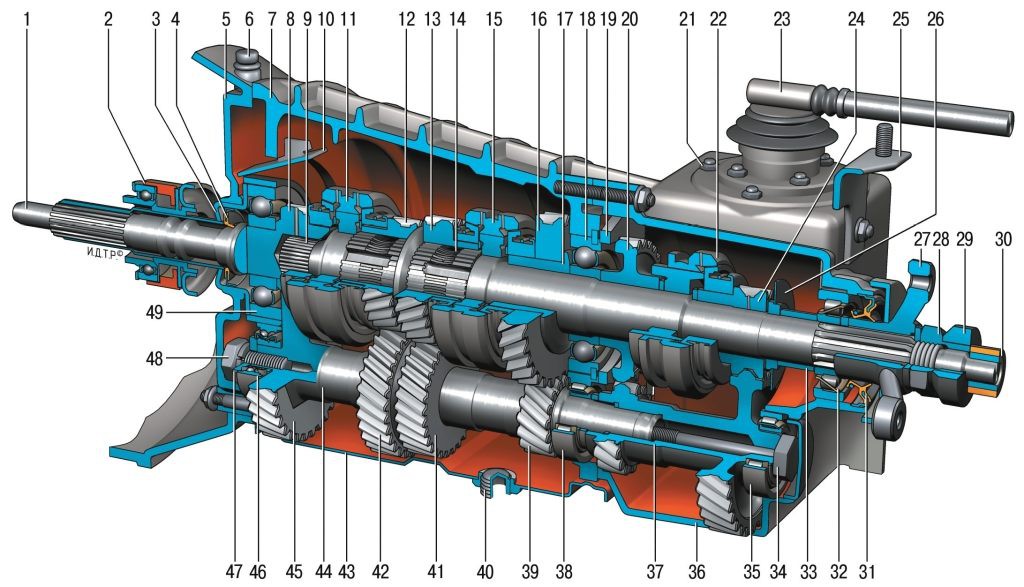
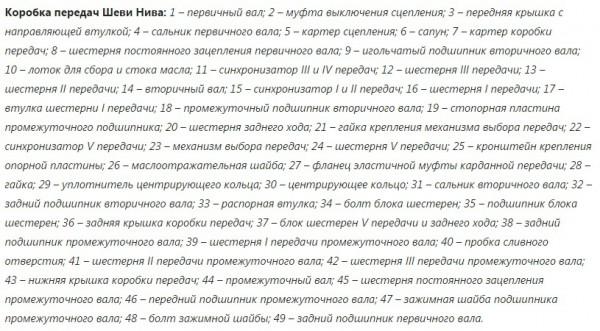
Scheme and gearbox
In order to proceed to the removal and disarm of the box, you first need to get acquainted with the scheme of the CPP of Niva Chevrolet in order to better understand how repairs will occur.
Repair with your own hands
A knuckle of gearbox - the disease is quite common and not particularly pleasant. Each time you make the switch to listen to the rattling sound, no nerves will not be attacked. But it is still possible to cure the checkpoint by conducting relevant repairs.
In order to remove the knock knock first you need to remove it. To repair the box you need to have keys with yourself (10, 13, 19), key (hex) on 12, scolding and passage. So, proceed:
- Install your car on elevation or to a pit.
- Disconnect the battery terminal and pour the oil.
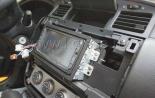
- Clear car salon. Remove the knobs from the levers, as well as the disassemble, the trim element and the case.
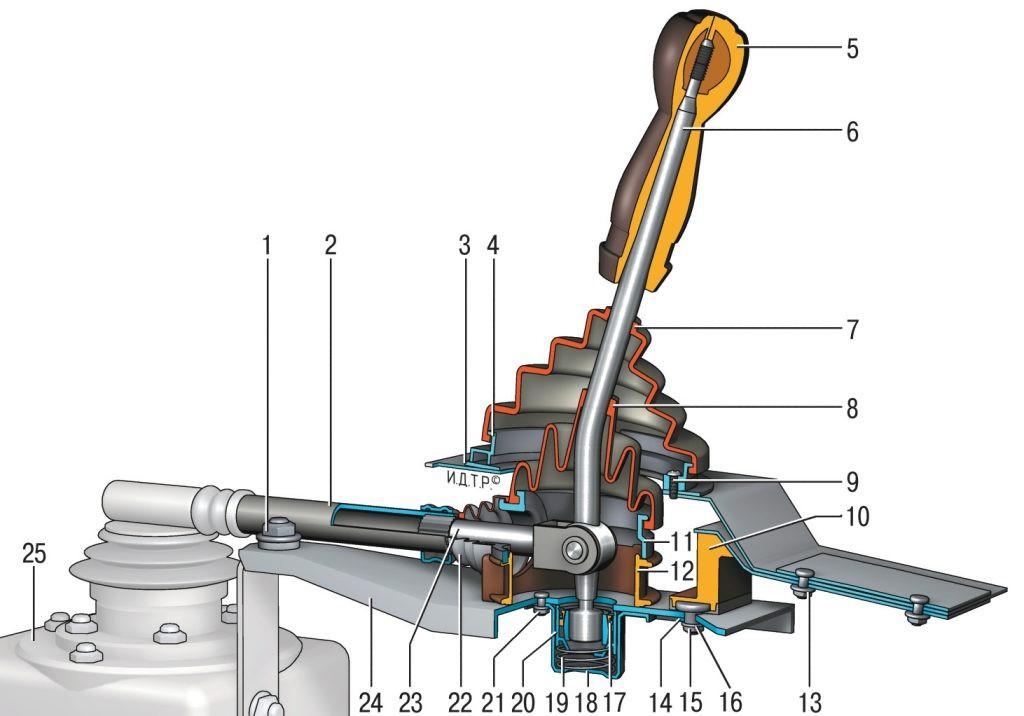
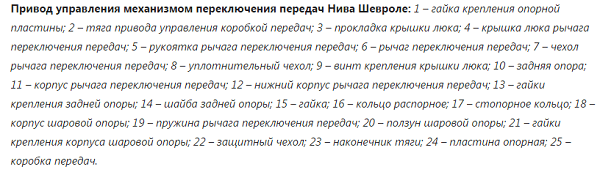
- Remove the casing, boot, the lock sensor connector. Remove the box lever itself.
- Adjust the transmission that is passing back, get a lock sleeve.
- Try to mark the flanges of Cardanov and still necessarily dispensing, then to collect everything in the right order.
- Remove the cardan (which, front) and washer (which, oil reflective).
- Saw a flange (look at the secondary shaft)? Unscrew the nuts of the elastic coupling from it (this is the key size 19).
- Unscrew the nuts on the pillows to the very end of the spill and remove the distribution.
- Now you need to unscrew the bolts from the cylinder and the starter itself, before removing the pin and next to it. For this action needs an extension cord.
- And the starter move closer to the radiator.
- Disconnect the sensor that is responsible for the lanterns (reverse), unscrew the silencer clamp, as well as the bolts from the crankcase and the nuts of the traverse.
- Unscrew the bolts on which the box is closer to the engine. Carefully disconnect it, just try to not hang all your cargo on the primary shaft.
- Shake her a little from the side and gradually move back until you reach the stop.
- Carter Lower down, squeeze out of the hole.

Congratulations, you removed the gearbox! In order to continue the repair, it must be disassembled. It should be disassembled slowly, immediately prepare your workplace. Tip, lay out all the details taken exactly in such a manner as you shoot them, it will be much simplified by the reverse process. As you will disassemble the device, watch the bearings, gears, axis behave, whether there are blowers, as the primary shaft behaves. You may not have to fully disassemble the element, for example, reveal the bearings wear is very simple when you remove the bottom cover, a little move them, if some of the bearings shifted, it means it was worn out and requires replacement. So, continue the repair. You need to do the following:
- First, screw the shank nut. Gently remove the flange-helicopter and the mechanism that selects the transmission. Check the scene on the detection of cracks.
- Now remove the cover behind. If suddenly it fails to remove it, then push down the bearing clip. It is on the climax that the condition and the nature of bearings are inspected. If you decide to replace them, you will need the bearing (already the secondary shaft) go down, remove the clutch crankcase and check the spring washer.
- Now get the clip, the sleeve (which, remote), and the washer. You will have to disassemble the locking mechanism. To do this, unscrew the gear bolts, as well as a bolt (see the secondary shaft). Last, remove the fungus and ring.
- Fully remove the fifth gear. Game disassemble. Remove the locking ball, for this you need to push it inside. Unscrew the third and fourth velocity bolt, pull out the rod, get it and the tear. Remove the locking ball and tear. And by analogy, disassemble the first and second gear.
- Unscrew the fifth speed plug. Remove the rear gear. Do not forget to check the backlash.
- Remove the middle bearing, remove the front, move the dumped back, and then pull out. Course that is inside, you need to knock down the chisel.
- Remove the forks of the first, second, third and fourth transmission. Also get the primary shaft, you need to remove the locking ring, use for this with a hammer or a reminder. Take the Passatia and output the ring. Carefully inspect the needle bearing.
- Riding from the side to the side, get the bearing. Shaft must be removed. Remove the gear of the first and second speed, as well as the coupling of the first, second, third and fourth hub. If you have discovered malfunctions, you need to break the stopper, remove the third and fourth hub of the third speed. Selns replace.

Hooray, ready, you disassembled the box! In order to remove the knock, you need to identify the item that was damaged or worn. After you find it, continue the repair of the box, replace the damaged item, collect the device in the reverse order and put it in place.
Video "Remove the gearbox"
How to correctly shoot our gearbox you can view in this video.