How to replace the windows on VAZ-2107
Power windows in any machine must be in good condition, even if they are used very rarely. From the factory on the VAZ-2107, cable lifts are installed, which are powered by manually. If an electric drive was installed on the machine, it already suggests that the unrelated by the car owner. In this article, we will consider the question of how to replace the windows on "seven" on their own.
Design features
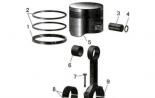
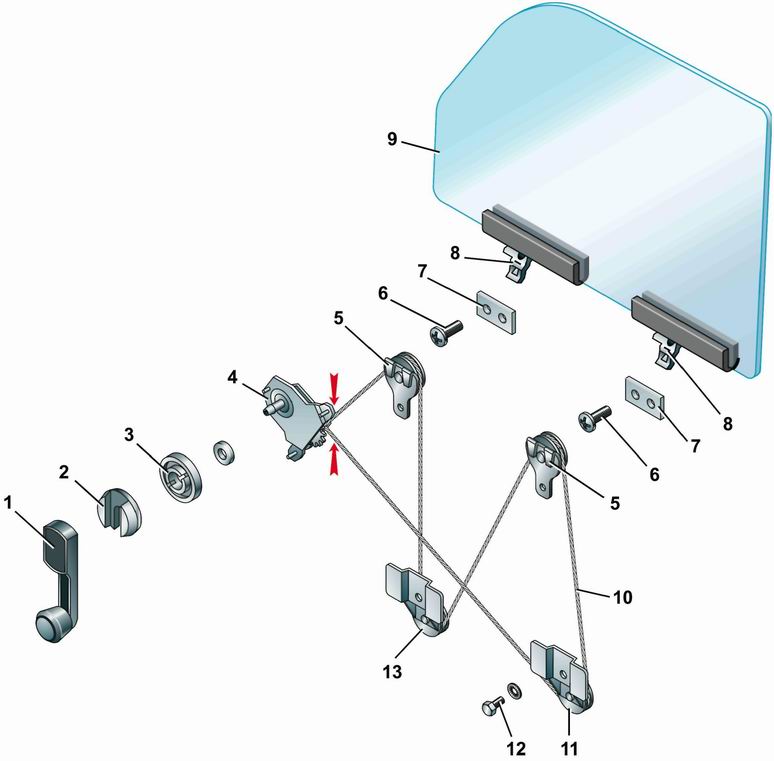
Most of the owners of the seventh model of the new generation are confident that the windows replacement process is somewhat complicated. All because the glass is connected to the supports and the cable not in one, but 2 places. Such a decision demanded another roller. Now they are used 4 pieces (three - for directions, one - for tension).
Replace independently possible in the presence of simple tools:
- Keys (8, 10).
- Cross screwdriver.
Step-by-step replacement sequence on the front door
 To install a new windows, it is pre-removed to dismantle the old mechanism.
Preparatory work:
- Remove the three bolts that fix the handle to the door.
- Remove the handle.
- Remove the trim from the door.
Before dismantling the factory lift, tie the two cable branches with wire.
It is necessary so that the cable does not fly off the grooves in the drum, and the mechanism could be applied again.
Removing the design is performed as follows:
- Flip the glass within one turnover of the glass lift handle so that through the technological doorways it is possible to get to the cable lock and to the glass supports.
- One locking screw must be turned off completely, and the other little to weaken about the cable fastening bracket to the carrying protrusion. Display it.
- Raise the glass to the extreme top position and secure it with a conventional screwdriver. For this you can use other remedies.
- Take the key to 10 and loosen a bit of a nut that crept the tensioner. It is located in the center of the bottom of the door.
- Remove the cable from the stretch and three guide coils.
- Unscrew the three nuts that fasten the windows device to the door.
- Unscrew 2 nuts fixing the guide groove and move it to the right.
- The final stage is the dismantling of the windows from the door.
After the mechanism is removed, you can check how rollers rotate.
Installing new windows
The new mechanism must necessarily have a bracket, which fixes two branches of cables. It can not be removed until the full installation will be made.
In general, the installation process is as follows:
- Installation and fixation of the housing on "your" place.
- Installing cables around the rollers.
- Fastening with a glass with a cable. It is fixed with screws using 2 brackets.
- Installation of the guide groove.
- Cable stretch.
- Now the bracket is cleaned, which fixes the cable branches.
- Installing the door upholstery and handle.
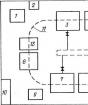
You can circle the cable around the rollers in two ways through the rolling support (upper or lower). If the stroke goes through the bottom roller, then the cable is sent as follows:
- Left guide roller (lower).
- Left guide support (top).
- Central tensile coil (bottom).
- The guide element on the right above.
If the front windows are replaced, then you can circle through the upper coil in the reverse order.
Test process:
- Lower the glass to the lower position.
- Turn the handle until it stops in the direction of lowering the glass.
- Adjust the tension of the cable by moving the required roller.
- Clamp bolt, which fixes the roller.
Note that the stretch must be sensitive. The cable should not be pulled, but also allow him to hang out, it is also not worth it.