Homemade products from a washing machine. Options for useful homemade products from an old washing machine
Disused washing machine motors can be the basis for new spinning appliances. For example, you can make an emery for sharpening knives, powered by electricity, as well as a mixer and much more. This will be discussed in the article.
Engine types
Shaft rotation washing machine carried out by the engine. It has various design features... The motor can be of the collector type, asynchronous or electronic type.
Washing machine motors are removed in different ways. First of all, you should disconnect the washing machine from the power supply, sewer network and water supply. The unit must be in this state for at least 10 hours. During this time, the capacitor will be able to discharge. Only then can you start removing the motor.
How to remove an induction motor?
The wires connecting the induction motor and the capacitor should not be cut. The battery is removed with the engine. There are many types of batteries. It may look like a metal or plastic box. Typically, the battery is of a sealed design. It contains one or more capacitors, the connection between which is parallel.
The unit connection diagram is also different. The winding can be connected directly to the network. Another modification involves passing current through a capacitor. The existing scheme cannot be changed. It needs to be connected to the power supply, and the asynchronous motor will begin to rotate.
Do not touch the motor parts until the capacitor has been discharged.
How to dismantle a commutator type motor?
The motor from the washing machine of the collector circuit belongs to the category of low-voltage modifications. The stator contains permanent magnets connected to constant voltage.

There is a sticker on the motor, which indicates the voltage required for operation. Connecting the motor from a washing machine with a collector configuration assumes the supply of this particular indicator.
Electronic motor
The electronic circuit is removed from the washing machine along with the control unit. The voltage indicator to which the motor should be connected is indicated on the block case. It is very important to observe the polarity, as this type of motor does not imply reverse.
It happens that the connection of the motor from the washing machine is not carried out immediately. In this case, it is recommended to find other outputs to which a zero phase or logical unit is supplied. After that, the unit will start to rotate.

How to connect the electric motor of a modern washing machine?
If you have decided what to do with the old motor, then you will probably be interested in how to connect the electric motor to a voltage in
Before proceeding with the direct connection, it is advised to familiarize yourself with electrical circuit... First of all, pay attention to the wires coming from the engine. At first glance, there are quite a few of them, but in fact, not all of them will be needed. For work, you only need rotor and stator wires.
How to deal with wires?
If we look at the front of the block, then, as a rule, the first two wires located on the left refer to the tachometer. They are responsible for the washing machine motor. You won't need these wires to work.
V different modifications washing machines, the wires will differ in color, but the principle of their connection remains unchanged. You just need to find the right ones by ringing them with a multimeter. For this purpose, the apparatus should be switched over to measuring the resistance force. One probe should touch the first wire, and the second one should look for its pair.
For a tachogenerator in working condition, the resistance indicator is 70 ohms. These wires are visible, but not needed.
Washing machine automatic
How to connect the motor to the washing machine? After required wires will be found, you need to connect them.

For this purpose, one end of the stator winding should be connected to the rotor brush. It will be better to make a jumper and insulate it. This leaves the end of the rotor winding and the wire that leads to the brush. These two ends are connected to the network. As soon as voltage is applied to these wires, the motor will begin to rotate.
Engines differ from washing machines high level power, so be careful not to injure yourself. It is advised to mount the motor on a flat surface.
If you want the direction of rotation of the motor to change, then you should put a jumper on the other contacts and change the wires of the rotary brushes in places.
If everything is done correctly, the motor will start to rotate. If this does not happen, then you should check the operating condition of the engine and only then draw any conclusions.
It is not difficult to connect the motor of a modern washing machine, which cannot be said about old models. Their scheme is different.
How to connect the motor of an old unit?
Motors from washing machines that have been in service for many years are more difficult to connect. To locate the wires, ring all the motor windings. This is how you find pairs.
The multimeter is in the mode. One end should touch the first wire, and the second one should look for its pair in turn. It is advisable to write down the winding resistance indicators. You will need them.
Further, by a similar method, the second pair of wires is found and the resistance indicator is recorded. There are two windings available with different resistance values. It should be determined which of them is the working winding, and which is the starting winding. The clue is the resistance indicator. The winding with the smaller one is the working one.
Many believe that starting such a motor is carried out by means of a capacitor. This is a misconception, since the capacitor is used in motors of another modification, in which there is no starting winding. In this case, it can contribute to the combustion of the motor while it is running.
To start this type of engine, you need a button or relay to start. The button must be equipped with a non-latching contact. You can use the button from the doorbell.
From the washing machine it looks like this: 220 V is supplied to the excitation winding (OV). The same voltage is supplied to the starting circuit (PO), only for the purpose of starting the engine for a short period of time. To turn it off, use the (SB) button.

After all the manipulations, it is enough to start the engine. For this purpose, the SB button is pressed and, as soon as the motor starts rotating, it is released.
To ensure reverse (rotation of the motor in the opposite direction), the winding contacts should be reversed.
Is it possible to give the motor of an old washing machine a second life?
Many are wondering what to make of a washing machine engine. The working motor of the collector circuit is suitable for the construction of a variety of devices. Some of them will be covered in this article.

Grinder
Any man can make it if he has a motor from a washing machine, an Indesit, Ariston and any other model.
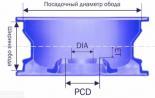
When attaching the sharpening stone to the engine, the manufacturer may encounter a problem: the diameter of the stone hole does not match the diameter of the motor shaft. It is advised to use an additional part that is turned on a lathe. The manufacture of such an adapter is not difficult. The main thing is to know the indicator of the shaft diameter. There should be more than just an adapter. You also need to prepare a nut, washer and a special bolt.
The thread on the nut is cut depending on which direction the motor will rotate in. For clockwise rotation, a left-hand thread is made, and counterclockwise - a right-hand thread. If you do not adhere to this rule, then the stone will begin to fly off, as the process will go to unwinding.
If there is a nut with a thread that is not suitable in the direction, then the direction of rotation can be reversed. For this purpose, the winding wires are interchanged.
You can set the motor to reverse rotation without using a capacitor. After the working winding is connected to a voltage of 220 V, the stone scrolls sharply in the right direction.
The indicator of the frequency of revolutions should not exceed 3000 per minute. Otherwise, the stone will burst.
When using such a unit at home, experts advise using a motor with a frequency of 1000 rpm.
DIY, needs to be rigged additional elements... They will serve as protection from dust and stone fragments during operation.
A piece of metal about 2 mm thick can be used as a casing.
How to make a vibrating table?
Using an engine from a washing machine, an automatic machine of the firm "Ariston", "Ardo", etc., you can make a vibrating table. It is needed for the production of tiles for laying out garden paths.

The design of the vibrating table is not complicated. It includes a flat plate, fastened to the base with movable joints. The work of the collector motor sets the plate in motion. As a result, air is pumped out of the concrete, which makes the tile quality higher.
The position of the collector motor is set in accordance with the diagram. If it is installed in the wrong place, then the table will not be able to function correctly, and the production of quality tiles will fail.
How to make a concrete mixer?
The engine from an old washing machine can also be used to create a concrete mixer. This product is not intended for industrial volumes, but it is quite suitable for household needs.
To make a concrete mixer from an old washing machine, you need not only a motor, but also a tank. A pair of blades, which look like the letter "P", are inserted into the container of the tank with the activator. The standard activator must first be removed from the tank. Making the details is easy. For this purpose, a strip of steel with a thickness of about 5 mm is taken. Cut off from her the right amount material that bends. The two blades are positioned so that they form a right angle. They are connected to the tank through the hole where the activator was located.
The opening in the tank through which the water is drained must be closed. With the correct assembly of the structure, you can connect the motor.
Depending on how much concrete you are going to mix, the engine power indicator is selected. With a small volume, you can mount a single-phase motor. If it is supposed to mix concrete of large volumes, then a more powerful unit is installed.
You should also remember about the temporary transfer. It must be replaced with a gearbox. It will reduce the engine speed.
A skilled owner has no such thing as trash. Any failed unit or equipment is at least a deferred benefit. Today the editors of the site will talk about how to use wisely some of the units of old washing machines. Lawn mower, concrete mixer - this is an incomplete list useful homemade products from the engine and drum from, which we will discuss in detail in this review. Step-by-step photo and video master classes with the easiest to implement, but useful ideas on how to make homemade products from a washing machine motor are waiting for you.
Read in the article
Types of washing machine motors
How to make a grinder or sharpener from a washing machine engine
If you don't know where to use the motor from, make a grinder. This is one of the simplest "alterations" of the washing machine engine. The biggest problem in assembling a grinder is to ensure a good, stable attachment of the grinding stone to the motor shaft, most often a special flange is used.
Let's consider in detail all the stages of work:
| Illustration | Description of action |
 | For work, we need an engine from a washing machine 180 V, 1400 rpm. An engine that is too powerful is not worth choosing. The first step is to insulate the wires. |
 | We mark the grinding wheel for the adapter. Moreover, for fastening the hub, it is necessary to use a washer and a nut with a thread directed in the direction opposite to the rotation of the shaft. Otherwise, it will unwind and the whetstone will fly off at the first start. |
 | We cut metal corners, they can be cut from 8 mm sheets. Using bolts, we attach the motor to the bed. |
 | We carry out the assembly of all elements of the grinding disc and a test run. |
 | The next stage is painting and welding to the base |
 | At the end of the work, the surface is decorated with an abrasive material. The easiest way is to use double-sided tape for these purposes. By the same principle, you can make a sharpener from a washing machine with your own hands. |

A comment
Electrician of the 5th category of LLC "Petrokom"
Ask a Question"If you need to change the direction of rotation of the grinder rotor from the washing machine, for asynchronous motors it is enough to switch the corresponding windings. If you do not have a starting coil, then when you push the stone in the right direction, the device will work on its own.
"Wood lathe
The hardest part about this DIY is to weld the correct frame for the base. Lathe in mandatory must have a stable base. The frame can be made of corners and profiles, and other materials at hand. The most important thing is that the motor axis is parallel to the support structure.

The motor in such models is asynchronous, usually with two speeds, from 400 to 3000 rpm.
For more information on how you can use a motor from a washing machine and assemble a lathe with it, see this video:
Do-it-yourself feathering machine from a washing machine
Such a machine will easily do “all the dirty work” for you. She will perfectly cope with the time-consuming and physically challenging task of plucking chickens.
| Illustration | Description of action |
 | We take the shaft from the old washing machine, we work on the thread. On emery we make neat cuts for the pulley. |
 | In our case, a top-loaded pulley is suitable. |
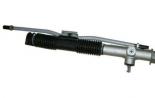
 | We cut the adapter from the old steering pin from the UAZ. The thread came up just right. |
 | For pressing, we use a centrifuge cap from an old semi-automatic washing machine "Siberia". |
 | To mount our motor, we assemble the frame. We paint, weld on the "ears". |
 | We put the pump on the sealant. |
 | Install the pulley on the reverse side. |
 | We check the belt drive of our unit. |
 | We connect the board with a tachometer. We connect the windings in series from the collector to the anchor. If you do not connect correctly, your motor will turn the other way. We fix the control unit under the tabletop. |
 | We attach it to the carcass loading bowl equipped with rubber pins. |
 | We put the bottom of the feathering machine on top and fix it with a cap on the screw. |
Such a machine will cope with plucking boiler chickens, as well as quails. For the manufacture were used about 120 rubber "fingers", with a diameter of 8 mm.
Lawn mower
It is another great way where you can use the engine from the washing machine and give it a second life. By analogy with any device, the most difficult thing here is to make a comfortable frame to which the motor could be stably screwed. The second most important task is to come up with a cover to protect the motor from dust and, and a person from cuts.
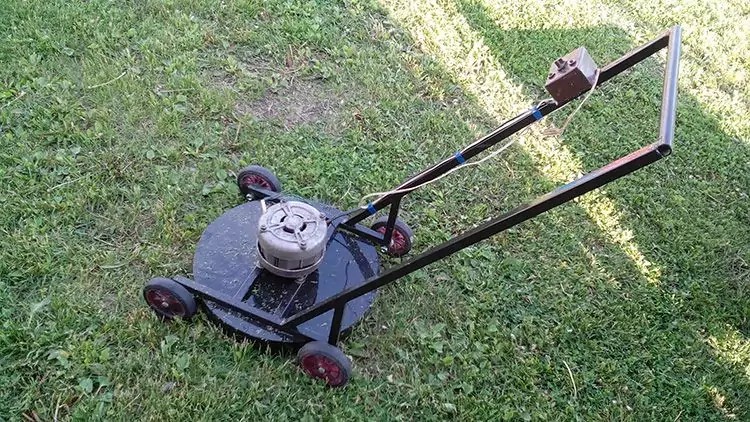
Sometimes a frame from a stroller or is taken as a basis. Next, a metal sheet is welded onto the frame. A casing is attached to the top of the platform, a special bumper is fitted in front and behind. It can be either plastic or rubber or metal.

 Knife options can be different - from rotary to cylindrical.

Feed cutter
But for the manufacture of a feed cutter, not only the motor from the washing machine, but also the drum will be used. True, it is worth initially choosing. However, if you haven't found one, a regular drum will do.
Important! If you are using a tank from a top-loading washing machine, make sure that the blades do not touch the bottom and sides of the tank during operation!
How to convert an old washing machine engine into a generator
To make a homemade generator, you will have to seek help from a professional turner. After purchase, it will be necessary to carve grooves of a certain depth on the motor core.

To fix the magnetic "amplifiers", it is necessary to prepare in advance the tin templates, the dimensions of which must coincide with the dimensions of the core and the width of the grooves. It is important to distribute the magnets on the core at the same distance. You can fix them with glue.
If your household appliances are broken, then do not rush to throw them away - you can make many useful things from its parts, even fashionable furniture. We will offer many original options, what can be done from the parts of an old washing machine with your own hands.
Helpful mechanisms
First of all, you can use spare parts from an old washing machine for the manufacture of mechanisms useful in the household.
Grinding and edging machine
It is quite simple to give a second life to an electric motor of household appliances - its power is quite enough to make a grinder. There are no special difficulties for the home craftsman: fix the engine body on a powerful wooden base (a piece of board is suitable), connect the start and stop button, make an adapter nozzle on the shaft, where the grinding or edging wheel will be attached. Other homemade products from the washer engine can be viewed.

Smokehouse
Many people dream of their own smokehouse to surprise their friends with smoked meats, but there is nowhere to install it in a city apartment. We offer a variant of a mobile analogue - it is made from the drum of the washing unit. We fix a thin sheet of steel in a circle so that the smoke does not go out through the perforations, and in the middle we insert a special grate, where fish and meat will be laid out for smoking.
A hole is made on top for the pipe, where the smoke will come out, under the grate we lay out wood blocks or chips from oak, alder, cherry or apple tree. The main task is not to overdo it, the volume of the smokehouse turned out to be small, so you don't need to put a lot. It is better to find out the norm in advance by an empirical method, from smallest to largest. Experts in this business assure that five small sticks or dry branches are enough.
For those who breed poultry for distribution in urban markets, this improvement will be to the liking. We mean assembling the feathering machine on our own. It works in the same way as the factory counterpart, only it looks less aesthetically pleasing, but many times cheaper.
The principle of operation is not particularly complicated:
- A fairly capacious tank is lined with special rubber pins (beats) with a threaded connection at the end, for a tight and reliable connection with the body.
- The bottom rotates at high speed and is also studded with rubber beaters.
- A poultry carcass scalded with boiling water is placed in the tank: chicken, goose, duck or broiler.
- When turned on, the bottom rotates, the beats make the carcass quickly move around interior space, causing the feathers to fly off in different directions.
- In 2 minutes, the carcass is cleaned, only minor residues remain in the area of the inner part of the wings, tail and paws.
On the example of some farms, up to 30 carcasses can be plucked in this way in an hour.
Amateurs believe that mechanical plucking of carcasses is damaged, but in practice, their presentation is 100% preserved.
The tank is located horizontally, water is supplied, as shown in the photo. A drain is made from the bottom to remove water and feathers, so the bottom is slightly smaller than the diameter of the drum. The water supply has a beneficial effect on the entire mechanical plucking process.
The most cost part- purchase of pins made of durable rubber: the cost of one is at least $ 1.5, and they need at least 120 pieces, but the costs will quickly pay off.

Interior details
We have listed far from everything that can be made from a washing machine if you have a lot of imagination and certain skills. If you don't need a lathe, that is, there are many ideas for using parts from an old washing machine in the interior of an apartment and a private house - you just have to choose the most suitable one.
Sealed door
The door of the loading hatch from the car can be adapted for a window in a wooden frame - it looks unique and in fact practical. To do this, you just need to cut out the door along with part of the front panel of household appliances - the original is ready porthole that fits into almost any interior.

If you live in the private sector in own home, and there is a shaggy guard in the yard, then he booth you can insert a door from a typewriter, through which in severe frosts he will see everything, but be in a warmer room. With the help of such a homemade product, you can isolate the formidable watchman during the arrival of guests - he sees everyone, but he is not able to bite or tear his clothes.
It must be remembered that the hatch is sealed, so make side holes for ventilation of the booth.

With the help of a stainless steel drum with an abundance of perforations, you can change the interior of your apartment beyond recognition: make a unique coffee table in a trendy hi-tech style. You can decorate it internal lighting from an LED garland to save energy - it is simple, but it looks original and very unusual.
This is easy to do: you just need to attach a few steel pins to the drum body. Fasten the top of the plexiglass or MDF board from above. A piece of furniture made in this way will decorate the interior of your living room.

Unique poufs
Fantasy has no boundaries - with a certain skill and invention, you can make various puffs out of a drum for a children's room. We take a colored pillow and cut out a square of the same size from the chipboard, then fix the pillow on the square with a stapler.
We fasten the halves of the card loop to the chipboard and the outer wall of the drum using self-tapping screws and screws, paint the side surface of the drum with bright paint - a unique pouf with a hinged lid is ready, and inside children can store small toys and things.
Such original poufs made of stainless metal will last for many years, when children grow up, they can be covered with a discreet fabric and put in the living room.

Lampshade in the nursery
To completely change the interior of the children's room using the original homemade lampshade from drum from an old washing machine, you need to do the following:
- from any non-combustible, non-conductive material (textolite, ebonite) we make a circle in size half the diameter of the drum;
- then we cut out a hole for the cartridge and the connection wire;
- insert the cartridge into the prepared hole, fix the circle on the rear wall of the drum, bring the wire out;
- we screw three special hooks into the ceiling, as shown in the photo;
- we attach special cables to the drum body, on which the entire structure will hang;
- we hang the assembled structure;
- we connect the wire from the chandelier to the terminals of the cartridge;
- We screw the light bulb through the inlet of the drum - that's it, you're done.
To dim the light and create a fabulous interior, you can attach a multi-colored lightweight fabric to the walls.

In the country
If you own a home plot, you can use one of the ideas below. Their implementation does not require special skills and does not take much time.
To help the gardener
Here, the old drum can be used to wash vegetables or mushrooms grown in the garden beds. The container is installed above the gutter, the harvested crop is laid through the linen hole, we water it from the top with a hose, and from below the dirty water flows out by gravity through the perforations. The original design works like a colander in the kitchen, only of a much larger size - at the entrance we get clean vegetables or mushrooms, quickly and without unnecessary hassle.
Many gardeners use the drum as growth restrictor fruit shrubs or protecting the root system of rare flowers from pests - not a single rodent can overcome the steel protection, and excess moisture will escape through the system of holes.
You can make unique flowerpot, decorating on the sides with fragments of ceramic tiles of different patterns - beautiful and unusual.

We make a brazier
The drum body is made of stainless steel, and it is resistant to high temperatures, so you can make the original rotating grill, especially since the perforations for blowing are already available on all sides. We take old pipes, if there is no welding of our own, then we invite a neighbor - and in half an hour we have a barbecue in our yard for making a barbecue. To prevent the weather from spoiling the holiday, we build a strong canopy on top from the rain.
A brazier on your own is quite simple to make from a drum from frontal machines, with a vertical laying of linen - you need to make minor modifications: cut off the side with a grinder, and add a stable support from below.

From a drum and an electric motor from household appliances, you can make a concrete mixer, a juicer, a universal sterilizer for home preservation, a chopper of grass and cereals for feeding poultry - there is no limit to your fantasies.
For the implementation of ambitious projects, anyone can find information of interest, diagrams and detailed drawings with an algorithm of step-by-step actions on the Internet. Each user, when the washing machine fails, can independently figure out how to organize a second life for it.
A morally outdated or outdated household washing machine contains a lot of structural elements that, having been in the hands of craftsmen, can be useful in the household. Such assemblies include various switches and relays, pulleys, a stainless steel drum, etc. However, most often there are homemade products using a washing machine engine.
Types of engines from washing machines
Washing machines are equipped with different types of motors depending on the design option. Among them are asynchronous, collector and inverter motors.
Asynchronous motors
Structurally, asynchronous electric motors consist of two main parts - a stationary stator and a rotor, the rotation speed of which can exceed 2500 rpm. Such a motor is easy to maintain, has low level noise and low cost... However, due to significant drawbacks (large dimensions, small coefficient useful action(Efficiency), the complexity of the electrical control circuit, etc.) they are in washing machines not used now. They can be found only in old models such as SM-1.5 "TsNA" (Tambov plant "Revtrud"), "Donbass", "OKA" (Nizhny Novgorod plant named after Y. Sverdlov), "Riga", etc., manufactured before 2000 year.
Collector motors
Collector electric motors are motors that are currently installed on about 80% of washing machines (Vyatka-automatic machine, semi-automatic models of the Eureka series, etc.). Structurally, they are somewhat more complicated than induction motors, since, in addition to the stator and the collector rotor, they require a tachogenerator and conductive brushes. Collector motors have:
- small overall dimensions;
- significant starting moment;
- simple control scheme;
- high rotor speed, etc.

Important! In this case, the collector electric motor requires regular Maintenance associated with the wear of the collector-brush assembly, and has a high noise level.
Inverter motors
Structurally, inverter (brushless) electric motors, as well as asynchronous motors, consist of a stator and a rotor. However, thanks to the use of direct drive technology and a three-phase inverter-type control circuit (the speed is controlled by a frequency converter), the developers managed to eliminate a number of connecting elements, which improved them. performance characteristics... They differ from other types of engines:
- high efficiency;
- high power;
- long service life;
- low noise level, etc.
Of the shortcomings, experts note a more complex control scheme, which somewhat increases the cost washing machines(Indesit, LG, Ardo and their analogues).

Dismantling and connecting electric motors
When removing a used electric motor from the body of the washing machine, it is necessary to take into account some of the nuances.
- removed together with the capacitor... In this case, the capacitor must be discharged, otherwise you can get an electric shock.
- On the stator of a low-voltage collector motor installed permanent magnets, alternately connected to the current source... On the casing of such a motor, there must be an information plate indicating the magnitude and polarity of the connected voltage.
- Inverter motors dismantled together with the block electronic control ... On the body of the latter there is also a plate (sticker), which indicates the magnitude of the supply voltage and its polarity.
Before starting the engine from the washing machine, you need to understand the purpose of its wires and connect them correctly. Have different manufacturers they have different colors, so they must first be “ringed out” with a tester.

In homemade products, collector motors from washing machines are most often used. They usually have 6 wires. Wherein pins from the tachogenerator are practically not used... Their resistance to ringing is about 60-70 ohms. Having identified these wires, they are taken to the side and fastened with electrical tape (so as not to interfere).
The remaining conductors go to the stator and rotor (2 wires) and to the conductive brushes (2 wires). On wiring diagrams they are indicated by colored or numbered arrows. For example, "arrows 1" mark the wires leading to the brushes, and "arrows 2" - to the stator windings. The easiest way determine the conclusions coming from the brushes... They are called from the side of the contacts, after removing the graphite rods. The resistance of the stator winding wires is in the range of 12-35 ohms.
There are also motors with 3, 4 or 5 wires. In this case, a three-wire circuit is used in single-phase motors, where the starting winding (with a lower resistance) connected via a capacitor... In addition, one of the wires can be ground. Pins that do not ring can go to various sensors (for example, a temperature sensor, etc.). The circuit for switching on the electric motor is also important - a star or a triangle.
Having determined the pairs of wires coming from the rotor and stator, connect one by one from the stator winding and from the rotor brush. The remaining two wires are connected to the mains and test the performance of the electric motor.
Advice! For safety reasons, before connecting to a 220 volt mains, the engine must be securely fixed to a fixed base. This will prevent it from moving unintentionally when power is applied.
Homemade products from the engine from the washing machine
The electric motor from the washing machine can be adapted as the main power unit in a variety of designs. Getting started, you must first of all decide on the parts that will be mounted on the shaft of this motor, and ensure their reliable fastening. To do this, it is necessary to equip the motor shaft with a suitable attachment.
Modification of the electric motor
The main problem that has to be solved when revising an electric motor is a discrepancy mounting holes parts to be mounted on the shaft, with the diameter of the latter. To mate these parts, it is necessary to make a special adapter (flange). On the one hand, it must have a thread to install the part, and on the other, an element that allows the flange to be securely fastened to the motor shaft.
Most often, for the manufacture of such a flange, a piece of steel pipe with a length of no more than 20 mm and a diameter of 32 mm is used. At one of the ends of this pipe, a thread is cut, the length of which must be at least twice the thickness of the nozzle to be installed.
Important! The thread must be cut in the opposite direction to the rotation of the motor shaft. Otherwise, the installed part will fly off, which is unsafe for the user.
The opposite end of the pipe is heated with a blowtorch and pressed onto the motor shaft. After cooling down, the flange will be securely fastened. To strengthen it, it is advisable to drill a hole across the joint and additionally tighten the shaft and flange with a bolt and nut. Such revision will allow you to reliably fix any nozzle on the motor shaft(a pulley for a belt drive to a compressor, grinding or cutting wheels, cutting blades, etc.). You can use an electric motor modified in this way when creating various homemade products.
To sharpen scissors, knives, drills and other cutting tools, the motor must be fixed to the workbench or other suitable surface. To do this, it is best to make an intermediate frame (stand), on which, using the standard mounting holes, install the engine. The design of the frame should ensure reliable fastening of the assembly to the workplace.

The next operation is setting the grindstone... For this, three nuts with the appropriate thread and two suitable washers must be prepared. One nut is screwed onto the flange until it stops, then a washer is put on, then an emery wheel and another washer. This whole "sandwich" is tightened with the second nut. The third nut is used to lock the threaded connection. On this, the creation of emery can be considered complete.
Advice! Such a device can be assembled using even a small electric motor from "Baby" type washing machines.
Other simple devices are made in a similar way, for example, a circular, a grinder (grinder), etc. old washing machine, you must have starting device... How to make such homemade products with your own hands will be discussed below.
By securely fixing the frame with the electric motor to the workbench, you can make a multifunctional lathe designed for processing wood blanks. It includes:
- headstock, fixed directly to the shaft of the electric motor;
- tailstock, designed for reliable fastening of the workpiece being processed;
- a hand-hand that provides a convenient use of the tool (cutter, chisel, etc.).

The construction of a stationary sawmill begins with the manufacture of a special bed with a technological slot for a saw blade. An electric motor from a washing machine is then installed on it, after fixing a small pulley on it for drive belt... The large disc is mounted on the saw blade shaft. The pulleys are connected to each other by a V-shaped or rivulent belt.

To make a feed cutter, in addition to the engine from the washing machine, you will also need its drum, in the back wall of which you need to make a hole for the electric motor shaft. Then, having installed the motor on the drum, the cutting elements (2 knives) are fixed on the shaft. The drum should be covered with a lid on top, otherwise the cut raw materials will fly out of it.

Conclusion
When purchasing a new washing machine, you should not throw the unit that has served its life in a landfill. Its constituent parts, and especially the engine, can be used to make handicrafts useful in the household, saving on this a certain amount of material resources.
The most reliable washing machines
Washing machine Electrolux PerfectCare 600 EW6S4R06W on Yandex Market
Washing machine Samsung WW65K42E08W on Yandex Market
Washing machine LG F-2J5HS4W on Yandex Market
Washing machine Gorenje WP 7Y2 / RV on Yandex Market
Washing machine BEKO WRS 55P2 BSW on Yandex Market
A washing machine, like other household electrical appliances, breaks down after a certain period of operation and cannot be repaired. Therefore, you have to buy a new one, but what to do with the old typewriter? Of course, you can just throw it away for recycling, like solid waste. But this is done by impractical owners, since the design of this household equipment includes many useful elements that may still be useful on the farm. Consider what can be done from an automatic washing machine.
What parts can be used
A washing machine is a rather complex household equipment that includes many individual elements. The more modern it is, the more details are included in its design.
Washer elements that can still be useful in everyday life:
Important! If you understand electronics, then you should not throw away the control unit, which includes a large number of semiconductor components that can be useful when repairing other electrical equipment.
Application of the working motor of the washing machine
Consider some homemade products from a washing machine engine. Today, with the help of the Internet, many home craftsmen are happy to share their own inventions, in the design of which spare parts from old washing machines were used. Let's consider the most popular ones.
Concrete mixer manufacturing
When carrying out repairs in an apartment, a private house, a small amount of concrete solution may be needed. Renting a concrete mixer for such a purpose is too expensive pleasure... You can build such a tool yourself, for which a case from an old washing machine (except for an automatic machine) is suitable.
Manufacturing instruction:

A simple concrete mixer for domestic use is ready. With such a device, you can easily prepare a bucket of solution.
Emery from the engine from a washing machine
A working motor from an old automatic machine can be used to make electric emery with your own hands. This is done very simply - an emery stone (sharpener) is installed on the motor shaft. Such a tool will be very practical in the country, since it can be used to sharpen not only knives, but also shovels and axes.
Feeder cutter, grain crusher
 Those who have a small piece of land contain household, do-it-yourself grain crusher, feed cutter will not hurt. If an electric motor of an automatic machine is used for this purpose, then homemade device will work as well as factory equipment.
It is not difficult to make a feed cutter in a domestic environment. In addition to the motor, you will need a top-loading machine body, which can be found on scrap metal.
It is important to understand! The motor of a failed washing machine can be used to make many different household tools that require rotation.
The working motor of the washing machine can be used to make a homemade dough mixer.
How to connect a motor to a washing machine
 If the owners of the old machine have ideas for the further use of the working engine, the question immediately arises of how to connect it to the 220 V.
To begin with, it is worth understanding the electrical circuit, after which it will not take much time to connect the motor to the power supply. We need to deal with the wiring. Specifically, wires connected to the stator, rotor will be used.
How to choose the right wires
Look from the front at the block with the wiring - the first two wires on the left are most often the wires of the tachometer, through which the washing machine speed is adjusted. We won't need them.
 Then comes the red, brown stator wire, followed by two wires (green, gray) connected to the rotary brushes. We will need all these wires to connect the engine to the mains.
Important! To connect the washing machine motor to the 220 V power grid, a starting capacitor is not needed, and the starting winding is not needed for the motor itself.
Of course, in different models of washers, the wires differ in color, but the principle of connection is the same. To deal with the wiring, you need to ring each wire with a multimeter. The device must be configured to measure resistance. Then one probe of the device is applied to any wire, with the second probe a pair is selected for it.
A quietly functioning tachogenerator most often has a resistance of the order of 70 ohms. These wires are recognized first of all, retracted to the side. After that, the rest of the wires are called, broken in pairs.
We connect the engine to the network
When everything is clear with wires, you need to connect them correctly:
- In accordance with the diagram, the end of the stator winding must be connected to the rotor brushes (it is recommended to make an insulated jumper).
- It is necessary to connect the wire of the rotor brush, the end of the rotor winding to the mains. After applying voltage to the wires, the motor will begin to turn the shaft.
Important! Washing machine motors are powerful. To avoid injury, you must be extremely careful. Therefore, before starting the equipment, it is recommended to carefully fasten the motor to some kind of base.
Washing machine drum use
The drum from the washing machine, made of durable stainless steel, can be used for a variety of purposes in the household. You can make many practical products from it with your own hands, for example, a barbecue grill or a barbecue roaster.
How to make a brazier:
- it is necessary to disconnect the drum from the old washing machine along with the shaft and pulley;
- we set it up with a hatch on the wheel;
- the brazier is ready.
 The working part of the brazier can be increased slightly. To do this, you need a grinder, with the help of which the front part of the drum, located near the hatch, is cut off. Accordingly, it will be much more convenient to put firewood in it.
For your information! For making a barbecue, a drum is an ideal material, since it has a huge number of holes through which the air flow will evenly blow the coals, creating the necessary heat.
You should not throw out a washing machine that has worked out its life, as it consists of many useful parts that can still be useful in everyday life, in the country, for housekeeping. At the same time, various devices made with your own hands will help save money.