Timing valve 8. The specifics of the timing belt on the fret grant
The gas distribution mechanism is one of the most important systems of an internal combustion engine. The timing belt controls the valves of the engine, carrying out the normal operation of the intake and exhaust. During intake, the air / fuel mixture enters the combustion chambers as a result of the opening of the intake valve. The next phase opens the exhaust valve, and the gas distribution mechanism removes exhaust gases from the combustion chamber. The VAZ 2190 uses a standard gas distribution unit, which differs only in the number of engine valves.
Timing characteristics of Lada Grants
The Lada Granta gas distribution mechanism has a belt drive. A similar device has been familiar to motorists for a long time. After all, the timing design migrated from the VAZ 2108 engine, which became the basis for all subsequent modifications of the VAZ power plants. Two types of engines are installed on the Grant: an 8-valve engine and a 16-valve engine. The gas distribution system of a 16-valve power unit has a complex structure and increased dimensions compared to an 8-valve one. Accordingly, replacing the Grants timing belt becomes more complicated.
The main feature of the 16-valve device is the presence of two camshafts that work synchronously, in parallel with the crankshaft. The structure is located in the cylinder head. All three shafts are synchronized via a toothed belt. The main drawback of the timing belt transmission is the unreliability of the belt itself. During its breakage or when jumping, the valves meet the pistons and bend. The structure of the 16-valve timing belt is clearly shown in the photo.
16-valve assembly
- Alignment mark on the cover of the drive.
- Lid.
- Intake camshaft pulley.
- Phase disc (sensor).
- TDC mark on the camshaft.
- Release camshaft pulley.
- Support roller.
- Roller tensioner.
- Drive belt.
- Pump pulley (coolant pump).
- Timing mark on the oil pump.
- Crankshaft alignment mark.
- Crankshaft pulley.
The timing kit can be changed by hand. The main thing is to know about the presence and correct placement of installation marks. By the way, most foreign cars are devoid of such marks, so in this case the advantage is for VAZ cars.
The eight-valve timing drive of the Lada Grants, in comparison with previous modifications of the car, looks simpler. The scheme is simple, because there is no bypass roller and there is only one camshaft. You can clearly see the timing device for 8 valves in the photo.
If you have doubts about your own abilities, you do not need to try to replace the timing belt with your own hands, as you can harm even more. In addition, in a car service, such a procedure, performed on an 8-valve engine, is inexpensive. But in the case of a 16-valve motor, the price tag is usually much higher.
Replacing the timing belt on a 16-valve engine Grants
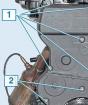
Access to the drive of the gas distribution device is closed by a plastic cover. To remove the cover, you need to unscrew the five screws with a 5 hex wrench. Pay particular attention to the location of these screws. In the photo, number 1 shows the top cover fixing screws, and number 2 shows the bottom cover fixing screws. After unscrewing the five screws, the top cover must be lifted and removed from the engine.

If the car has a manual gearbox, you need to turn on the fifth speed, hang out the right front wheel and turn it clockwise. At the same time, it is required to inspect the belt for cracks, abrasions, delamination, etc. If the car is equipped with an automatic gearbox, you need to remove the right front wheel and the boot (protective shield) on the right. The 17-inch head rotates the drive pulley mounting bolt for additional equipment (air conditioner, generator) and inspects the belt. If various defects and damage to the belt are diagnosed, it must be urgently replaced. Replacement will also be required in the event of oil leaks, a malfunction of the water pump and the tensioner roller.
On a 16-valve motor, a break in the belt drive will lead to a discrepancy in the angular arrangement of the crankshaft and camshafts. As a result, the piston group will come into contact with the valves. As a result, repair work will be required.
All the latest models of front-wheel drive cars, which are produced by the automobile plant located in Togliatti, have a timing belt in the timing mechanism. Lada Granta fully refers to these models.
The car is equipped with several engine modifications, which can have 8 or 16 valves in the cylinder head. Many owners service and repair this model on their own, so it will be useful for them to learn about how to change the timing belt on a Lada Granta with 8 valves.
Lada Granta motors with 8 valves in the cylinder head have an index of 11183 and 11186. The first of them began to be produced in 2004, the second later, namely in 2011. The power of the "83" unit is 82 horses, at 87 hp for the "86" modification. The 11186 engine is an improved model “83” engine. It uses a lightweight connecting rod and piston group. It was possible to achieve a reduction in the mass of the piston group by almost 30%. The cylinder head is subjected to a specific heat treatment, which increases its strength and wear resistance.
And also the cooling system of the power unit received some changes. The skirts of lightweight pistons are coated with graphite grease, this avoids the appearance of scoring on the cylinders of an unheated engine. The compression ratio "86" of the engine was 10.5 against 9.6 for the "83" modification. The cylinder head gasket of the new engine is now thinner, it is equal to 0.43 mm versus 1.2 on the old model. The diameter of the intake valves was increased, which improved the filling of the cylinders with the air-fuel mixture.
Does the valve fold
This problem, unfortunately, is present for Lada Granta. It appeared from the moment the production of the first cars with front-wheel drive VAZ 2108 began. Later, the working volume of the power unit of this model was increased, it became equal to 1.5 liters. The engine index became 21083, in which the pistons have a recess in the head. This made it possible to exclude the meeting of the pistons with the valves when the toothed belt in the timing belt breaks or if it is incorrectly installed. It was this power unit that was taken as the basis for the engine for Grants, so the valves did not bend.
The upgrade of this motor to model 11186 provides for the installation of lightweight parts of the connecting rod and piston group. The piston has become shorter in height, which does not allow making recesses in the head to avoid meeting with the valve. Therefore, a break of the toothed belt is always accompanied by damage to the valves on the 8 valve Grant, sometimes connecting rods, pistons. This problem accompanies all subsequent modifications of engines for Lada Grant.
Replacement procedure
Many owners of this car prefer to carry out this operation in specialized workshops, but some do it themselves. There is nothing super complicated in this procedure, there is no need to purchase special equipment or devices. You can replace the toothed belt in the garage yourself. You will need to prepare a set of wrenches, a mounting spade, a jack, a support for the body, wheel chocks, gloves, and rags. Use round nose pliers as a key for adjusting the tensioner roller.
Replacing the timing belt on the Lada Grant is performed in approximately the following sequence:
- The car is installed above the inspection pit or on a flat surface, the handbrake cable is tightened, and chocks are installed under the rear wheels.
- Open the hood of the engine compartment, disconnect the terminals from the battery.
- The drive belt of the generator set will interfere with work, so it is removed.
- Now "5" with the hex number unscrew the four screws that secure the front protective casing of the timing drive.
- To avoid accidentally damaging the crankshaft position sensor, it should be removed from the cylinder head and set aside. Do not allow metal filings to come into contact with the sensor, they may distort its readings in the future.
- Next, you need to set the piston of the first cylinder to the top dead center position.
- Removal of the toothed belt is interfered with by the alternator drive pulley on the crankshaft, which must be removed. To do this, rip off the wheel bolts of the right front wheel, raise the body with a car jack.
- A stand is installed under the body, the wheel is removed, the protective shield is on the mudguard.
- An assistant is needed to remove the crankshaft pulley. Ask him to put in fifth gear and push the brake pedal hard. Some specialists insert a powerful screwdriver into the hatch on the gearbox cover between the flywheel teeth.
- Applying some effort to the head "17", unscrew the bolt, remove the pulley from the crankshaft.
- Again, you need the fifth hex number, which you need to unscrew the three screws of the lower timing case, then you can remove the protection.
- Now it is necessary to loosen the tension roller fixing bolt, the “15” spanner wrench is best suited for this. After that, the roller will turn, release the tension on the drive belt, which can be easily removed from the toothed gears and removed from the engine compartment.
Important! After that, the engine crankshaft must not be turned so that the pistons do not meet the valves.
Usually, the belt is replaced in conjunction with the idler roller and the coolant pump, so they must be removed from the cylinder block. There is an adjusting washer under the roller, which is installed back during assembly. When removing the pump, a certain amount of antifreeze is poured into a previously prepared container. The installation of a new timing belt is carried out in the reverse order. Please note that you need to check the position of all alignment marks on the crankshaft and camshaft, the cylinder block and the timing case.
Setting labels
This is an important procedure when replacing a timing belt and must be taken seriously. This motor has four timing marks. Two on the crankshaft and camshaft gears, one on the cylinder block in the area of the crankshaft, the last on a metal protective casing. Two more marks are located on the flywheel and gearbox housing. They will be clearly visible when the rubber plug is removed. It is the marks of the flywheel and the box casing that will indicate the position of the piston of the first cylinder at top dead center.

The crankshaft is turned clockwise with a “19” wrench until all marks of the mechanism match. The tapered groove or tide mark on the camshaft pulley will be horizontal and aligned with the lip on the guard. The mark on the crankshaft pulley will look strictly vertical and coincide with the mark on the cylinder block.

Tension
The installed new toothed belt must be tensioned to the required parameters. Before that, be sure to check the position of the alignment marks again, if everything is in order with them, you can tension the drive. To do this, turn the tension roller counterclockwise until the marks on it coincide. One mark in the form of a cutout is on the outer cage, the second on the inner one in the form of a ledge. You can turn the tension roller with a special wrench, round-nose pliers.
Some craftsmen insert drills suitable in diameter into the holes on the moving part of the roller. Between them, a screwdriver as a lever and turn the clip until the marks coincide. Then you can tighten the tension roller fixing screw. After all the work has been done, it is necessary to manually turn the crankshaft a few turns, making sure that the marks have not moved. Then you can install the protective cover.

How long does it take to replace
The factory operating manual for the car recommends replacing the toothed belt with a mileage of 75 thousand km. This norm is not always fulfilled by the owners; there are good reasons for this. How long the drive takes before replacement depends on many factors. This is the quality of the parts used, the operating conditions of the vehicle, the technical condition of the engine. At each maintenance, the tension and condition of the timing drive should be checked. When cracks, delamination, or other damage appear, the belt is changed.
With a high mileage of the machine, natural wear of the crankshaft and camshaft pulleys occurs, this significantly reduces the service life of the entire timing drive. And also the drive is afraid of engine oil getting into the belt operation zone. It softens its structure, the teeth are easily cut off. If the car has been standing still for a long time, it is also better to replace the drive due to its aging. Most owners, experts recommend changing the belt after a run of 50 thousand km.
Which kit to buy
In addition to the toothed belt, a tension roller and a coolant pump are purchased. The main supplier of rubber products is the RTI plant in Balakovo. Products from the companies GATES, BOSCH, DAYCO, CONTITECH have proven themselves well. If the pump in the engine cooling system is replaced, you will need antifreeze to top up.
Lada Granta 8 valve: how to independently replace the timing belt
 Owners of domestic cars most often prefer to do their own repairs. This is due to the fact that components for them are sold in almost any auto parts store and are inexpensive. In addition, the Lada Granta device resembles earlier models released from the AvtoVAZ assembly line. Replacing almost any component on this car will not cause you any inconvenience.
Checking the timing belt
According to the documents accompanying the car, the belt that synchronizes the movement of the shafts has a resource equal to 45 thousand kilometers. However, it can fail earlier due to increased loads or insufficient attention to the car's engine.
A functional check must be carried out every 15 thousand kilometers. For it, you will need to remove the cover from the timing belt drive.
- First of all, check the protrusion of the control of the tension of the belt mechanism: the cutout of the inner disk of the roller must coincide with the protrusion located on its rectangular bushing. Even with minor discrepancies, this consumable must be replaced.
- Next, inspect the outside of this Lada Granta component. Make sure that there are no traces of wear, oil, carbon deposits, threads.
- From the end, the belt should be complete, without separation into layers and fibers.
An eight-valve engine with a capacity of 87 horsepower is installed on the Lada Granta in the body of a liftback. If the timing belt breaks on such a motor, the valves are bent against the pistons, which threatens you with complex engine repairs.
When purchasing a component, note that Grant uses a 113-tooth belt that is 17 millimeters wide. With the right choice, you will not need to replace a failed component soon, so carefully study the new part before buying.
Car enthusiasts recommend purchasing Gates brand components from the USA. The good thing is that official support can tell you the address of the nearest store where they sell quality spare parts. The price of a repair kit (belt and roller) is about 3,000 rubles. At the same time, you will receive a high-quality product, the resource of which is approximately twice that of the stock one (about 80 thousand kilometers).
Grant 2015 replacement of timing
Litter for the mate !!! Replacement pumps, timing roller, timing belt.
Replacing the timing belt 8 valve 1.6l engine!
Video report on timing replacement on an 8-valve VAZ engine! Camshaft marks, crankshaft marks, how to set them, ...
How is the replacement
So, you have found a defect or the scheduled repairs are due. Replacement is carried out step by step only with a cooled motor:
- Disconnect the battery of your Lada Granta.
- Remove the crankshaft position sensor. Place the sensor in a clean place such as a shelf free of steel filings or oil.
- Place the piston of the first cylinder at top dead center.
- Turn the crankshaft until the mark on its pulley aligns with the projection on the drive cover.
- Remove the plug from the sight glass (located on the clutch housing) and check the position of the shaft. If you did everything correctly, a mark will appear in the window and will be opposite the slot. Lock the flywheel with a screwdriver (it must be placed between its teeth).
- Unscrew the generator drive pulley, remove it from the axle and remove the washer.
- Remove the timing cover.
- Loosen the idler roller (it should turn).
- Remove the belt from all pulleys and pull out.
- If, in addition to installing the timing belt, you need to remove the tension roller and replace it with a new one, then unscrew the mounting bolt, and then remove the roller directly with it.
- Before installing a new roller, check if a replacement is really necessary. To do this, grasp the metal center of this mechanism and turn the plastic part. In a serviceable component, it moves smoothly, without jamming.
- Inspect the pump and begin reassembling the timing mechanism. Install the roller in the upper hole on the cylinder block, but do not fully tighten the bolt securing this part of the drive.
- Fit the belt so that it runs correctly on all pulleys and rollers. In order for the belt to lay down correctly, after laying it on the crankshaft pulley (it must first be installed in its place), tighten both parts of the part. Try to distribute the load evenly.
- The far part of the timing belt should lie on the pump pulley and go behind the tension roller (at this stage, check the diagram), and the near one should lie gently on the toothed part of the camshaft.
- Turn the camshaft pulley slightly (in the direction of less travel) so that the teeth of the belt line up with the notches on it. Use a wrench to turn the tension roller counterclockwise.
After the replacement has been made, check the timing belt tension. Excessive stress in it on the Lada Grant is fraught with failure of the pump of the cooling system. Also, if too tight, the belt can fail very quickly.
A loose belt can lead to a valve timing failure. Turn the crankshaft to the right so that the timing marks are aligned. Then reassemble the alternator pulley. Remember that it is strictly forbidden to turn the shafts with the belt removed on the Lada Grant model car. The setting is only done when the replacement has already been carried out.
There is a special offer on our website. You can get a free consultation of our corporate lawyer by simply asking your question in the form below.
We hang the right front wheel and include the fifth gear in the gearbox. Turning the wheel clockwise, we turn the engine crankshaft and inspect the timing belt. With normal belt tension ...
The surface of the toothed part of the belt should not have folds, cracks, undercuts of teeth and peeling of fabric from rubber. The underside of the belt must be free of wear and tear, exposing the cords, and burn marks. There should be no delamination or loosening on the end surfaces of the belt. If defects are found on the belt or a significant mismatch of the belt tension control elements (see photo above), the belt must be replaced. You should also change the belt to a new one if traces of engine oil are found on it (before installing a new belt, the cause of oil getting on the belt must be eliminated) or when replacing the coolant pump.
Attention! Failure of the timing belt (breakage and shearing of teeth) can lead to the valves sticking into the pistons due to the mismatch of the angles of rotation of the crankshaft and camshafts and, as a result, to expensive engine repairs.
We replace the timing belt in accordance with the maintenance schedule every 75 thousand kilometers or in case of defects on the belt.
Next, we should dismantle the alternator drive belt or the accessory drive belt.
Remove the crankshaft position sensor to avoid damage.
Before dismantling the belt, it is necessary to check the valve timing of the engine - set the piston of the 1st cylinder to the TDC (top dead center) position of the compression stroke.
Before unscrewing the bolt securing the alternator drive pulley ...
Using the "17" head, unscrew the bolt securing the alternator drive pulley, ..
This will rotate the tension roller and release the belt tension. Remove the timing belt from the crankshaft and camshaft pulleys.
Attention! After removing the timing belt, do not turn the crankshaft and camshafts to avoid the pistons sticking into the valves.
To remove the belt tension roller, unscrew the bolt of its fastening ...
The roller should rotate quietly, evenly and without jamming. Otherwise, the roller must be replaced. At the same time, you can check the serviceability of the coolant pump by twisting and shaking it by the pulley. We install the tension roller in place, completely without tightening the bolt of its fastening. For various engine modifications, two threaded holes are made in the cylinder head for the tension roller bolt.
Install the timing belt in reverse order. Before installing the belt, make sure that the timing marks of the crankshaft and camshaft are aligned. We put the belt on the crankshaft toothed pulley, then ...
If necessary, turn the camshaft pulley in the direction of the smallest stroke until the belt teeth coincide with the pulley grooves. To tension the belt, turn the tension roller counterclockwise. To do this, we insert into the grooves of the outer disk of the roller ...
Such a key was used to adjust the belt tension in all front-wheel drive VAZs.
We tighten the belt by turning the belt tension roller counterclockwise ...
… Until the cutout of the outer disk of the roller coincides with the rectangular protrusion of its inner sleeve, and tighten the roller bolt to a torque of 34–41 Nm.
… Until the cutout of the outer disk of the roller coincides with the rectangular protrusion of its inner sleeve, and tighten the roller bolt to a torque of 34–41 Nm.
Excessive belt tension will reduce belt life as well as the life of the coolant pump and idler roller bearings. Insufficient belt tension also leads to its premature failure and can cause a violation of the valve timing. We turn the crankshaft two turns clockwise. We check the belt tension and the coincidence of the crankshaft and camshaft timing marks. With the alternator drive pulley removed, it is convenient to control the correct position of the crankshaft ...
Starting with the VAZ-2108 model, the Volzhsky Automobile Plant switched to the use of a belt drive for the gas distribution mechanism, and continues to use it on modern models, including the Lada Granta.
This type of drive has a number of advantages over a chain drive, including:
- no need for lubrication, which is why it is possible to move the timing drive to the outside of the motor;
- quiet operation and easier replacement process.
But the belt runs much less than the chain. Therefore, the basis for a long and trouble-free operation of the power plant is a timely check of the condition of the belt and its replacement.
Replacement frequency
The manufacturer's technical documentation indicates that the timing belt on the Lada Grant must be replaced every 60 thousand kilometers.
But here it is worth noting that this is a boundary value and it is better to replace it before reaching such a mileage, approximately - by 50 thousand km, but there are times when the drive requires replacement by 40, or even 30 thousand km, it all depends on the quality of the belt and its working conditions.
In any case, it is better to periodically check the condition of the drive (it is recommended every 15 thousand km) and, if signs of wear are found, replace it immediately.
If this is not done, then its breakage is possible, which is fraught with serious consequences - the engine pistons collide with open valves, leading to their damage and subsequent expensive repairs.
Design features of the drive of different motors
To understand how maintenance work is performed with a timing drive, first consider its design.
So, the drive of the gas distribution mechanism is carried out from the crankshaft. In this case, the valve timing in the engine cylinders has 4 cycles and they are performed in two full revolutions of the crankshaft.
But 2 of these cycles occur with closed valves, so the camshaft must ensure only one-time closing and opening of the valves for all 4 cycles.
Therefore, there is only one camshaft revolution per two crankshaft revolutions. Moreover, this is achieved quite simply - due to the different diameters of the drive gear pulleys.
The belt has a toothed working surface, which excludes slipping on the pulleys. In addition to transmitting force from the crankshaft, the belt performs another function - it drives the pump of the cooling system.
In this case, the drive must be constantly tensioned in order to exclude jumping of the teeth on the pulleys, therefore, a tension roller is included in its design.
This and the entire drive structure, that is, it includes only two toothed pulleys (crankshaft and camshaft), a pump gear, a tension roller and the belt itself.
All this is located on the side of the engine, not inside. But in order to exclude the ingress of dirt and technical fluids that can harm the belt, all elements are covered with protective shields.

But this describes the design of the 8-valve gas distribution mechanism, for which only one camshaft is used to drive.
But some Lada Grant models are equipped with engines with a 16-valve timing mechanism and two camshafts. But because of this, the design of the drive does not change much.
Unlike the 8-valve, there is not one, but camshafts and, accordingly, two toothed pulleys, and another roller has been added to the design - a bypass roller, which is also a support one. This is where all the differences ended.

Checking condition and tension
As already noted, so that a broken belt does not lead to serious problems, it is periodically necessary to check its condition and tension.
Checking the condition of the belt is quite simple and you can do it yourself.
To do this, unscrew and remove the protective covers of the drive, unscrew the front right wheel, engage an overdrive and turn the wheel.
The engaged gear will ensure the rotation of the crankshaft and the timing drive through the gearbox.
When rotating, carefully inspect the belt. If any defects or traces of wear are noticed on it - torn teeth, peeling of rubber from threads, cracks, significant abrasions, then the belt must be changed regardless of the mileage.
Additionally, when checking the condition of the drive, its tension should also be assessed.
Although a roller with an automatic tension is used on Grant, it is impossible to rely on the fact that it works normally, and it is better to check the tension, especially since it is performed very simply.
The belt must be taken with two fingers in the middle of the area opposite to the tension roller, that is, on the span between the shaft pulleys and turned clockwise.

Moreover, if even with significant effort it is impossible to twist it at an angle greater than 90 degrees, then the belt is tensioned normally. If it twists to a greater angle, then it is necessary to adjust its tension.
What you need to replace the belt
So, to perform the work, you will need such a tool, devices:
- A set of open-end and ring spanners of the most common sizes;
- Hexagon set;
- Powerful screwdriver or mounting paddle, pry bar;
- Special wrench for tensioning the tensioning roller or at least round-nose pliers for removing the retaining rings;
- Marker;
- Rags.
Naturally, a new belt of the appropriate size will be needed, as well as a new tensioner pulley, since it must be replaced along with the belt. Having prepared all this, you can proceed to disassembly.

Disassembly
The sequence of work is as follows:

Features of disassembling a 16-valve motor
As for the 16-valve engine, the disassembly sequentially is completely identical to that described, with the exception of one point - the installation of marks. Since this engine uses two camshafts, the marks must be aligned on both, while not forgetting about the marks on the flywheel.
Also, during disassembly, in addition to the tension roller, it will be necessary to dismantle the bypass roller, since it also needs to be replaced.

After removing the belt, you should also check the bearing play on the pump. If it is significant, then it is better to replace it immediately. Otherwise, it may soon fail after replacing the belt and the need to re-disassemble the drive, since the pump changes only after dismantling the drive.
Note that after removing the belt, it is important to take care not to accidentally turn one of the shafts when installing a new one.
Assembly, check
The assembly of the drive is carried out in the reverse order, but with observance of certain nuances. First, we put the tension roller in place and bait the bolt of its fastening, but do not tighten it.
In a 16-valve engine, before putting on the belt, we put both rollers in place, but unlike the tension bypass, you can immediately tighten it.
The belt is put on from the bottom up. That is, first, the belt teeth are installed on the crankshaft toothed pulley, then it is thrown onto the pump, then wound up behind the rollers, and only then is put on the camshaft pulley.
After installing the belt, it is tensioned. To do this, a special key or round-nose pliers are installed in special holes in the outer cage of the tension roller, after which it is turned clockwise until the cutout on this cage is aligned with the rectangular recess on the inner sleeve.
Holding the roller in this position, the bolt of its fastening is tightened.
Having finished tightening, we install in place the lower protective cover, washer and generator drive pulley. After that, we check the correctness of the work.
To do this, first we check the coincidence of all the marks, then we turn the crankshaft a few turns, after which we again combine all the marks. If they converge, the replacement work has been done correctly and the assembly can be continued. Here we note that a slight deviation is allowed on any marks, but no more than a couple of millimeters.
When checking the coincidence of marks on a 16-valve motor, this action should be given more attention, since there are two camshafts, and the mismatch of marks on any of them can lead to significant interruptions in the operation of the motor.