How to connect a universal remote control and adapter for a car radio to a steering wheel with control buttons. Connecting the buttons on the steering wheel to an aftermarket radio Steering features
When I decided to change the radio in my car, I was faced with a choice - to lose the standard sound control using the buttons on the steering wheel, or to buy a special (quite expensive) adapter.
Then I thought, why not make such an adapter myself?
A review for those who are familiar with a soldering iron.
First, the essence of the problem.
Many cars have a standard radio control installed on the steering wheel. These buttons work on the principle of a resistive keyboard, which allows you to transmit a signal through just two wires.
For example, we press the volume up button - a resistance of 130 Ohms appears in the circuit.
We press volume down - a resistance of 240 Ohms appears, etc.
Many modern radios also have the ability to connect a wired remote control. But the problem is that the standards of all car and car radio manufacturers are different. For example, with Pioneer radios, to increase the volume, you need to “apply” a resistance of 16 kOhm.
Therefore, between the steering wheel and the radio, you need a special adapter that will convert the resistance values into understandable values for the radio.
When I looked for such an adapter for my car, it turned out that it costs more than $50. Considering that I got the radio itself for a ridiculous $30-35, I decided to try to make an adapter myself using an Arduino. At that time there was no ready-made scheme on the Internet; I had to invent it myself.
I would like to apologize in advance for possible inaccuracies and errors - I am not well versed in electronics. I collected all the information bit by bit from Google. :)
In my project I used the following components:
1. Suzuki Swift car
2. Pioneer MVH-X165UI car radio (bought offline)
3. Arduino Nano, or Mini (bought on ebay for $2.5)
4. MCP4131, digital potentiometer for 100k (bought offline for $1, for some reason they are on ebay)
5. 10k resistor
6. Development board
7. Step-down converter (for $1.5) to make 5V from 12V
The principle is simple - at the input we measure the resistance from the buttons on the steering wheel. If the resistance corresponds to pressing a button, then at the output potentiometer we set the corresponding resistance required by the radio.
The first thing I did was get a service manual for my car, which shows the resistance values for all the buttons. However, you can simply measure them with a multimeter.
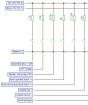
Also found on the network is the following diagram of a wired remote control for a Pioneer radio (uses a 3.5mm plug): 
I don’t have Preset Up/Down buttons on my steering wheel, so I used only two contacts on the plug - Tip and Sleeve.
Because The range of resistances required by the radio tape recorder is from 1K to 62K, then I bought the MCP4131 microcircuit - this is a 100K digital potentiometer with 129 adjustment steps. 129 steps are enough, because... We don’t need super accuracy; the radio understands resistance with a spread of somewhere around 10-20%.
Well, you don’t have to buy the MCP4131, I think any other digipot with similar characteristics will do.
There are instructions on the Internet for using a digital potentiometer with an Arduino, I liked it, it’s very detailed and accessible.
I will not explain the basics of working with Arduino; there are a lot of other specialized resources where everything is described much better.
The connection diagram looks like this: 
Resistance is measured at pin A5 using a voltage divider with a 10K resistor.
The potentiometer is connected according to the following diagram: 
4, 7 - GND
8 - +5V
1 - arduino pin 4 (you can choose another one)
2 - arduino pin 13
3 - arduino pin 11
6 - to the radio, “Tip” contact on the plug
Sketch under spoiler
#include
Photo of the finished board. 
The photographs on the reverse side were not preserved, because... this was a year ago and I had no plans to write a review. Well, there’s nothing interesting there - a bunch of jumpers and bad soldering :)
The Arduino can operate from 12V, but I decided to install a step-down converter to 5V. Firstly, I powered the DVR from it, thereby freeing up the cigarette lighter socket. Secondly, I read that the voltage in the car network is dirty and unstable, it can fluctuate by several volts, both down and up. The converter will withstand such surges, but the arduino may burn out. To further “clean” the power supply, I added several protective elements - a diode, a zener diode, a capacitor. I looked at the diagram. I have some doubts about its necessity, but I decided - let it be.
That's all.
The device has been working normally in the car for about a year now.
And I saved some money and gained valuable experience.
The review is dedicated to those who do not have buttons to control the radio in their car.
Initially I didn’t plan to write a review (that’s why some of the photos are missing), but then I thought, why not? Maybe it will be useful to someone.
Background
I have a bearded Hyundai Getz 2004 and in my configuration there are no buttons on the steering wheel. After purchasing a radio (need a review? 1Din on Android, although I lost the photos somewhere (but maybe I’ll find them)) with touch controls, I realized that I had to take the buttons on the steering wheel (the touchscreen is evil). I started looking for standard buttons, they are there, but the price tag is space. Two blocks will cost ~ 4000 rubles. + you need to change the steering wheel (or whatever it’s called - that’s not the point). The total would be about 6,000 rubles. That for such optional modifications is expensive (the toad will not approve).Go!
The parcel was received at the post office on 07/01/2018 and arrived at the post office on 07/14/2018. Fairly good delivery time.Package
The parcel arrived in a standard gray package.
The packaging of the buttons was very surprising. The cardboard box is of very good quality, the cardboard is thick, well packed, the buttons are in a separate box, the control unit is in a separate box.


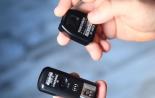
After opening all the boxes we get 3 parts:
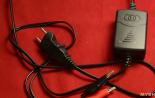
1) Control unit;
2) Radio control buttons (2 pcs.);
3) Rounds of tape for securing buttons (2 pcs.);
The control unit is a small plastic box. To open the control unit you need to unscrew 4 bolts.

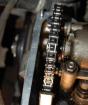
Inside the block looks like this:

On the other side:

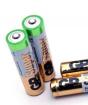
The control buttons (each block) are powered by a battery. I opened the case, but apart from the battery, nothing was visible there, but I didn’t break it.

For the buttons to work, you need to connect the control unit to your radio. This is done quite easily:
1) Connect the red wire of the control unit to ACC (a plus that appears only when the key is turned to the ACC position)
2) Connect the black wire of the control unit to GND (ground)
3) Connect the gray wire of the control unit to SW1
4) Connect the white wire of the control unit to SW2
Attention! There may be problems:
Your radio may not have wires SW1/SW2 and the like;
The wires may be named differently, for example, key1/key2;
If you only have one key wire, then both wires from the control unit can be connected together to it.

After everything is connected, you need to teach your radio to work with the buttons; how to do this - read the manual of your radio, if it is Android, then there is a special utility.
Once everything is set up and working, you can attach the buttons to the steering wheel. The buttons are attached using double-sided tape.
The tape holds well.

If you don’t mind the steering wheel, then you can “embed” them into the steering wheel and the buttons won’t look so alien.
Total: Excellent buttons, they stay on the steering wheel well and do not interfere with steering. Using the buttons is convenient. I am completely satisfied with the purchase.
I'm planning to buy +50 Add to favorites I liked the review +77 +118Music in the car is a great addition to comfort and good mood while driving. A wide variety of radios on the automotive market, standard installation and non-standard ones, allows the consumer to choose equipment according to individual taste and for a specific company and brand of car.
Push-button auto audio control
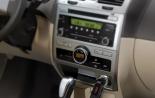
While driving a car, it is not always convenient to use a push-button radio to search for a specific audio recording, radio wave, or to adjust the volume. It is safer to use standard radio control buttons on the steering wheel. This function is installed in car dealerships as an additional feature or as part of a premium kit for new vehicles. The standard devices of a middle-class car (for example, a Chevrolet Lacetti) have limited capabilities.
Sometimes car owners prefer to replace the standard audio system with a new multifunctional one. Then the signal from the buttons on the steering wheel does not reach the installed radio, and the driver has to contact the installation center.
To create a relationship between auto control and audio technology, a steering controller is used, which changes the signal from the button on the steering wheel into a signal for reading by the radio. To connect it, the car has all the necessary wiring. Steering adapters are suitable for almost all radios that have an infrared port and/or mini-jack output.

Modules for multifunction steering wheel:
- Resistive. The measured resistance values are recorded in the module's memory, resulting in control of the steering buttons above the radio.
- Supporting CAN buses. This adapter converts only digital signals into those that are received by the installed non-standard audio system.
Independent connection of the multifunction steering wheel
The service of connecting steering wheel radio controls at auto centers requires certain financial costs and the involvement of experienced specialists with knowledge in the field of auto electrics.
But you can connect the remote control and buttons on the steering wheel yourself. So how to connect steering wheel controls to the radio?
Let's consider the algorithm for reinstalling the radio control on the steering wheel when buying a new radio using the example of a Chevrolet Lacetti car. The work will take 1-1.5 hours with all the steps.

Instructions for reinstalling the standard remote control
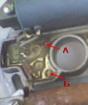
- The radio control panel is removed from the steering wheel by removing the bolts.
- The connector is removed from it.
- The remote control is disassembled by unscrewing three screws.
- Resistors of certain values are soldered onto the remote control board using a soldering iron.
- The ribs in the control panel cover are trimmed and we assemble it back.
- One wire from the mini-jack is soldered into the central input, the second into the side one. The wires are insulated with electrical tape.
- In the car, the connector from the radio is trimmed, stripped, connected to the mini-jack terminals and also insulated.
- The mini-jack is connected to the radio through a connector in the rear wall of the equipment case.
- The connector is inserted into the remote control, which is then put back by screwing two bolts.
- We turn on the radios and check the results to see if the radio control on the steering wheel works.

Instructions for installing the steering wheel remote control with a compatible car radio
- The glove compartment is removed.
- The heater cables are disconnected.
- The beard is removed from the panel.
- The radio is taken out, from which three wires come out - black, brown-yellow and brown-orange.
- In the connector from the radio in the left corner (yellow-green chip) there are two wires from the control panel on the steering wheel.
- Two wires from the remote control and black and brown-yellow wires from the radio are connected.
- The radio, beard and glove compartment are put in place.

Installation and connection instructions for Chevrolet steering wheel controls
- A control panel with a mount and a steering wheel contact group with the ability to connect the remote control itself are purchased.
- Removing the steering wheel:
- On the right side of the steering wheel, remove the plug for the hole in the screws intended for fastening the airbag module;
- The screws for fixing the block are unscrewed;
- The connector is disconnected and removed from the block;
- Unscrew the two screws securing the airbag module;
- The module is removed;
- The pad holder opens;
- The connector is disconnected and the airbag module is removed;
- The connector from the audio signal is disconnected;
- Use a wrench to loosen the steering wheel nut, then unscrew it completely;
- The steering wheel is removed.
- The steering group is being installed or replaced.
- The airbag is removed.
- In the extended steering group there are three wires installed - for the signal and two for the radio control panel.
- The wires from the steering wheel group are connected to the wires from the radio (there are also three of them).
- The remote control, airbag and steering wheel are put in place.
- Installation and programming of the car radio control adapter on the steering wheel:
- The central panel (beard) is removed;
- The radio is removed;
- The black wire from the yellow-green steering control chip is connected to the black wire of the adapter;
- The blue wire of the yellow-green chip with the green wire from the control module (not with the blue one);
- The red wire of the adapter is connected to the red power wire from the radio;
- To connect to the audio system, use a mini-jack or infrared port;
- The adapter is secured with clamps under the radio;
- The functionality of the buttons on the steering wheel is checked.
- The radio is installed and the panel is assembled.
- Checking programming and connection.
Following all the points of the algorithm, every car enthusiast will be able to install the control panel on the steering wheel with his own hands, reinstall it in connection with the purchase of a compatible audio system, as well as install and connect the radio control on the steering wheel. Thus, the driver will save money and some time.

Bottom line
The audio system control panel on the steering wheel provides comfort and confidence for the car owner at high speeds, while talking on the phone, and in poor visible weather conditions. This is a necessary and sometimes irreplaceable addition to the functionality of the car.
Almost all modern cars come with a standard music system. But what if? Install a more powerful and advanced system? In this case, the buttons on the steering wheel will not work. There are two options to solve the problem. Operate the system in normal mode or perform light tuning. Choose the second option - the article is just for you. We will tell you how to connect the buttons on the steering wheel to the radio.
Steering Features
If you send signals to it using the steering wheel, it will be impossible. This happens because the non-standard device does not perceive control signals. To solve the problem, it is necessary to install a special controller-converter of the incoming signal.
Types of controllers:
- resistor (work on the principle of measuring resistance. Suitable for most modern cars);
- CAN module (work on the principle of digital signal conversion. Used mainly on European cars).

Before you start connecting a new system, study the features of the car and determine exactly which controller is needed.
Better . But if you don’t have extra money or just want to test your own strength, try connecting yourself. Let us dwell in detail on the order of the operation.
Regardless of what type of controller you choose, the connection principle for all devices is approximately the same. In order for everything to work, you need to connect four wires (on some models - only three). As a rule, standard colors are used for marking wires - red, black, blue and green. Additionally, a numerical designation is used (in this particular case it is 6, 7, 15 and 16). Wire colors may be different. Digital marking does not change, so focus primarily on this indicator.
Connection order:
- from the main steering block we select four wires of the above markings;
- connect the red cable (“ACC”, which supplies power to the adapter when you turn the ignition key) to wire “7” of the block;
- connect the black cable (“Ground”) to wire “15”;
- connect the blue cable (signal wire for the steering wheel buttons) to wire “6”;
- We connect the green cable (“Input 2”) to wire “16”. This item is relevant for cars of the Nissan and Toyota brands;
- programming the steering.
Conclusion
As you can see from the article, connecting the radio yourself and controlling it using the steering wheel is not so difficult. Additionally, follow the instructions. Each specific device may have some features.
How to connect the radio to the steering wheel on different cars
A standard car radio or car multimedia system is equipment for reproducing sound and video information (depending on the class of equipment), which is installed at the car plant at the time the car is equipped with equipment and car accessories.
 How to connect to the steering wheel?
Car audio head unit
Devices for this purpose have four control options.
- Control from a remote control (remote control).
- Push-button control. The buttons are located at the bottom of the front panel of the radio.
- Touch control of functions and options with one touch to the symbols on the LCD screen, if available.
- Push-button control from the steering column or directly from the steering wheel of the car.
It is the fourth option that we will consider in detail in our article.

Nissan X-trail, BMW E46 and an aftermarket Pioneer radio will be used as examples.
Radio with steering wheel buttons connection
Almost all modern players can be controlled by buttons on the steering wheel. But the most popular among car enthusiasts are devices from Pioneer and Sony. This type of device control can be carried out in two ways (we do not take into account the remote control mounted on the steering wheel in a special clamp):
- Through buttons already present on the steering wheel (multi-steering wheel).
- A separately purchased and built-in block of buttons for remote control of a non-standard Pioneer radio.
The second option for connecting the radio control to the steering wheel is much more difficult, since its implementation will require not only the installation and adaptation of the alternative head unit itself, but also almost complete disassembly of the car's steering column.

Many models of passenger cars already have a so-called multifunction steering wheel as standard. But even in this case, the work of connecting the player to the control buttons will not be easy. Although manufacturers promise that all installation steps will take no more than half an hour, in reality this process takes several hours. It all depends on the level of knowledge and skills of the installer. Therefore, we recommend that if they are unavailable, contact professional technicians from a specialized center for the installation and repair of car audio systems. Otherwise, if connected incorrectly, you risk not only losing the Pioneer radio, but also damaging the control system and other equipment.
Chinese 2 DIN Radio for Android Connecting Buttons on the Mazda 3 Steering Wheel
Radio tape recorder 2 DIN Car Radio on Android from China Full Review and Test on…
Lancer X. How to connect standard buttons on the steering wheel to the Pioneer radio. The most affordable way.
After installing 2din radios Pioneer MVH-AV280BT standard buttons on steering wheel refused to work. Let us clearly show...
Connecting the Pioneer radio to the steering wheel of a Nissan X-trail car via standard buttons
What is needed in order to connect the buttons on the steering wheel to a non-standard radio?
- The multifunction itself. On the Nissan X-trail it is present as standard;
- Car player Pioneer;
- An ISO adapter or adapter is usually sold complete with the radio;
- Second ISO adapter. Sold separately;
- Adaptive adapter for connecting an antenna. Also bought in the store;
- Adapter for buttons on the steering wheel for combination with an aftermarket radio.

After carefully studying all the available information about connecting the buttons on the steering wheel to the Pioneer radio, pinout diagrams, etc. We proceed to install the player by connecting the ISO adapters specified in the instructions, including the antenna and its adapter. We check the operation of the radio using the usual control method. And only then do we begin to adapt it with the steering wheel buttons.
This is where an unpleasant surprise awaits. The color scheme of the pinout is completely inappropriate for this car, although it is specified in the instructions.
The following information is based on reviews and advice from car owners who have already encountered this problem when connecting the Pioneer head unit to the X-trail. But we cannot guarantee its 100% accuracy!
Diagram of contact wires by colors and functions from Nissan X-trail owners
- The blue and purple wires are responsible for adjusting the increase in volume level and switching music tracks or radio stations.
- Orange and green wire - switching stations and tracks. Decrease volume.
- Gray and black - a lot.
- Red wire - voltage.

Having achieved the operation of all the buttons on the control wheel, we move on to synchronizing the steering wheel buttons with a non-standard device through an adapter specially purchased for this purpose.

In this case, all operations are performed according to the instructions supplied by the manufacturer, which are completely true.
After completion of the work, a full check of all functions of the radio control from the steering wheel is carried out.
Connecting the Pioneer radio to the steering wheel of a BMW E46 car via standard buttons
When changing the make of a car, the process of installing and adapting the head unit with steering control is similar to what we have given for Nissan and the Pioneer device. If you still have the desire to carry out all these operations yourself, then you can perform them using this article as a guide. We have not found any clear information from the manufacturers, other than assurances that it is uncomplicated.

We will also not describe installing the button block on the steering wheel and then connecting it to the player. Because this is a topic for a separate article.

And our advice to you, if you set yourself the goal of controlling the radio without taking your hands off the steering wheel, without having buttons on the steering wheel (that is, with their preset), then purchase a ready-made multifunction steering wheel with control buttons. This will save you money and nerve cells. Although, of course, not to the same extent as contacting a specialized car audio center.