We make a high-quality subwoofer for a car with our own hands. How to make a subwoofer from a regular speaker? How to make a subwoofer at home for a car
A subwoofer is an element of an acoustic system that reproduces the sound of audio tracks at the lowest frequencies. Having a good subwoofer is a music lover’s dream, because everyone loves high-quality sound of music inside the car. However, such a device is not cheap. However, most car owners can calculate the subwoofer box and make it themselves in order to avoid unnecessary expenses on a factory model.
How to choose speakers for your subwoofer
Subwoofers are used in cars to improve the sound of music at low frequencies. For regular listening to melodies or radio broadcasts, the standard audio system in the car is quite sufficient, but connoisseurs of loud and clear sound at low frequencies prefer to place a subwoofer in the cabin.
When selecting speakers for a future product, the car owner learns that they can be round or oval in shape and size. Typically (based on the dimensions of the car interior), round speakers with a diameter of 10, 13 or 16 cm, as well as oval ones with a length of 15x23 cm are selected. Accordingly, the larger the diameter of the speaker, the better the sound will be reproduced at low frequencies.
How to Know Which Car Speakers Are Right for You
Before making a subwoofer for your car yourself, you need to clarify several basic points:
- The shape of the speakers does not affect the sound quality of music in the car;
- The depth and richness of the sound is affected only by the size of the speaker;
- You need to think carefully about the exact shape and size of the speakers so that the subwoofer looks appropriate in the cabin.
Design is not of paramount importance, so when choosing a speaker, its technical characteristics are a priority
Designing a homemade subwoofer
Car subwoofers are installed in the luggage compartment or on the rear parcel shelf, which is why this system is called rear.
The most important point in manufacturing is determining its size and design. Depending on the tasks assigned, the design can have a variety of variations.
Types of subwoofers
There are only two main types of subwoofers. If we talk about the relationship to an audio power amplifier, then they are conventionally divided into:
- active. They already have a built-in amplifier and crossover, which provide high sound quality and remove high frequencies from the sound. An active subwoofer receives signals from any source with which it has a connection;
- passive. The device is not equipped with additional amplification elements, so it is connected to the main audio system of the cabin. The only drawback of a passive subwoofer is that it seriously loads all the channels of the system, and therefore the sound quality decreases.
Active subwoofers do not load the standard cabin audio system, so they have better sound quality
Where to install: in the trunk or under the seat
If an active subwoofer can be placed almost anywhere, then the purity and power of its sound at low frequencies will directly depend on the location of the passive device. Depending on the preferences of the car owner and the availability of free space in different types of cars, several installation locations are offered:
- in the center in front is the optimal position for communication with the front speakers, which will ensure almost ideal sound of tracks in the cabin. However, most cars don't have room in the front to accommodate any large devices, so a center front location is more suitable for minibuses;
- in the trunk, with the speaker directed forward - one of the most popular ways to place a subwoofer among drivers. Suitable for all types of vehicles;
- in the trunk, with the speaker directed backwards - more suitable for a car in a hatchback body, since the sound wave does not encounter obstacles in its path. The location in the trunk back is unacceptable for cars in a sedan or coupe, since the sound will be greatly deformed due to the specific design of the luggage compartment;
- on the floor under the seat is another option, which, however, is not widely popular among drivers. Due to the fact that the subwoofer is located flush with the floor, and the housing is located under the seat, the sound encounters many obstacles in its path;
- on the rear parcel shelf is one of the best options for placing a subwoofer in all types of cars. The main condition is that the shelf must be wide and strong enough to withstand low-frequency bass.
Photo gallery: main places to place the device in a car
The program algorithm will take into account all your wishes and calculate the volume and other parameters of the case quickly and correctly
What to make a box from
A subwoofer box is more than just a box that houses a speaker. The box must comply with many dynamic laws of acoustics in order for the sound to be truly rich and clear. To make different types of boxes, different materials will be required, and the manufacturing methods will in many ways be different from one another.
How to build a box for a bass reflex subwoofer
The standard version of a homemade subwoofer is a bass reflex. This is the simplest type of subwoofer; moreover, its box is good because a special bass reflex tube allows you to reproduce low frequencies that are practically not perceived by the human ear. And the design of the box is quite simple, which makes its production accessible to almost everyone.
Required tools:
- sound insulation;
- wood screws 50 mm long;
- drill;
- screwdriver;
- electric jigsaw;
- liquid Nails;
- sealant;
- PVA glue;
- carpet
The housing for housing a bass reflex subwoofer must be as durable as possible and not allow sound waves to pass through. Multilayer plywood or high quality chipboard is perfect for these purposes. The best option is to take a plywood sheet 30 mm thick.
To make the case you need to follow this plan:
- Prepare parts of the body: front, back, two sides, bottom and top in accordance with your calculations or parameters derived by programs.
- To fit the speaker size (for example, diameter 160 mm), cut a hole in the front part of the housing blank.
- Above the hole for the speaker you will also need to cut a slot for the bass reflex tube and screw the bass reflex compartment to it.
- After two holes are made on the front panel, you need to glue all the side parts of the box together and then screw them to each other with self-tapping screws.
- In this case, it is especially important to tighten each screw until it stops, since empty spaces between the panels will seriously distort the sound of the speaker.
- Next, you will need to cut a small hole for the wires on the back of the case.
- Before connecting all parts of the case, we insert the speaker.
- Next, it is necessary to carry out the interior finishing of the case: for this, all joints and cracks need to be coated with resin or sealant to improve the sealing, after which soundproofing fabric is glued to all side panels.
- After completing the interior decoration, you need to move on to the exterior: the body is covered with carapet fabric, and the fabric should also cover the slot for the bass reflex. Karapet can be tensioned using regular epoxy or a furniture stapler.
Once the speaker is secured, wires are pulled from it through the hole and connected to the car's sound system.
Photo gallery: how to assemble a compact box with a bass reflex
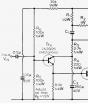
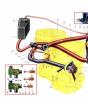
You can connect the subwoofer yourself, based on the parameters of this circuit
Before starting work, make sure that the vehicle battery is disconnected. This is a safety measure that will not only avoid damage to the speaker system, but can also preserve the health and performance of parts of the human body.
Video: connecting and setting up a subwoofer
Independent design, manufacture and connection of subwoofers in a car is available to almost every driver. The key to success will be both a competent calculation of the dimensions and volume of the product, and careful assembly of the case. At the same time, the car enthusiast can independently select the desired size of speakers in order to create in the cabin the low-frequency sound that suits him most.
In this article, we will consider in detail how to make a subwoofer with your own hands, if you do not have professional knowledge in the field of electroacoustics and there is no desire to use previously unknown and incomprehensible circuits, although of course you will still have to do a few measurements.
What is a subwoofer and for what purposes is it used?
A subwoofer is popularly called simply a sub, and if you translate this word literally, it sounds quite funny - a bark. In fact, this is a real bass speaker, characterized by low frequency, housed in a special box with an extremely complex device.

Today, if you look at a photo of a subwoofer with your own hands, you will notice that they are used in a huge number of different places, ranging from simple everyday situations when it is installed at home and ending with the fact that today many people use subwoofers in their cars.

If you can find a good drawing of a subwoofer and make it correctly, then you can definitely take on almost any complexity of speakers, since low frequency reproduction is one of the most difficult moments in the world of electroacoustics.

It is only important that the subwoofer circuit fully meets your idea of ideal acoustics.
A little about bass
Reproducing different basses is, in principle, quite a difficult process. In general, the low-frequency region of absolutely any spectrum of available sound waves varies depending on its psychophysiological strong impact on several areas.

In order not to make a mistake in choosing a bass, truly high-quality speaker, and subsequently the box for the subwoofer was made quite quickly, first of all it is necessary to understand their key significance and the corresponding boundaries.

Depth
For various types of wind organs in halls specially renovated for musical instruments, the sub-bass has a significant influence on the timbre of the sound. It is for the sounds of nature and various man-made disasters, such as unexpected explosions, that quite strong sub-bass components are characteristic.

It is worth noting that most people either do not hear sub-bass at all, or they hear it, but not well enough. For example, if you filter out the fundamentally different sounds of a nuclear explosion and a strong hurricane, like a tornado in the tropics, from everything except sub-bass, then we can say with absolute certainty that it is unlikely that any of the listeners will be able to understand what is actually happening.
It is for this reason that almost everyone optimizes a home subwoofer exclusively for midbass.

How to choose a speaker?
When choosing, you should definitely pay attention to the fact that a complete calculation of the entire acoustic design is always made only according to the known Thiel-Small parameters.

When creating a good subwoofer on your own, it is only important to take into account the absolute quality factor of the head precisely at its main resonant frequency. This is due to the fact that it is used to select the ideal option for future acoustic design.
Car subwoofers
If you are interested in car subwoofers, then you should definitely keep in mind that they are most often installed either directly under the driver’s seat or in the trunk compartment.

When placed with the second option, the car subwoofer can take up quite a lot of useful space, so it is not used so often. However, even if the subwoofer is placed under the seat, there are some risks associated, for example, with the fact that in this case it is quite easy to damage it with your feet.

In addition to everything else, it is worth paying special attention to the important point that in a fairly cramped car interior you cannot do without the obligatory effect of masking various noises.

It is for this reason that almost all car subwoofers are optimized primarily for sub-bass.
In conclusion, it is worth noting that, in principle, anyone can make an amplifier for a subwoofer on their own, and this will be quite a fun activity, useful not only for the development of skill, but also the mind.

Note!

DIY subwoofer photo


Note!


How to turn a passive subwoofer into an active one
How to turn a passive subwoofer into an active one is often asked by beginners interested in improving car acoustics. If you know the difference between these types of speakers, then the conversion process will not be difficult.
The complexity of the process of how to turn a passive subwoofer into an active one lies in the fact that you need to be able to determine the difference in sound and make the correct calculations.
Subwoofer concept
It will be useful for a beginner to know what this speaker is generally intended for. Isn't it possible to just use a pair of multi-voice speakers and quietly enjoy the full sound? It turns out not.
Note. As you know, a subwoofer is designed to reproduce low frequencies that have low localization. If there were not one speaker enclosed in a separate housing, it would be difficult to determine from which point the sound is coming. It will seem unreal, too voluminous and enveloping.
In addition, if earlier, when the subwoofer was not invented (see), speakers for reproducing various frequencies, including low ones, had to be huge and expensive, then with the advent of a separate subwoofer everything was significantly simplified, both in terms of volume and and cost.
Difference
So, subwoofers are designed to reproduce low frequencies. It's clear. But why do passive and active types exist? What are the differences? Let's try to figure it out.
Passive
This sub, by its design, is a low-frequency driver enclosed in a separate housing. To achieve the required sound from it, you will have to connect it to two separate elements: an external amplifier and a crossover (see).
The latter is nothing more than a crossover filter that distributes frequencies and directs them to the speakers.
Active
This type of subwoofer already has a built-in amplifier in its design. A crossover is also built inside it. This saves the user from the complex connection process and setting up the speaker is also quite simple.
Note. Note that due to the presence of its own amplifier, the active sub must be separately connected to the power supply.
Some users, in order not to overpay for an active subwoofer, decide to make one themselves from a passive one. The idea is interesting and fully justified in practice.
Note. Converting a passive subwoofer into an active one involves connecting it to a power amplifier and crossover, which must be built into the speaker. Only this setting requires specific knowledge.
Calculation of indicators
If we were making an active subwoofer completely from scratch, then first of all, we would need to download from the Internet or find another way a program for calculating acoustic designs.
Note. For example, it could be a GBI Speaker, which includes two more independent graphic schemes that are needed to determine the required volume and size of the housing, and also allow you to independently select two directions for the housing.
In addition, it would be necessary to find the known Thiel-Small values. By the way, they are needed in our case as well.
The fact is that the emitters installed in the speakers may not meet the above parameters. And then everything will have to be measured again.
Measurement
Started:
- First, the resonant frequency Fs is measured. This parameter specifies the frequency without any additional decoration.
Fs is calculated as follows: the emitter is suspended in the air at a great distance from foreign objects so that this value is not influenced by external characteristics; - It is better to measure the resonant frequency in a vacant garage or other room. We hang the speaker on the ceiling;
- Open the Tone Generator program on your computer;
- The initial frequency is set to 10Hz, and then the frequency gradually increases in 1Hz steps. At the same time, you need to look at the voltmeter readings. Thanks to the graph below, you can determine the required value;
- The approximate speaker frequency Fs in 1Hz steps will be the maximum value of the voltmeter;
- To calculate the exact value, you will need to change the frequency not by 1Hz, but by five hundredths of it.
Note. Some people believe that a very low resonant frequency is ideal for a subwoofer. This is true, but partially, because for some designs such a low resonance can lead to interference.
Second meaning
- Then the total electromechanical quality factor Qts is measured. Interestingly, the quality factor has two indicators: mechanical and electrical.
The first is determined by the choice of suspension material. Quality factor is often measured using a makeshift method: shaking. The low quality factor of the subwoofer is 0.3/0.35, and the high value is 0.5/0.6. - The electromechanical quality factor is found using the formula, where the values will be two components, one of which is lower than the resonant frequency, and the other is higher.
Equivalent Volume
Finally, the third value we will need to calculate is the equivalent volume Vac:
- To determine such a volume, you will need a bass reflex box with a hole. The manufacturer has already agreed on the volume of such a box in comparison with the diameter of the speaker. Therefore, there is no need to do anything extra;
- Again, using the Tone Generator program we determine the value, as in the case of the resonant frequency. Only calculations are carried out using the following formula:
Hull alteration
In order to get high-quality sound, calculations alone are not enough. It is necessary to carefully prepare the subwoofer housing, converting it to the active version.
What have we achieved with calculations? We determined the internal volume of the box, the length and diameter of the bass reflex.
Note. It is believed that converting a passive subwoofer into an active one is much more difficult than doing everything again with your own hands. Thus, a homemade box is made with the necessary holes.
One thing you need to know: an active subwoofer (its housing) must consist of 2 compartments. The emitter or loudspeaker is located in one of the compartments, and the amplifier, crossover and power supply are in the other.
Note. From the inside, it is recommended to glue foil to the walls of the compartment where the amplifier, power supply and isolation filter will be located. It eliminates the negative effects of external fields and minimizes noise levels.
- After this, as soon as the signal is formed, it enters the amplifier, and only then into the emitter.
So, we found out that the alteration can be done with your own hands. In this case, it will be extremely useful to watch a video review on the topic or relevant photo materials.
You must act strictly according to the instructions. Thus, if everything can be accomplished, we will save a lot of money, because the price of an active subwoofer is quite high.
A subwoofer is a separately created acoustic system that is designed to reproduce frequencies in the audio range of 20-120Hz. The subwoofer reproduces low frequencies, and the main one only reproduces mid and high frequencies. The direction of low-frequency sound remains unrecognized to human hearing, so the subwoofer can be installed anywhere. Making a subwoofer with your own hands is not difficult and you need to start by purchasing speakers.
Selecting Speakers and Impedance
Typically used size dynamics:
- 6-inch speakers – used as an additional source of mid-bass.
- 8-inch speakers - used to obtain front-facing bass.
- 10-inch speakers - sound quality in a 15-20 liter “Closed Box” housing, resulting in a compact subwoofer with good sound pressure.
- 12-inch speakers are the best option, good for a subwoofer with a volume of 25 - 35 liters.
- 15-inch speakers are used, as a rule, at SPL competitions, since not every car can accommodate a 60-90 liter subwoofer.
The basic principle of the difference in resistance in a voice coil is: the lower the load resistance of the amplifier, the higher the power.
Using 1 - 2 ohms in a load results in a loss of sound quality.
Based on this, it is recommended to choose 2-4 Ohms. There is still no consensus among experts and amateurs about the power of the speakers. But we can say for sure that the speaker should be chosen more powerful than the maximum power of the amplifier. No system is designed to operate for a long time at maximum volume: this leads to an increase in nonlinear distortion and a significant decrease in sound quality. Therefore, it is recommended to maintain a balance.
Speaker Settings
Now it's time to create a homemade subwoofer and its virtual image. Further design of the box will be carried out by the WinISD 0.44 program and will require some speaker characteristics, namely the Thiel-Small parameters:
- Qts - speaker quality factor;
- Fs - resonance frequency for open space;
- Vas - equivalent volume.
The Fs parameter does not cause any problems. For GDN35 Fs will be 38 Hz, for GDN50 - 40 Hz, and for GDN75 it will be 25-35 Hz. An imported speaker, where it is also a branded one, has parameters that are easy to find in the WinISD 0.44 database.
Qts is most important when calculating a box. This parameter determines the ratio of the transfer function of the frequency dynamics Fs to the transfer function at those frequencies whose amplitude-frequency response (AFC) is horizontal. In other words, at frequencies above Fs. Qts describes the efficiency of a speaker at its resonant frequency. The problem is that the HDN standard woofer is manufactured in different places. And the parameters vary greatly among different manufacturers.
When calculating the box, you need to take into account all possible values of Qts and add waste options.
Most sources indicate the following parameters:
- 35GDN-1-8 Qts = 0.4;
- 35GDN-1-4 Qts = 1±0.5;
- 50GDN-42D Qts = 1±0.5;
- 75GDN-1-4 Qts = 0.2-0.5.
Vas is not a particularly important parameter for calculations; its value can be considered equal to:
- GDN35 - 40-50 l.;
- GDN50 - 90 l.;
- GDN75 - 80 l.
Video example of subwoofer assembly:
Latest values
The WinISD 0.44 program for designing a drawer will require some more parameters:
- Z - resistance, it is indicated in the speaker labeling, GDN35-1-4 Z=4 Ohm, GDN75-1-8 Z=8 Ohm and further down the list;
- Re - maximum noise power: GDN35 Re = 35 W, GDN50 Re = 50 W, the rest is in the reference literature.
- Qms - mechanical quality factor, GDN35 - 5.8, GDN75 - 2.38...
- Qes - electrical quality factor, GDN35 - 0.44; GDN75 - 0.31…
- dia - diffuser diameter.
The remaining parameters are not so important and can be omitted from the program.
Drawer design
Further making a subwoofer with your own hands requires deciding on the type of box. The program allows you to design four types of boxes:
- ZYA - or closed box. Simple to design and manufacture, but has minimal efficiency. In addition, it is somewhat difficult to completely seal the box.
- FI - bass reflex. Somewhat more difficult to calculate, but produces higher efficiency.
- – 4. BP4 and BP6 - bandpass of the 4th and, accordingly, 6th order. The most difficult to design and manufacture, but they have maximum efficiency at low frequencies and dampen high frequencies.
Each type has its own positive and negative traits.
To a large extent, the choice of box depends on the selected speaker.
The program will tell you which box best suits the speaker.
Before starting design, we will create a new speaker with its own parameters in the database. Click New, then select Own drivers, then New, load your parameters, then OK, Close.
Then we will create a project based on the created speaker. We repeat the same procedure several times, using different types of boxes.
The design itself consists of changing the size of the box and adjusting the frequency of the bass reflexes. The program reacts to changes made and changes the sound graph depending on the frequency. To adjust the frequency of the bass reflex, the length and diameter of the pipes change. The length of the pipes is also affected by its diameter, specified in the corresponding field. It is necessary to ensure that the length of the pipes is not excessively long and the Vent mach field does not turn red.
The ideal graph crosses the -3 dB line at 25-35 Hz, then crosses the 0 dB line and falls off at about 150-200 Hz. The rest of the design will consist of finding the optimal permissible deviations.
Making the body
Now more about that. how to make a subwoofer with your own hands and. The shape of the subwoofer body is made in the form of a slightly truncated pyramid, as it is the most universal. The rear wall will be angled at 23 degrees because most cars have the rear seatback angled at that angle. After determining the required volume, we calculate and draw a drawing of the body of the future subwoofer.
Closed box
The front wall will be made of chipboard 23 mm thick, and the side wall will be 20 mm thick. We cut out the walls of the required dimensions and in the required quantity, then we assemble the body.
It is better to make all connections with glue and self-tapping screws, which are screwed in at intervals of 5 cm.
We pre-drill holes for them with a drill with a diameter of 3 mm, and for the heads of the self-tapping screws we take a 10 mm drill.
Then, on the side, using a compass, we mark a hole for the acoustic terminal. We cut the hole with a jigsaw. An acoustic terminal under high pressure may produce overtones. To avoid this, we shield it with a small box. We coat the connections with glue and fasten them with self-tapping screws. Use a plane to cut off the protruding parts of the body.
On the front wall, use the same method to mark and cut out a hole for installing the speaker. To do this, you should impregnate it with furniture nitro varnish. We also apply varnish to the front panel, to the inner end. For a more attractive appearance, you can cover the outside with carpet. The same nitro varnish is used as glue. We connect the subwoofer speaker and the acoustic terminal and secure them in the housing.
Bass reflex
This type is more bulky and more difficult to calculate and configure, but a homemade subwoofer has efficiency and sound quality that is significantly higher than the previous version. As in the previous case, calculations of parameters are carried out using one of the programs.
We cut the walls to the required dimensions and carefully fasten them together with glue and self-tapping screws. It is recommended to coat the inside of the seams with silicone sealant. For putty, two-component automotive putty is used. It is necessary to sand the body as thoroughly as possible.
We cut out holes for the bass reflex, special handle pockets and sockets. We install and check the reliability of all fasteners. The body can be covered with leather.
There are slot-type FI options. The main difference is the unique alkaline inverter. Due to the special design, fastening is best done with long screws; liquid nails or Moment glue are used for sealing. However, the greatest strength and sealing is achieved if the fabric and epoxy resin are used. Otherwise, the manufacturing and assembly process is similar to a conventional bass reflex.
Bandpass 4th order
This is for those who have experience in calculations and manufacturing.
The 4th order bandpass is quite difficult to calculate and it is easy to make a mistake in size.
However, it produces excellent sound and efficiency. In addition, it has better protection from external influences, since the speaker is located entirely inside the housing.
Calculations of body dimensions are carried out using the same computer program. It is important to correctly calculate not only the dimensions of the entire body, but also each of the cameras separately. When cutting out all the parts, you should strictly adhere to the dimensions. Then we assemble the structure using glue or sealant and self-tapping screws.
After assembly, carefully coat the seams again with the same sealant or liquid nails. We make a partition with a speaker located on it from 2 sheets of chipboard. We coat the junction with the speaker with sealant or silicone and compress it tightly with self-tapping screws.
Then cut a hole for the terminal and cover the inside with sound-absorbing material. You can use, for example, batting. The glue should not be applied to the entire area, but in small strokes so that the insulating material does not become static. Additionally, you can secure it using a construction stapler. Next, solder the wires to the terminal and to the speaker.
Now we finish assembling the rear camera and completely seal it. Batting should also be placed on it. Then secure tightly with screws and glue. Better tightness is provided by liquid nails and tape glued over the seams.
To make a bass reflex subwoofer with your own hands, you can buy it or, if the required size is not available, make it yourself from a plastic tube. You can use a sewer pipe with a diameter of 100mm. The bass reflex has two parts with bells, on the front part of a larger diameter.
You can make a socket if you heat the edges of the pipe a little and, using a jar or plate, expand it.
We cut a hole in the lid with a jigsaw, place the carpet together with the bass reflex, having previously coated the joints with liquid nails. We cover the back side of the cover and the bass reflex with noise-absorbing material; you can use the same batting. We assemble the finished subwoofer and cover the outside with carpet.
Bandpass 6th order
The most complex subwoofer in terms of calculations and assembly. Thorough preparatory work with calculations is required. Comparable with PSU 4, but the frequency range produces a much larger one. Correctly calculating the efficiency and power of this subwoofer is difficult even with the help of simulation programs. Usually all parameters are selected on a whim, based on personal preferences.
The structure of the housing is more complex than in other subwoofers, therefore, to give additional strength to the connections, they are made using wooden blocks, which are secured with self-tapping screws. We cut out all the components strictly to size. In the partition intended for the dynamic head, mark with a compass and cut a hole, mark and drill holes for mounting the speaker. Next, we attach a block around the perimeter. Then we connect one of the side walls of the subwoofer to the bottom and install a partition under the speaker.
The second side wall of the subwoofer is then attached to the partition and bottom. After this, the bars are attached around the perimeter of both chambers. The second side wall of the housing is also attached to the bottom and partition. Then bars are attached around the perimeter of the chambers. Next, 2 holes are cut out for the bass reflexes, and the subwoofer is assembled. This is done using a technology similar to BP 4. But cotton wool is used as an additional soundproofing material. It is placed between the batting and the inner surface of the subwoofer housing. The subwoofer can be painted as an additional finishing touch.
Homemade stealth subwoofer
This subwoofer is unnoticeable and does not take up much space in the trunk. As a result, it is convenient to use in a car.
It is usually installed in the trunk of a car behind the rear fender arch.
A good speaker requires a box with a volume of up to 18 liters, and sometimes more. You can move the front panel of the body a little into the trunk, or, by trimming the floor in the trunk, occupy a niche intended for a spare wheel.
When installing the stealth, you should pull out the front panel a little and carefully connect it to the standard trunk trim. Cut the casing along the line where the amplifiers and subwoofer meet. Work with molding fiberglass begins with masking the surface at the points of contact with the polyester resin. A mold is made from corrugated cardboard and the pieces are glued together with masking tape. Assemble the metal frame for the amplifiers, focusing on the fiberglass edge. After that, we try on the equipment.
We also make a cladding panel for the amplifiers from fiberglass, already on the installed frame. To do this, we close all the gaps between the MDF sheets with polyethylene and tape. Then we mount everything with self-tapping screws on the housing box. We use corrugated cardboard as formwork to eliminate gaps in the subwoofer housing. Between the parts it is necessary to dial the same thickness of plastic as on the other products. Using fiberglass and putty we add a more attractive appearance to the exterior of the housing. We install the subwoofer in the fender of the car and you can remove irregularities with polyester putty and level it with sandpaper. We cover the body with carpet and attach the speaker.
Installing the subwoofer backlight
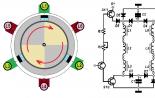
For illumination, LEDs are used or decorated with LED strip. LEDs have 2 contacts, Anode (A) and Cathode (K). To connect the LED correctly, and it worked, you need to connect the contacts: A is connected to the “plus” on the power source, K – to the “minus”. It is to A that resistors are soldered, the resistance of which is calculated using the OMA law formula.
It should be assumed that the operating voltage of the LED is Usv=3V, the operating current Isv=10mA=0.01A. Solder resistors to pin A of each individual LED. You also need to decide in advance how to mount the LEDs inside the subwoofer. It is best to arrange them so that they stick tightly together.
When an LED strip is used as backlight, the process of attaching the diodes is replaced by the strip design. The LEDs are already installed and carefully secured. You can attach the LEDs to the inner surface of the subwoofer using double-sided tape.
Working with LED strip is much easier. It allows you to create brighter design solutions and interesting lighting. For example, a diode ring surrounding a speaker. It is recommended to use a tape whose brightness and color are chosen to suit your own taste.
Another thing is to use an equalizer on the rear window of your car. The neon equalizer reacts to the peak amplitudes produced by the subwoofer, causing the light columns to jump. This is a beautiful and original solution for the lighting design of an installed subwoofer.
Any car owner does this based only on his own taste. Any expert advice is always advisory in nature only. The same applies to tips on making subwoofers with your own hands and installing them. Visitors to our site can leave their opinions on the methods presented in the article in the comments or describe their own. We'd love to hear your opinion.
- News
- Workshop
The Prosecutor General's Office began checking car lawyers
According to the Prosecutor General’s Office, in Russia there has been a sharp increase in the number of trials conducted by “unscrupulous auto lawyers” who work “not to protect the rights of citizens, but to extract excess profits.” According to Vedomosti, the department sent information about this to law enforcement agencies, the Central Bank and the Russian Union of Auto Insurers. The Prosecutor General's Office explains that intermediaries take advantage of the lack of due diligence...
Tesla crossover owners complained about the build quality
According to motorists, problems arise with opening doors and power windows. The Wall Street Journal reported this in its article. The cost of the Tesla Model X is about $138,000, but according to the first owners, the quality of the crossover leaves much to be desired. For example, several owners had their upward opening...
You can pay for parking in Moscow with a Troika card
Troika plastic cards, used to pay for public transport, will receive a useful feature for motorists this summer. With their help, you can pay for parking in the paid parking zone. For this purpose, parking meters are equipped with a special module for communication with the Moscow Metro transport transaction processing center. The system will be able to check whether there are enough funds on the balance...
Traffic jams in Moscow will be warned a week in advance
The center’s specialists took this measure because of work in the center of Moscow under the “My Street” program, reports the Official Portal of the Mayor and the Government of the capital. The data center is already analyzing traffic flows in the Central Administrative District. At the moment, there are difficulties on the roads in the center, including on Tverskaya Street, Boulevard and Garden Rings and Novy Arbat. The press service of the department...
Volkswagen Touareg review reaches Russia
As stated in the official statement of Rosstandart, the reason for the recall was the possibility of loosening of the locking ring on the support bracket of the pedal mechanism. Previously, Volkswagen announced the recall of 391 thousand Tuaregs worldwide for the same reason. As Rosstandart explains, as part of the recall campaign in Russia, all cars will have...
Mercedes owners will forget what parking problems are
According to Zetsche, cited by Autocar, in the near future cars will become not just vehicles, but personal assistants that will greatly simplify people’s lives, ceasing to provoke stress. In particular, the CEO of Daimler said that soon special sensors will appear on Mercedes cars that “will monitor the body parameters of passengers and correct the situation...
The average price of a new car in Russia has been announced
If in 2006 the weighted average price of a car was approximately 450 thousand rubles, then in 2016 it was already 1.36 million rubles. These data are provided by the analytical agency Autostat, which studied the situation on the market. Just like 10 years ago, foreign cars remain the most expensive on the Russian market. Now the average price of a new car...
Mercedes will release a mini-Gelendevagen: new details
The new model, designed to become an alternative to the elegant Mercedes-Benz GLA, will receive a brutal appearance in the style of the “Gelendevagen” - Mercedes-Benz G-Class. The German publication Auto Bild managed to find out new details about this model. So, if you believe insider information, the Mercedes-Benz GLB will have an angular design. On the other hand, complete...
Photo of the day: giant duck vs. drivers
The path for motorists on one of the local highways was blocked by... a huge rubber duck! Photos of the duck immediately went viral on social networks, where they found many fans. According to The Daily Mail, the giant rubber duck belonged to a local car dealer. Apparently, an inflatable figure was blown onto the road...
Every connoisseur of good sound while driving knows what a subwoofer is and what functions it performs. Without this element it is impossible to achieve high-quality sound with “fat” bass. In this article we want to talk about how to make a subwoofer with your own hands at home and what you will need for this.
[Hide]
Speaker selection
If you are thinking about how to make a speaker yourself, then in addition to the size, you should also decide on the resistance level. For example, the most optimal option would be a resistance of 2-4 ohms; if this figure is lower, this will significantly affect the sound quality. As for the power of the speakers, in this case it is difficult to say anything for sure, since disputes regarding this issue are still ongoing. One thing is for sure - the power of the speaker must be greater than the power of the amplifier, since no device can work for a long time if it operates at the highest power. TO The box is easy to make, but if done without calculations, it will play poorly.
Instructions
Now let's move on to the question of how to make a subwoofer for a car yourself. Let's start our process with design.
Design
Car subs are divided into several subtypes:
- Active. Such devices are equipped with a built-in amplifier and an active crossover. The main purpose of the latter is to reduce the low-frequency load on the amplifier. With the help of a crossover, coordination of the operation of the subwoofer and the acoustics as a whole is achieved.
- Passive. Options of this type operate in parallel with the main acoustics, but usually they require a separate power amplifier channel. Passive devices in practice are more sensitive to location, while they provide additional load for the output amplifiers of stereo channels (video author - Konstantin Kozik).
When designing, the location of the device must also be taken into account. The sub itself is quite voluminous, but since the possibility of bass localization is minimal, it can be installed anywhere in the cabin or luggage compartment. You can install a subwoofer under the seat, but usually car enthusiasts choose the trunk, since here it will practically not interfere. As for the shape of the device, we start creating it after you decide on the location of the subwoofer and the choice of speaker for it.
If you decide to build a subwoofer in your car, then the next step is to develop a diagram and drawing; today there are several options for choosing a diagram:
- The closed box or closed box is one of the simplest to design and manufacture, but its efficiency is minimal. Moreover, in this case it will be problematic to completely seal the case.
- A FI or bass reflex allows for a higher efficiency, but this option is more complex in terms of calculations.
- BP4 and BP 6 are bandpasses of the fourth and sixth orders. This option is one of the most difficult to manufacture, but the quality of its work will please you in any case. Devices in such a housing allow not only to enhance the bass, but also to dampen the low frequencies (author of the view: ALEX SOUND).
Manufacturing
In principle, to make a car subwoofer, you can use and remake a home subwoofer. Below we will talk about how to make a subwoofer and what is needed to ensure that the made device is of high quality and does not have to be remade. First you need to decide on the shape and material that will be used to make the case. The most popular options currently are chipboard, particle board or regular plywood, which can be found in any hardware store. It should be noted that such materials are characterized by good acoustics and are themselves quite durable.
- Based on the drawings and prepared diagrams, you need to carefully cut out the walls for the future subwoofer and other holes that will be required for laying the wires. After this, it is advisable to sand the walls. Then the main components of the structure need to be firmly fastened and fixed; for this you can use screws or glue.
- If the body consists of several layers, you need to make sure that there is no void between these layers. If the empty space remains, this can lead to resonant cricket, so there will be no point in using the case at all. Just in case, the body can be covered with vibration material and filled with foam rubber inside. As for the back wall itself, it should be covered with fiberglass; to achieve a greater effect, several layers will be required. After pasting the sub, you need to leave it to dry for about one day.
- If the design of the device is important to you, then the body can be painted with glossy or matte paint; you can also use carpet or leather for upholstery. To protect the device from unwanted external influences, such as moisture, the case can be pre-impregnated with furniture nitro varnish. This procedure should be carried out outdoors, as it can poison a person.
- The last stage in manufacturing will be the installation of the speaker itself. The assembly procedure may vary depending on the type of housing.