What keys are needed to remove the generator. Replacing the generator: removal and installation
The VAZ 2106 generator is a rather complex device, and in order to repair it, you have to partially or completely disassemble it. Firstly, this unit is removed from the car, which is described in detail here:. Now consider the list of necessary tools that will be needed for disassembly:
- Socket wrench or open-end wrench 19
- Ratchet with extension
- Heads for 8 and 10
- Hammer
How to disassemble the generator on a VAZ 2106 and other “classic” Zhiguli
I will give my sequence of actions with which you can completely disassemble the device without unnecessary tools.
First, unscrew the 4 nuts securing the back cover, they are marked with yellow numbers in the photo below:
When they are unscrewed, turn it over and, pressing slightly on the ends of the bolts, make sure that the caps fall between the pulley blades, thereby fixing it in a stationary state. And putting the key on 19, try to unscrew the pulley fastening nut, firmly fixing the generator in a stationary state:

If this could not be done in this way, then you need to clamp the pulley in a vice and then try in this mode. After you have dealt with this, you can separate the two parts of the VAZ 2106 generator by lightly tapping the mounting ear with a hammer, approximately as shown in the photo below, although it is not a fact that you will need a hammer at all; you can probably do it without it:

After which the generator can be separated into two parts: a rotor with a pulley and a stator with a winding:

But in the end everything is divided into two parts:

As you can see in the picture above, on the left is a stator with a winding and a diode bridge inside, and on the right is a rotor with a pulley and bearing.
Since the pulley mounting nut is already unscrewed, you can remove the pulley by simply pulling it slightly back towards removal:

Be careful, since after removal the key is no longer fixed and may fall, carefully remove it from the hole and set it aside so as not to lose it:

And now you can freely remove the rotor along with the bearing, as clearly shown in the photo below:

If this particular part fails, replace the rotor with a new one, the price of which is 350 rubles in many stores. The same applies to the stator with winding; a new one also costs about 400 rubles. Replacement is easy; just disconnect the winding from the diode bridge by unscrewing the three fastening nuts from the inside:

This is what it looks like at the end of the job:

Installation of all removed generator parts is carried out in the reverse order.
Often, many VAZ 2110-2112 car owners are in too much of a hurry at the first generator malfunction and prefer to replace it with a new one, instead of simply finding out the cause of the breakdown and eliminating it. In this case, we will not consider repairing this device, but will only look at the procedure that must be performed to remove and install the unit.
So, to dismantle it without problems, we will need a tool such as:
- Socket heads for 10 and 13
- Ratchet handles or cranks
Before starting repairs, be sure to disconnect the car’s battery by removing the negative terminal. Otherwise, you risk getting a short circuit when disconnecting the positive wires of the generator.
Replacement video
Especially for this post, I decided to make a video instruction to explain everything clearly and clearly.
If you have any questions about the video review, you can ask them on my YouTube channel. Below will be presented everything in the usual format.
Photo report on repairs
I would like to warn you right away that in this example of my VAZ 2110, the generator is slightly clamped by the mounting bracket, since it broke off during the accident, so I cannot show you the removal procedure in all its details. But still, the main points will be shown quite clearly in the photo.
Unscrew the tensioner nut, which is shown by the arrow below:

After this, move the generator back (towards the car interior) and remove the belt from the pulleys. Now you can disconnect all power wires. One “bundle” is secured with a stud and nut, and another plug is simply fixed with a connector:

Then you can unscrew the lower nut securing the generator, first crawl under the car and remove the engine protection (if installed):

Usually the bolt fits tightly, so it can be knocked out carefully and without excessive force with the handle of a hammer:

Then from the reverse side we try to remove this very bolt to the end:


If you are replacing the complete device, install it in the reverse order. But please note that the generator model, if possible, should be the same as the one installed by the factory. That is, first of all, look at the applicability specifically to your car, and then at the current rating in Amperes.

As for the price of generators for VAZ 2110-2112, it may vary depending on the type and manufacturer. But if you take the KZATE model, which in most cases is installed by the factory, then the cost can be about 3,500 rubles. Although, Chinese options can be obtained at almost half the price. True, you should not chase low cost, since the service life of these parts can be quite short.
The generator of any VAZ car model is a part without which the functioning of the car is impossible. Ideally, its condition should be checked systematically every 15,000 kilometers. If some comments arise when diagnosing this element of the vehicle’s power system, they should be eliminated immediately. In this article we will tell you how to disassemble the generator of a VAZ car. We will instruct you on how to remove the generator yourself, as well as remove the voltage regulator, diode bridge and replace the bearings.
What will you need?
Before you begin repairing generators of any VAZ car model, you must first remove them, and then remove the voltage regulator and rectifier unit.
Interesting to know! Cars with gasoline-powered power units use the vacuum that occurs behind the throttle valve. Diesel engines do not have such a damper; instead, a vane vacuum pump is installed, which is mounted on the rear end of the generator.
Spare parts

If you have already specifically asked yourself the question of how to repair a malfunctioning generator, then to completely overhaul it you need to purchase the following parts:
- front and rear bearings;
Generator voltage regulator;
Diode bridge;
Nuts for 8 – several pieces;
Regulator relay, if it requires replacement.
So that when carrying out work it does not turn out that you do not have enough tools, take the following:
- the most complete set of wrenches: both wrenches and spanners;
Screwdrivers: flat and Phillips;
Multimeter or ohmmeter;
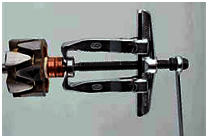
Special bearing puller;
Hammer;
Tubular straighteners or coupling heads.
Assembly and disassembly
 Basically, if the alternator no longer recharges the car battery or fails, then the problem lies with the drive belt. Therefore, check its tension first. If it is in order, then you should remove the generator, disassemble it and repair it. Buying a new generator will cost much more than replacing some of its cheap, worn parts. This procedure is not very complicated, but it is quite painstaking. The main thing here is to put everything back together correctly. So, how to repair a suspicious VAZ generator yourself? Read detailed instructions below.
Did you know?The supply power of the exciting winding is equal to the twentieth part of the rated power at the output of the car generator. The same amount is spent on rotating the rotor and producing the rated voltage at the output of the unloaded generator mechanism.
Removing the generator
Before removing the generator, disconnect the battery cable and take the keys “10” and “13”. Then:
1. Unscrew the fastening nut of the wires to the “B+” terminal with a “10” key.
2. Remove the "B+" terminal wires.
3. Disconnect the generator power cable.
4. Remove the alternator belt.
5. Unscrew the adjustment bolt and fixing nut.
6. Remove the generator tension bar.
7. Loosen the lower mount of the generator using a key set to “13”.
8. Remove the mounting bolt.
9. Pull out the generator.
Removing the generator voltage regulator
 Once you have the generator in your hands, you need to check and possibly replace the voltage regulator. For this:
1. Press out the three spring clips and remove the casing protecting the diode bridge of the generator.
2. Unscrew the fastening screws of the relay-regulator with a Phillips screwdriver.
3. Disconnect the block from the voltage regulator terminal and remove it.
Interesting! Its own magnetic field is formed around the stator winding, which interacts with the rotor field. This leads to the formation of rotational resistance on the generator shaft.
Removing the diode bridge from the generator
 To remove the rectifier block, also known as the diode bridge, you will need an “8” socket wrench, a “10” socket wrench and a Phillips screwdriver. Further:
1. Unscrew the three bolts connecting the terminals of the stator windings to the rectifier unit, an “8” spanner and the bolt that holds the diode bridge.
Important!Be sure to remember the location of the insulating and thrust washers.
2. Bend the wires of the stator winding leads to the sides.
3. Unscrew the capacitor mounting screw using a Phillips screwdriver.
4. Remove the diode bridge along with the capacitor.
5. Unscrew a pair of contact bolt nuts with a 10mm socket wrench.
6. Remove the bushing bolt: spacer and insulating.
7. Remove the bolt from the diode bridge, and remove the capacitor tip from the contact bolt.
Replacing the front and rear bearings of the generator
 We continue to repair the generator on VAZ car models. To remove the generator bearings you will need an "8" socket wrench, a flat head screwdriver, a "27" socket, a large open end wrench and a "19" deep socket.
Important! Before you begin to remove the generator covers: front and rear, you need to mark with a marker where they are located.
1. Unscrew the bolts with an “8” socket wrench.
2. Use a flathead screwdriver to pry open the generator covers.
3. Disconnect them from each other along with the stator winding.
4. Proceed to remove the old front bearing and install the new one.
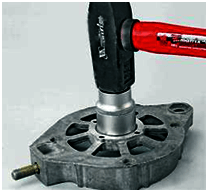
5. Place a head of a suitable diameter on it and knock it out with light blows of a hammer.
6. Lubricate the bearing seat.
 7.
The new element is installed using the worn one. Place it on top and lightly drive the bearing in a circle.
7.
The new element is installed using the worn one. Place it on top and lightly drive the bearing in a circle.
8. New front alternator bearing installed.
9. Proceed to remove the old rear bearing and install the new one.
10. If you don't have a special puller, it doesn't matter. You can use a large open-end wrench.
11. Use it to hook the rear bearing.
12. Lightly hitting the key with a hammer and moving it in a circle, remove the generator element.
13. Remove the bearing from the generator rotor shaft.
 14.
You can install a new one using a small piece of pipe with a suitable diameter. Lightly hitting it with a hammer, press the new bearing onto the generator rotor shaft.
14.
You can install a new one using a small piece of pipe with a suitable diameter. Lightly hitting it with a hammer, press the new bearing onto the generator rotor shaft.
Good to know! To check the operation of the relay regulator, you need to measure the voltage on the battery. Before starting the engine it is 12 V, and after that it will increase slightly.
Generator assembly
Assembling the generator should naturally occur in the reverse order of disassembly, but several nuances should be taken into account:
Each bearing is pressed in with a hammer and a mandrel of suitable diameter.
Be sure to inspect the generator covers for defects.
The covers must be connected exclusively according to the previously marked marks.
 If one of the covers is damaged, the sealing ring located between them should also be replaced, because it may also have invisible damage in the form of tears or cracks.
Any breakdown has causes and consequences. Let's try to figure this out and make repairs using the right technology.
Causes of malfunction and repair
Main reasons for repairs
So:
- The windings are burnt out;
- The brushes are worn out;
- The body is cracked;
- Bearings make noise (creak);
- Other reasons.
Attention: It is more convenient to replace the unit from below the car. To do this, you will need to unscrew the boot protecting the car. You will need a lift or inspection hole.
We make a withdrawal
How to replace a VAZ 2107 unit with your own hands:
- Disconnect the negative terminal from the battery;
- Then disconnect the connector from the generator. (In the photo we previously removed the battery and thermostat);

- Remove the insulation cover from the terminal. Using a 10mm wrench, unscrew the terminal and disconnect the wire;

- Loosen the generator mount, then remove the belt;
- Using a 17 key, unhook the adjustment bar;
- After unscrewing the lower fastening nut, remove the bolt with sleeve;

- We will perform the installation in reverse order;
- After installation, we adjust the belt tension.
Generator repair
In this manual we will look in detail at the VAZ 2107 - generator repair.
For repairs, you will need a bearing puller, a mandrel for pressing and knocking out bearings in the generator cover.
So let's get started:
- Using a socket wrench, unscrew the nut securing the pulley and impeller, and use a screwdriver to hold the rotor from turning;

- We pull the pulley off the shaft, then the fan impeller, take out the key, take out the spacer washers;

- We unhook the voltage regulator relay, first unscrew the fastening screws, and disconnect the wire block;

- We take out the voltage regulator along with the brush assembly from the housing;

- We unscrew the nuts securing the generator cover with a 10-mm socket and a ratchet, and remove the bolts;

- We rest the cover against a block of wood, helping by hitting the shaft with a rubber hammer, knocking down the front cover;

- Remove the cover and take out the spacer bushing;
- Check the condition of the front ball bearing. To do this, hold the cover tightly, turn and rock the bearing itself (the inner ring of the ball bearing) with your fingers.
If excessive play is detected or the bearing is broken, it should be replaced with a new one; - To replace a faulty ball bearing, use a size 8 wrench to unscrew the nuts securing it;

Attention: If the nuts do not unscrew, then it is necessary to cut off the riveted ends of the bolts. During assembly, we install new bolts, tighten their ends, then rivet them with a core.
- We take out the mounting bolts and washers securing the bearing;

- We select a suitable mandrel (punch) and knock out the bearing;

- We take two wooden blocks, rest the edges of the back cover against them, and use a drift made of soft metal to knock out the rotor. If the surfaces of the lids are suddenly damaged, treat them with an abrasive wheel;

- We check the serviceability of the rear ball bearing using the method described in point 8;
- If replacement is required, remove it from the rotor using a puller;

- Using a 8-mm socket with an extension and a ratchet, unscrew the nuts securing the diode block (diode bridge) and the leads from the stator winding;

- We take out the bolts and pull out the stator from the cover;
- We check the integrity of the stator winding. If the winding is damaged by mechanical action (scuffs, broken wires), or from overheating (blackened, burnt), then we replace the stator winding or rewind it, if time and price permit;

- Using a ratchet head, remove the generator output nut along with a washer made of an insulating substance;
- Now we can remove the diode bridge itself;

- Using a Phillips screwdriver, unscrew the screw securing the capacitor and remove the capacitor. We remove the third bolt from the cover, which secures the rectifier unit.

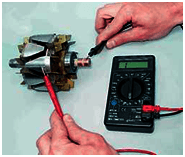
After completely disassembling the generator, we check the stator and rotor using a test lamp (watch the video).
VAZ 2107 generator (repair and replacement) yourself is not such a difficult task, you no longer need the services of auto electricians. This will save you a lot of money.
Let's start assembling the VAZ 2107 generator
Before you begin assembly:
- clean all parts from dust and dirt
- blow with air using a compressor.
- It is recommended to wash metal parts with gasoline.
We press a new bearing onto the rotor using a mandrel (or head) with a diameter that matches the diameter of the inner ring of the bearing.

Taking both generator covers in your hands, carefully inspect the bearing seats. There should be no damage.
Be sure to replace cracked lids with new ones. We perform the assembly in the reverse order, which our instructions tell you.
At this point we consider the repair complete. In my opinion, everything is clear here without the video! If it’s not clear, look for the video using the keywords: VAZ, repair, 2107, generator.
Replacing a generator in a VAZ 2107 is a fairly rare occurrence. This unit usually works without failures and does not need repairs. However, in fairness, it is worth noting that it also has malfunctions, the elimination of which requires immediate repair, or even its complete replacement. The most common generator problems are listed below:
- Failure of the diode bridge (rectifier unit);
- Failure of the stator winding (break, short circuit);
- Failure of the excitation winding (break or short circuit);
- Worn or stuck brushes;
- Worn or jammed bearings;
- Failure of the voltage regulator.
These faults in the VAZ 2107 are quite easily diagnosed, which cannot be said about their elimination. For example, bearing wear is accompanied by noise or knocking noise during operation. In order to make sure that the cause of its appearance is damage to the generator bearings, you should loosen and remove the drive belt and shake/turn the pulley. If there is play or difficult rotation, the bearings must be replaced immediately.

Unlike the mechanical problem described above, electrical problems are more problematic from a diagnostic point of view. The fact that the VAZ 2107 generator is not working is indicated by the battery charge lamp. But the cause of such a malfunction will be more difficult to establish. If you do not have sufficient experience in handling auto electronics and special measuring instruments, then it is better to entrust this matter to specialists.
If you feel that you are able to solve the problem yourself, then proceed with the initial diagnosis of the malfunction. To do this, at a minimum, you need to have a multimeter on hand that can measure the voltage at the generator output and test the rotor and stator windings.
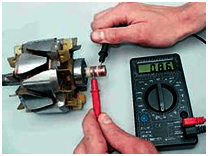


It should be noted that with an interturn short circuit in the stator winding, you can do without a measuring device. With such a malfunction, the generator emits a characteristic howl. In other cases, you will still have to remove the generator, disassemble it and try to determine the cause of the malfunction from the inside.

Typically, any of the above malfunctions can be eliminated by replacing the failed element: rotor, stator, bearing, brushes. However, if repairs take time, and the car is needed urgently, a known working generator is installed in place of the faulty one. Typically, for classic cars, which includes the VAZ 2107, separate replacement units are available both from car enthusiasts and in workshops. After repairing the original generator, a reverse replacement is performed.

Removing the generator from a VAZ 2107 is quite simple. To do this, you will need two wrenches, 17 and 19, and penetrating lubricant like WD-40 in case you can’t just unscrew the nuts. First, use a 17mm wrench to unscrew the nut intended for tensioning the drive belt, and then use a 19mm wrench to unscrew the nut securing the generator to the engine housing.
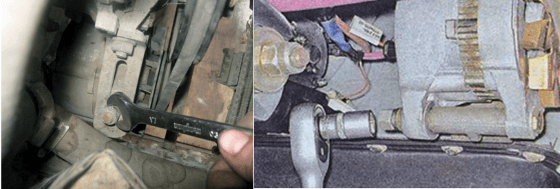
Reinstall the generator in reverse order, while monitoring the tension of the drive belt. When pressing on it between the pulleys, the degree of deflection should be 10-17 mm. If you lose sight of this important point, you may end up with new troubles in the future, such as belt damage, premature wear of bearings, or loss of charging due to belt slippage.